


Texas Downspout Installation: Protect Your Home’s Foundation
A lot of Texas homeowners notice the problem the same way. A hard rain rolls through Dallas, Fort Worth, Tyler, or Austin, and instead of seeing water move cleanly away from the house, they see it dumping beside the slab, splashing onto siding, and carving out little trenches in the flower beds.
That's usually the moment downspouts stop feeling like a minor gutter detail.
A proper downspout installation controls where roof runoff goes after it leaves the gutter. If that part of the system is wrong, the rest of the gutter setup can still underperform. In Texas, that matters because heavy thunderstorms, fast runoff, and shifting soil can turn a simple drainage issue into foundation movement, erosion, staining, and moisture problems around the base of the home.
Why Your Home's Downspouts Are Critical for Texas Weather
When a thunderstorm hits, your roof sheds a surprising amount of water in a short burst. Gutters catch that runoff, but downspouts manage the vital process of removing it from the structure. If they're missing, undersized, loose, or discharging in the wrong place, water collects where you least want it.
That shows up in familiar ways:
- Pooling at the slab edge that keeps soil wet near the foundation
- Splashback on brick and siding that leaves staining and can push moisture against the wall
- Washed-out mulch and soil around beds, walkways, and corners
- Overflow at gutter corners during sudden downpours
In Texas, those aren't cosmetic annoyances. Expansive soils in many parts of the state react to changing moisture levels. One area around the house stays saturated while another dries out, and the structure can start dealing with uneven support conditions.
Practical rule: If rainwater is landing beside the house instead of being moved away from it, the drainage system isn't finished.
The market size tells you this isn't a niche concern. The U.S. gutters and downspouts market is valued at about $8 billion, and the average cost to install new downspouts on an existing system is reported at $200 to $650, with material pricing ranging from $4 to $40 per linear foot depending on material choice, according to Freedonia's gutters and downspouts market study.
That fits what property owners see in the field. Downspout work is usually part of practical home maintenance, not an optional add-on. When a home in Arlington, McKinney, or San Antonio takes repeated roof runoff at the foundation line, the issue usually gets more expensive the longer it sits.
Planning Your Downspout Installation Project
A clean installation starts before any cutting or fastening. Good planning comes down to capacity, placement, material choice, and the discharge path at ground level. If one of those is wrong, the finished system may look fine and still perform poorly in heavy rain.
Start with placement and sizing
Building science guidance recommends downspouts spaced every 20 to 50 feet along the gutter line, with a sizing rule of 1 square inch of downspout cross-section for every 100 square feet of roof area, according to the Building America Solution Center guidance on gutters and downspouts.
That tells you two things right away. First, one downspout at a single corner won't suit every roof. Second, roof area matters just as much as gutter length.
Look closely at these conditions before you buy materials:
- Long gutter runs that collect water from a broad roof section
- Valleys and intersecting roof planes that dump concentrated runoff into one area
- Corners near entry walks or patios where discharge can create nuisance water
- Low spots in the yard where water already tends to stand
If you're also comparing full gutter system options, this guide on best gutters for heavy rain is useful because it frames gutter selection around runoff demands instead of appearance alone.
Choose a material that fits the property
The right downspout material isn't only about appearance. In Texas, heat, UV exposure, storm debris, and ladder contact all affect how long a system stays straight, sealed, and properly attached.
| Material | Cost per Foot | Pros | Cons |
|---|---|---|---|
| Vinyl | $4 | Budget-friendly, simple to cut, won't rust | Can look less refined, may become brittle over time, less rigid under stress |
| Aluminum | $4–40 | Common choice, lightweight, easier to form, available in many colors | Can dent if struck, depends on good fastening |
| Steel | $4–40 | Stronger feel, holds shape well | Heavier, can be more demanding to install and protect at fastener points |
| Copper | $4–40 | Premium appearance, long-term curb appeal | Higher material cost, usually chosen for architectural reasons |
For many homes, aluminum is the practical middle ground. On properties where appearance matters as much as drainage, copper may make sense. On basic replacement work, vinyl can work, but it isn't my first choice where storms and impact are common.
Build a real project list
Before installation day, have a measured plan for:
- Outlet location under the gutter run
- Elbows and offsets needed to get from fascia to wall
- Wall straps and matching fasteners
- Bottom extension or ground-level discharge method
- Sealant and connectors for watertight joints
A broader walkthrough of gutter layout, components, and installation details can help if you're planning the full assembly together. Hail King Professionals has a related gutter installation guide that covers how the gutter and downspout system work as one drainage package.
Don't plan a downspout in isolation. The roof section feeding it, the wall it attaches to, and the ground where it discharges all matter.
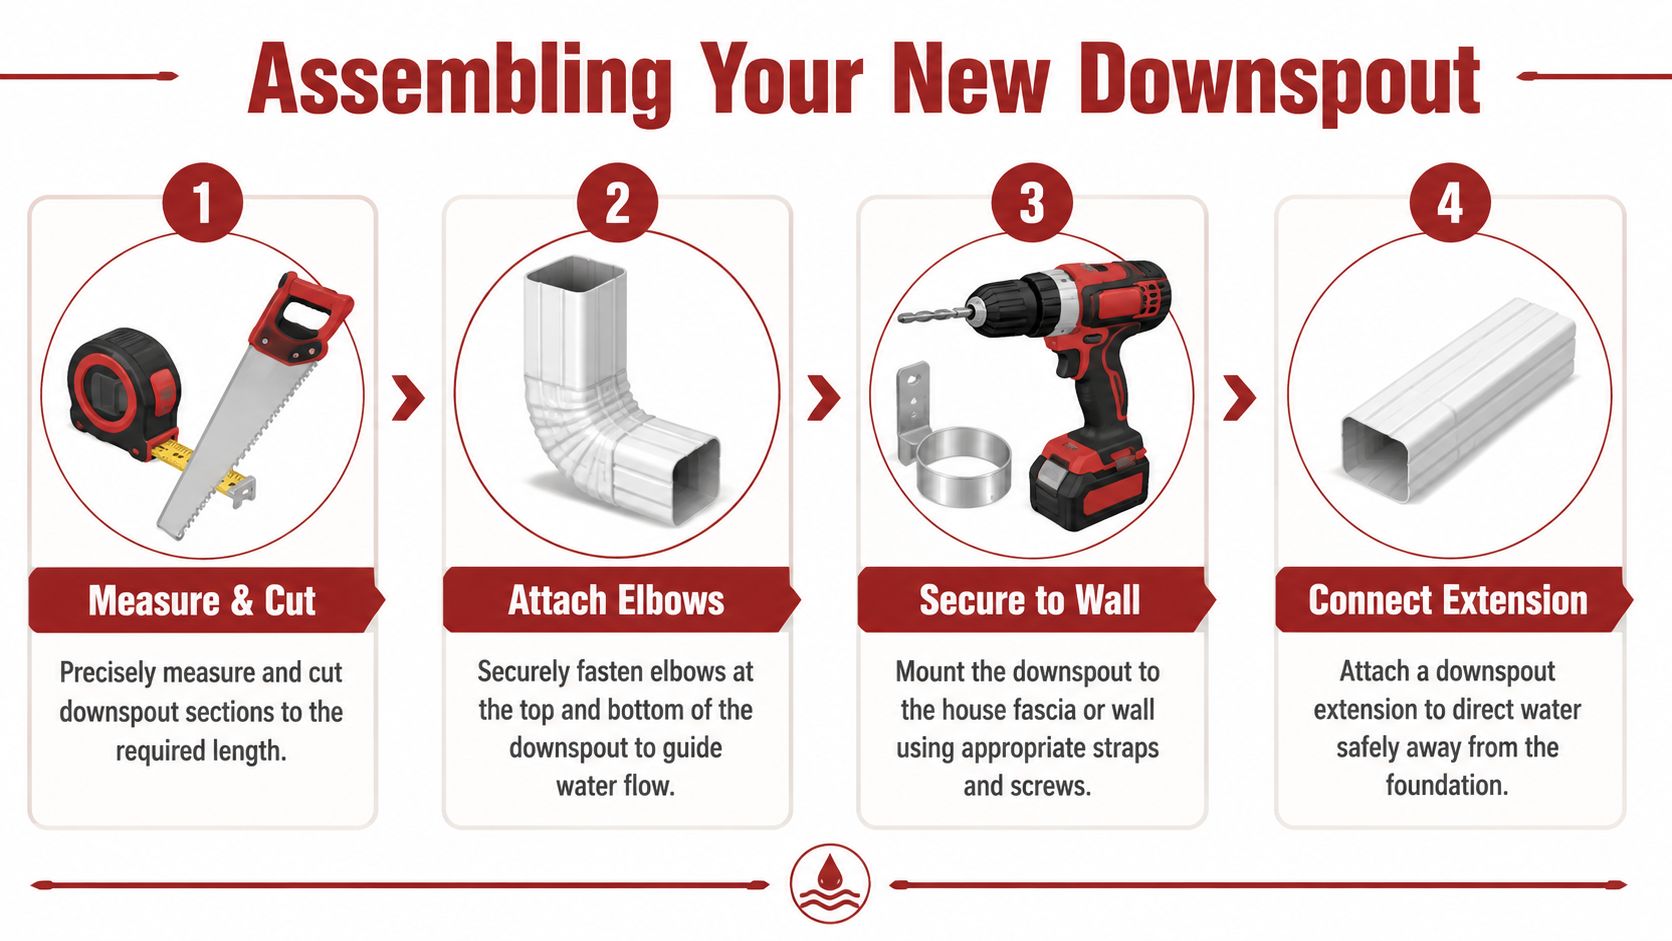
Assembling and Securing Your New Downspout
Once the layout is settled, the installation becomes a sequence problem. The order matters. If you try to improvise with elbows, straps, and cuts as you go, you usually end up with twisted sections, loose joints, or an extension that points water into the wrong area.
This visual shows the basic flow of the job.
Attach the outlet where the water naturally wants to go
Best practice is to place the outlet at the low point of the gutter run, then build the vertical downspout from the top down. Installers also secure the downspout with straps every 6 to 8 feet, and most homes use a standard 2×3 inch downspout, as outlined in this downspout installation guide from NorthStar Gutter.
That top connection does more than join pieces together. It sets the line for everything below it. If the outlet is off location, the elbows become awkward. If the elbows are awkward, the wall run won't sit tight. If the wall run doesn't sit tight, wind and storm movement eventually loosen the assembly.
Use a careful fit at the outlet and don't rush the first elbow pair.
Build the offset cleanly
Most houses need an offset between the gutter edge and the wall. That usually means using elbows to turn the run back toward the siding or masonry, then continuing vertically. Such adjustments often lead to bad-looking installations.
A clean offset should do three things:
- Keep the run close to the wall without forcing the metal
- Avoid sharp, unnecessary bends
- Leave enough space for straps, screws, and future maintenance
If the soffit projection is deep or the trim is uneven, dry-fit the elbows before final fastening. Small alignment errors at the top become obvious by the time you reach the ground.
The top of the downspout is where neat work starts. If the offset is crooked, the whole elevation looks off.
For homeowners who want to watch the assembly process in action, this install video is a helpful reference before handling the tools yourself:
Cut and assemble from top to bottom
Measure the wall run in sections, not as one optimistic total. Fascia depth, trim bands, brick ledges, and grade changes can all alter your final cut length. Tin snips, a drill/driver, a level, a tape measure, and proper exterior fasteners are the usual basics.
A steady assembly flow works well:
- Set the top elbows first so the wall path is established.
- Measure the first vertical section and cut it accurately.
- Join each section so water stays inside the seams, with attention to fit and orientation.
- Check plumb as you go instead of waiting until the entire run is hanging.
- Install the lower elbow or extension connection only after the wall run is secure.
This part of downspout installation rewards patience more than speed. A section that's cut slightly long can buckle. One that's cut short can force a weak joint.
Strap it so Texas wind doesn't work it loose
A downspout should never flap against the wall in high wind or shift when water rushes through it. Straps are what keep the system stable over time, especially on taller walls and exposed corners.
Pay attention to these fastening habits:
- Match the fastener to the wall type. Brick, wood trim, and siding each need the right anchor approach.
- Keep straps snug, not crushing. Over-tightening can deform the downspout.
- Reinforce the lower section carefully. The bottom is the area most likely to get bumped by mowers, feet, pets, or tools.
- Seal joints after fit-up. Don't use sealant as a substitute for proper alignment.
For service work, one option is Hail King Professionals, which offers gutter and downspout installation as part of exterior water-management work. But whether a homeowner does it personally or hires a contractor, the quality markers are the same: straight runs, firm support, clean joints, and discharge directed away from the home.
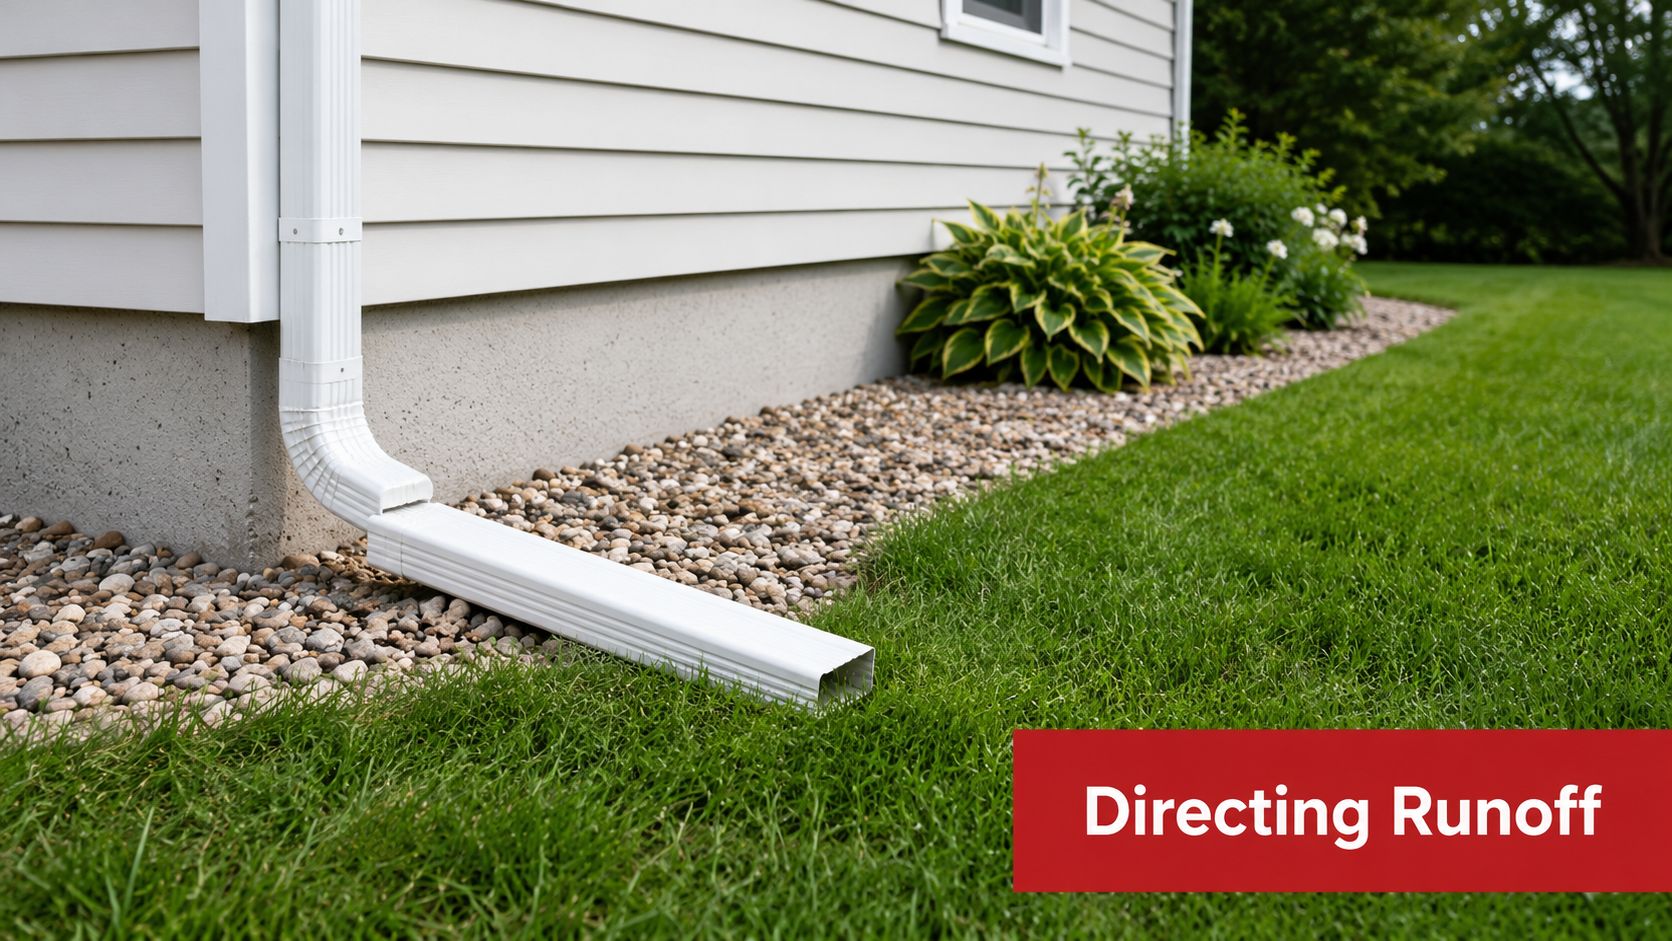
Managing Water Runoff at the Foundation
A Texas storm can dump a lot of water on one corner of a house in a hurry. If that downspout empties right beside the slab, the system is doing only half the job. The goal is to move roof runoff far enough away that it does not soak the soil next to the foundation, wash out planting beds, or create the kind of repeated saturation that leads to movement in Texas clay.
Industry guidance from the EPA's recommendations for disconnecting downspouts supports sending runoff at least 5 feet away from the foundation. On homes with poor grading, heavy clay, or a history of standing water, more distance is often the safer call if the property gives you a good place to discharge it.
Compare the common discharge options
The right outlet depends on grade, soil type, existing plants, paved surfaces, and how concentrated the runoff is at that corner.
| Option | Where it works | Main advantage | Main drawback |
|---|---|---|---|
| Splash block | Short runs, open beds, visible discharge areas | Simple and easy to inspect | Water can jump past it in hard rain or on steep grade |
| Above-ground extension | Homes that need to push water farther from the slab | Better control over discharge distance | Can shift out of place or create a tripping point |
| Buried drain connection | Tight side yards, limited surface drainage paths, cleaner appearance | Carries runoff farther from the structure without a visible extension | Needs careful slope, cleanouts, and periodic inspection |
A good downspout outlet should match the full roof-drainage path, not just the last elbow. If you want a quick refresher on how the whole system works together, this guide on what the gutter does and why it matters ties the discharge decision back to the roofline.
When burying the line makes sense
Buried drainage solves a real problem on some homes. It also creates one if the pipe has nowhere safe to drain, settles after installation, or clogs where nobody can see it.
The University of Maryland Extension notes in its guidance on rainwater runoff from your roof that downspouts can be directed to rain barrels, rain gardens, or other managed discharge areas when site conditions allow. That is the key trade-off. A buried line works well only if the outlet stays downhill, stays clear, and releases water where it cannot cycle back toward the house.
Use buried drainage when these conditions are true:
- The property has a reliable outlet point lower than the downspout
- The pipe can be cleaned or flushed if debris builds up
- The trench and pipe bed can resist settlement
- The discharge will not spill onto a neighbor, driveway, or walkway
I tell Texas homeowners to judge the result after a hard rain, not on a dry afternoon. If water ponds near the slab, cuts channels in the soil, or leaves one corner of the house damp for hours, the runoff plan still needs work.
For homeowners sorting out grading problems beyond the gutter itself, outside guidance on expert help with property drainage can help you evaluate whether the issue is the downspout, the yard slope, or both.
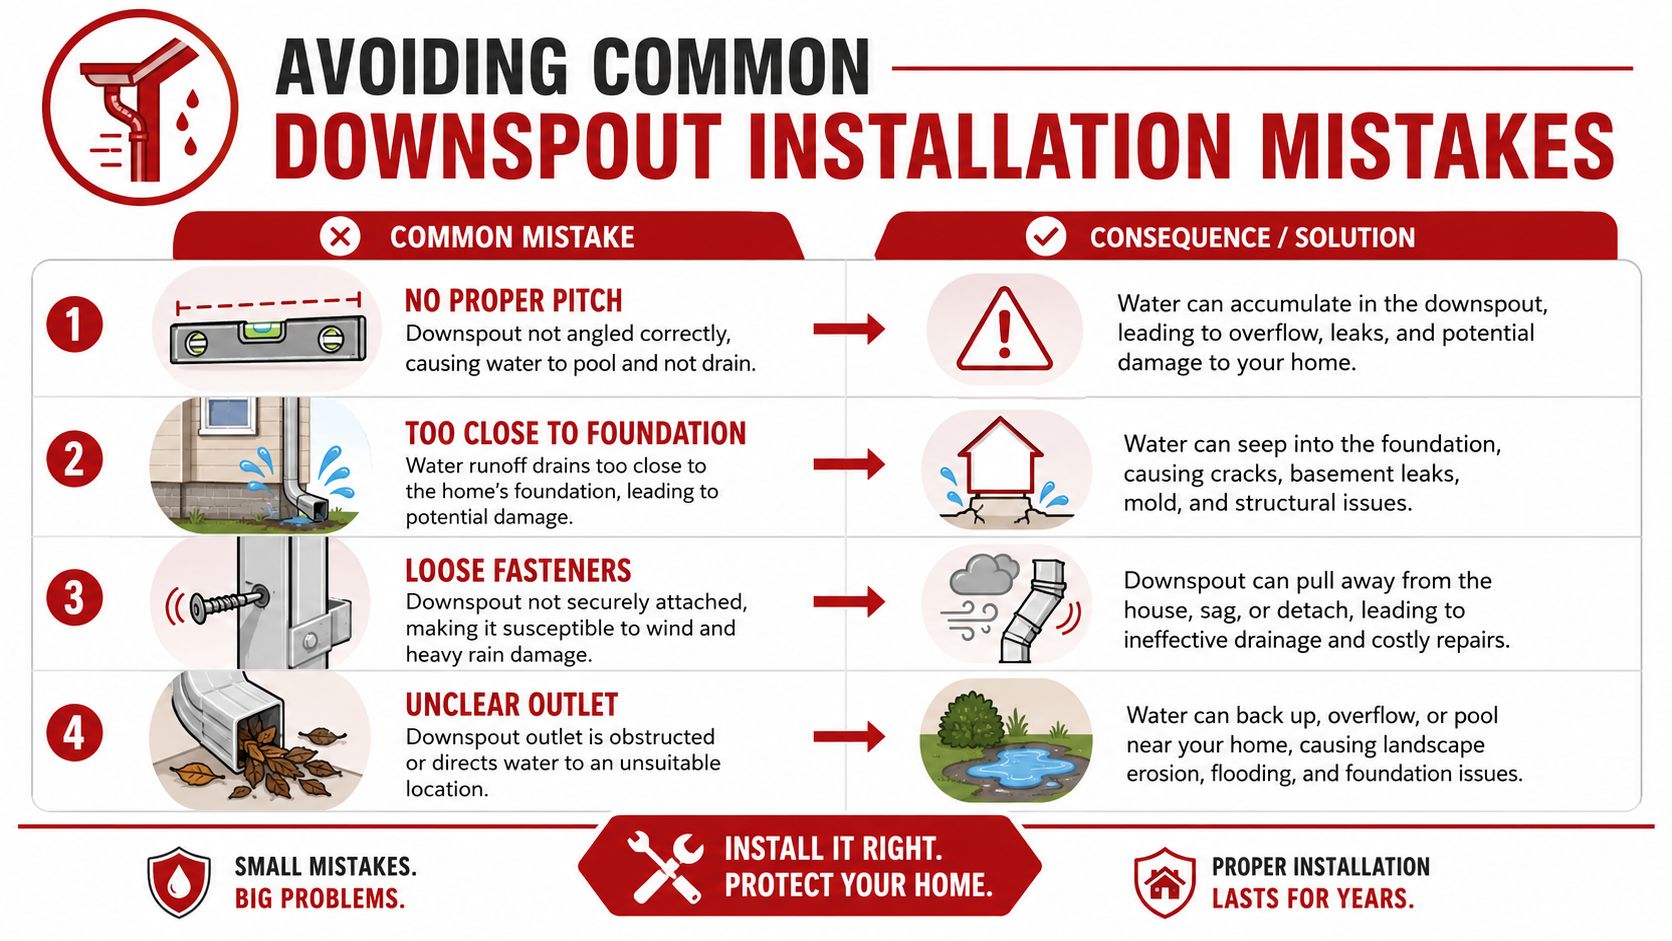
Avoiding Common Installation Mistakes
Most bad downspout installations don't fail on day one. They fail slowly. A little movement at a strap, a little overflow at an elbow, a little splashback at the base. Then the siding stains, the mulch washes out, and the corner of the house starts staying wet after every storm.
The “good enough” approach causes problems.
Problems that look small but aren't
A few installation errors show up again and again on Texas homes:
- Loose support at the wall. The downspout chatters in wind, joints separate, and the lower section gets knocked out of line.
- Discharge too close to the house. Water leaves the pipe correctly, then lands in the wrong place and saturates soil next to the foundation.
- Poor outlet path. The extension points into a walkway, flower bed, or low area that can't handle repeated runoff.
- Overcomplicated routing. Too many turns make the system work harder than it should.
The elbow issue deserves more attention than it gets. According to Spectra, each elbow can reduce system capacity by about 15%, while moving from a 2×3-inch to a 3×4-inch elbow can increase flow capacity by 78%. Their explanation of why gutter elbow angles affect drainage performance shows why elbow choice is a real design decision, not just a fitting detail.
Where homeowners get tripped up
The common assumption is that if water reaches the ground, the installation is fine. That's not enough. In a strong Texas storm, the system has to move water fast, stay attached, and keep runoff from re-entering the problem zone around the structure.
Watch for these judgment mistakes:
Using extra elbows to solve every alignment issue
Sometimes the better answer is reworking the path, not adding another bend.Sticking with standard size when the roof section is demanding
A bigger elbow or different routing can be the smarter move on high-flow areas.Treating the bottom extension like an afterthought
The last few feet are often what determine whether the foundation stays dry.
If a downspout looks neat but sends water into the same wet corner after every storm, the installation missed its purpose.
A reliable system balances appearance and performance. It should fit the home cleanly, but it also has to respect how hard and fast Texas rain can come off the roof.
Maintenance and When to Hire a Roofing Professional
Even a well-installed downspout needs routine attention. Leaves, shingle granules, nests, storm debris, and loose straps can all change how the system performs. Homeowners should inspect after severe weather, confirm joints are still tight, and make sure the bottom discharge hasn't shifted into a bad location.
Simple maintenance goes a long way:
- Clear blockages so water can move freely from gutter to ground
- Check straps and fasteners after wind and hail events
- Look for stains or splash marks on siding and foundation edges
- Watch the system during rain because active water flow tells you more than a dry-day inspection
Some projects shouldn't be treated as weekend work. Two-story homes, steep rooflines, complex offsets, buried drainage plans, and properties with existing storm damage are better handled by a qualified contractor. The same goes for homes in Dallas, Plano, Frisco, Longview, San Marcos, or Round Rock where drainage problems are already affecting the exterior or slab edge.
If the roof has hail damage, sagging gutters, fascia deterioration, or signs that runoff is getting behind exterior finishes, it makes sense to address the whole water-management system together. Downspout installation is one piece of protecting the home. Roof condition, gutter alignment, fastening, and discharge planning all work together.
If you're dealing with pooling water, storm damage, loose gutters, or a downspout system that isn't moving runoff away from the house, Hail King Professionals can inspect the roof and drainage setup and give you clear next steps for repair or replacement.