


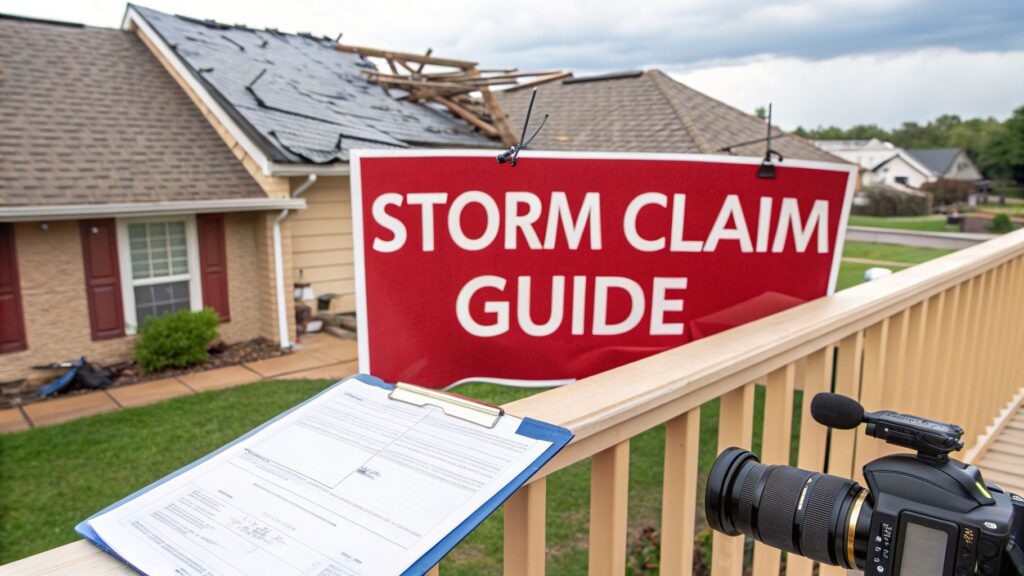
Navigating the Storm Damage Insurance Claim Process in Texas
When a big Texas storm rolls through and leaves a mess behind, what you do in those first few hours can make or break your insurance claim. Before you even think about picking up the phone to call your agent, there are three things you absolutely must do: make sure everyone is safe, document the damage like a crime scene investigator, and take steps to stop things from getting worse.
Getting these three things right in the first 48 hours lays the groundwork for a much smoother, more successful claim.
Your First Steps After the Storm Hits
The wind has died down, the hail has stopped, and you're left looking at the aftermath. It's a stressful moment, but a clear head now will pay dividends later. Your absolute first priority is safety—check on your family and make sure the immediate area is secure.
Once you know everyone is okay, it's time to shift gears. Your new job is to protect your home from further harm and gather undeniable proof of what happened. This isn't just about snapping a few pictures; it's about building a solid case for your claim. Your phone is your best friend right now.
When you're dealing with the chaos right after a storm, it’s easy to feel overwhelmed. Having a simple checklist can keep you focused on what truly matters for protecting your property and setting up your insurance claim for success.
Initial Storm Damage Action Checklist
Here’s a quick-reference guide to the immediate actions you should take.
| Action Item | Why It's Important | Pro Tip |
|---|---|---|
| Check for Immediate Hazards | Your family's safety is paramount. Look for downed power lines, gas leaks, or structural instability before anything else. | Don't go on the roof yourself. It could be unstable or slippery. Wait for a professional. |
| Thorough Photo & Video Documentation | This is your primary evidence. It establishes the "before" state for repairs and proves the extent of the damage. | Narrate your video walkthrough. Point out specific damage and say the date and time out loud. |
| Make Temporary, Protective Repairs | Insurance policies require you to "mitigate damages." Tarping a roof or boarding a window prevents further loss. | Keep every single receipt for tarps, plywood, or any materials you buy. These are typically reimbursable. |
| Contact a Trusted Roofing Contractor | Get an independent, expert assessment before talking to the insurance adjuster. This gives you a baseline. | Choose a local contractor with experience in storm damage claims, not a storm-chaser from out of state. |
| Locate Your Insurance Policy | You'll need your policy number and to understand your deductible and coverage limits. | Have a digital copy stored in the cloud so you can access it even if your physical documents are damaged. |
Following these steps methodically will put you in a position of strength when you're ready to file your claim.
Master Your Initial Damage Documentation
Start by getting the big picture. Take wide-angle photos of your entire property from different angles—front, back, both sides. Capture the roof, siding, windows, and any outbuildings like sheds or garages. These shots establish the scene.
Then, it's time to zoom in. Get detailed, close-up shots of everything.
- Hail Damage: Take pictures of the actual dents and dings on your shingles, gutters, siding, and even A/C fins. A great tip is to place a coin or a small ruler next to the impact marks to show their size.
- Wind Damage: Snap photos of any shingles that are missing, lifted up, or creased. If a tree or large branch came down, document where it landed and the damage it caused.
- Water Intrusion: Inside your house, look for water stains on ceilings and walls. If you have active drips, get photos and video of that, too.
A video walkthrough is fantastic for tying it all together. Walk around your property, inside and out, filming and talking through what you're seeing. It creates a powerful, time-stamped record of your home's condition right after the storm.
I've seen it happen a hundred times: a homeowner waits a week to take pictures, and by then, the water stains on the ceiling have started to fade. That delay gives the insurance company an opening to question when the damage actually occurred. Don't give them that chance—document immediately.
Take Protective Measures and Get a Baseline
After you've got your evidence, you need to stop the bleeding. Covering a hole in the roof with a sturdy tarp or boarding up a shattered window is your responsibility, and insurance carriers expect it. These are temporary measures, but they show you're acting in good faith to protect the property. Hang on to the receipts for any supplies you buy; they should be part of your claim.
Now, here's where a lot of people make a misstep. Their first instinct is to immediately call the 800-number on their insurance card. I always advise a different approach: first, call a trusted local roofing contractor for an independent inspection.
Especially when dealing with major issues, like when you need to understand the specifics of tree falling on house insurance, having an expert on your side from day one is a game-changer.
Getting a professional report from a team like Hail King Professionals gives you a detailed breakdown of the damage from an expert's point of view. You can learn more about what to look for by reading our guide on finding the right roofing contractor near me. This arms you with critical information before the adjuster even schedules their visit. With global insured losses from natural disasters recently hitting between $107 billion and $145 billion, you can bet that insurance companies are scrutinizing claims more closely than ever. Your own documentation, paired with a professional assessment, is the best way to ensure you're treated fairly.
Filing Your Claim and Building a Bulletproof Damage Portfolio
Once you’ve taken photos of the immediate damage and put up temporary fixes, it’s time to kick off the official storm damage insurance claim process. This isn't just a quick phone call. Think of it as the formal start of a legal and financial procedure where being organized and precise is your best strategy.
Before you pick up the phone, take a deep breath and get your materials in order. You’ll want your policy number in front of you, along with the notes you took and a clear timeline of when the storm hit. When you call, be ready to give a straightforward, concise summary of the damage you've found so far.
This first call really sets the tone for everything that follows. The key is to be factual, calm, and cooperative. The agent will give you a claim number—treat it like gold. It’s your reference for every single interaction from here on out.
The infographic below breaks down the crucial first moves to make right after a storm, which lay the groundwork for a solid claim.

As you can see, assessing the situation and protecting your property with tarps before you call the insurance company puts you in a much stronger, more prepared position.
Create a Master Communication Log
From this moment on, every phone call, email, and letter is part of the official record. You have to track it all. Don’t ever rely on your memory; it will fail you when you need it most.
Grab a notebook or open a new digital document and start a simple log. For every single interaction, jot down:
- Date and Time: The exact time you called or when an email was sent or received.
- Person's Name and Title: Get their full name and find out their role (e.g., John Doe, Desk Adjuster).
- Claim Number Reference: Always make sure your claim number is mentioned and correct.
- Key Points Discussed: A quick summary of the conversation, including any promises made or timelines mentioned.
- Action Items: What did they ask you to do? What did they promise to do? Write it down.
This log becomes your rock if—or when—disputes or delays pop up later. It turns a vague "he said, she said" situation into a factual, chronological record of your claim. In some cases, you may even need an insurance affidavit form to formally document your side of the story.
Pro Tip: After any important phone call, send a quick, polite follow-up email. Something like, "Hi John, just confirming our conversation from 2:15 PM today, where we agreed you would schedule the adjuster's inspection for next Tuesday." This creates a paper trail that is incredibly difficult to argue with.
Assemble Your Comprehensive Damage Portfolio
Those first pictures you snapped were just the rough draft. Now, it’s time to build an undeniable case file. This "damage portfolio" is your most powerful tool in getting a fair settlement, and it needs to be organized, detailed, and easy for an adjuster to digest.
Think of it as more than just photos. It's a collection of evidence that tells the complete story of your loss.
What to Include in Your Damage Portfolio:
- Organized Photo & Video Evidence: Don't just email a zip file with 200 random photos. Create subfolders like "Roof – Hail Hits," "Interior – Ceiling Stains," and "Broken Windows." Take wide shots to show context, but also get close-ups—use a ruler or coin for scale to show the size of hail dents.
- Receipts for Temporary Repairs: Every receipt for tarps, plywood, or emergency shrink-wrapping goes in here. Your policy almost always covers these "loss mitigation" costs, but you need proof of payment.
- An Independent Contractor's Report: This is huge. The detailed damage inspection from a trusted contractor (like our team at Hail King Professionals) gives you a professional benchmark to compare against the adjuster’s findings. It's critical to know what's in this report, and you can learn more about how contractors calculate the roof hail damage repair cost.
- Proof of Pre-Storm Condition (If you have it): Did you take any photos of your house for a party last summer? Or maybe you have pictures from when you bought the place? Any photo showing your roof or siding in good condition before the storm can shut down an insurer's argument that the damage was pre-existing.
When you document everything this thoroughly, you remove the guesswork and turn the claim from a subjective debate into a fact-based negotiation. Presenting a clear, well-supported case from the start shows you’re a serious and prepared policyholder, which is exactly the foundation you want when you sit down with the insurance adjuster.
The Adjuster's Inspection: The Moment of Truth

The adjuster’s visit is, without a doubt, the most pivotal moment in your entire insurance claim. This is when the insurance company's field representative lays eyes on your property, assesses the damage, and starts building the "scope of work" that ultimately determines the size of your check.
How you handle this meeting can make or break your claim.
The adjuster is a trained professional who evaluates damage against the specific language in your policy. They've seen it all and are looking for clear, undeniable evidence of storm-related failure. Your job is to make it easy for them to see everything that’s wrong by being organized and ready.
Setting the Stage for a Successful Meeting
You’d never walk into an important business meeting unprepared, and this is exactly that—a business meeting about one of your biggest assets. The goal here is to foster a professional, fact-based conversation, not an argument. Scrambling to find photos or being unsure about where the leaks are only creates confusion and can lead to costly oversights.
Before the adjuster rings your doorbell, have these things squared away:
- Your Damage Portfolio: Keep your collection of photos, videos, and receipts neatly organized and ready to go.
- A Command Center: Clear off the kitchen table or a desk. Having a quiet, designated space to talk without distractions is a game-changer.
- Your Questions: Jot down a list of questions beforehand. In the moment, it’s easy to forget something critical.
This level of preparedness sends a clear signal to the adjuster: you’re organized, you’re serious, and you’re on top of things. It sets a professional tone right from the start.
The Power of a Second Set of Expert Eyes
If there's one piece of advice I can give you, it's this: never, ever meet the insurance adjuster alone.
Always have your trusted contractor—someone from our team at Hail King Professionals, for instance—on-site with you during the inspection. This isn’t about being confrontational. It's about leveling the playing field with expertise.
An adjuster knows a little bit about a lot of things. A dedicated roofing contractor, on the other hand, has a deep, specialized knowledge of how roofing systems work, and more importantly, how they fail in a brutal North Texas hailstorm.
A contractor’s trained eye can spot subtle damage an adjuster might easily miss—things like hairline cracks in shingles, granule loss patterns, or lifted flashing that will become a major leak next season. They speak the same technical language as the adjuster and can point out damage using industry-standard terms, ensuring nothing gets glossed over.
Think of your contractor as your advocate. They are there to ensure the final report is accurate and that all proposed repairs meet current local building codes. This one simple step can be the difference between a few hundred dollars for a patch job and a fully funded, code-compliant roof replacement.
Stick to the Facts: What to Say and What to Avoid
During the inspection, your words matter. Keep your conversation focused on the facts and let the damage do the talking. Be polite and cooperative, but don’t offer up opinions or guesses that could accidentally poke holes in your own claim.
Things to Say:
- "I found these water stains in the upstairs bedroom right after the storm."
- "We found a bunch of shingle pieces in the yard right here."
- "My contractor pointed out bruising on the shingles all along this west-facing slope."
Things to Avoid:
- "Well, the roof was probably getting old anyway." (This invites depreciation.)
- "It's just a small leak, it's probably not a big deal." (Never downplay damage.)
- "I'm not really sure if that spot was there before the hail." (Uncertainty hurts your case.)
Your role is simple: point out what you've seen. Let your contractor and the adjuster debate the technical causes, repair methods, and costs.
Must-Ask Questions for the Adjuster
This is your chance to get clarity and set expectations. Don't be timid. You are the customer, and this is a business transaction involving your home.
Be sure to ask:
- "Based on what you've seen so far, what is your initial assessment?"
- "Can you walk me through the next steps and give me a rough timeline?"
- "When should I expect to see a copy of your full report and the scope of work?"
- "How will my deductible be applied to the settlement you’re proposing?"
Getting answers to these questions helps you understand the road ahead and holds the carrier accountable to a schedule.
Decoding Insurance Lingo: ACV vs. RCV
During your meeting, the adjuster will likely throw around some industry jargon. Two terms you absolutely must understand are ACV and RCV.
- Replacement Cost Value (RCV): This is the big number. It's today's full cost to replace the damaged property with brand-new materials of similar kind and quality, with no deduction for age.
- Actual Cash Value (ACV): This is the RCV minus depreciation. Depreciation is the value your roof or property lost over time due to age and normal wear and tear before the storm hit.
Most homeowner policies in Texas are RCV policies. However, the insurance company typically pays the claim in two parts. First, they send you a check for the ACV. Once you've completed the repairs and submitted the final invoice from your contractor, they release the second check for the depreciation they held back.
This process is also the perfect time to consider upgrading to stronger, more durable products. You can explore modern options by learning more about hail-resistant roofing materials. Grasping these core concepts allows you to be an active, informed participant in the conversation about your settlement.
Decoding Your Insurance Settlement and Avoiding Common Traps

When the adjuster’s report and initial payment finally show up, it’s a weird mix of relief and total confusion. You’re looking at a dense document packed with jargon, weird codes, and a bunch of numbers that don’t immediately add up. Don't gloss over this. This is the moment in the process where a little bit of knowledge can mean the difference between getting a full restoration and having to pay out of your own pocket.
The natural reaction is either to jump on the offer just to be done with it or get angry because the number seems insultingly low. My advice? Do neither. Look at this as the insurance company’s opening bid. Your job, with your contractor at your side, is to take it apart piece by piece and make sure it matches the real-world cost of putting your home back together.
The Money Talk: ACV, RCV, and Your Deductible
Before you can even begin to analyze the line items, you have to speak the language. There are a few key terms that control how and when you get paid.
It all starts with two big ones: Replacement Cost Value (RCV) and Actual Cash Value (ACV).
Replacement Cost Value (RCV) is the big number. It’s what it would cost, today, to completely repair or replace your damaged property with new, similar materials. Think of it as the "full retail price" of the job.
Actual Cash Value (ACV) is the RCV minus depreciation. Depreciation is just a fancy word for the value your roof or siding has lost over time from age and weather. A 15-year-old roof just isn't worth the same as a brand-new one.
Most homeowner policies in Texas are RCV policies, but here’s the catch they don't just hand you a check for the full RCV. First, you get a check for the ACV amount, minus your deductible. The rest of the money, called recoverable depreciation, is held back until you prove you've actually done the repairs by submitting a contractor's final invoice.
This two-payment system is the insurance company's way of making sure you use the money for its intended purpose. You absolutely have to complete the work to get the full value of your claim.
How the Numbers Actually Work
Your deductible is simply your part of the bill. It's the amount you have to cover before your insurance pays a dime. Let’s make this real with a quick example.
Say your roof replacement is going to cost $20,000.
- Total Replacement Cost (RCV): $20,000
- Depreciation (for its age): -$4,000
- Actual Cash Value (ACV): $16,000
- Your Deductible: -$2,000
The first check you get from the insurance company will be for $14,000 (the $16,000 ACV minus your $2,000 deductible).
Once your contractor finishes the $20,000 job and you send the final invoice to your insurer, they release that withheld $4,000 in depreciation. Your total payout from them is $18,000. Your only out-of-pocket cost is your $2,000 deductible, as it should be.
Finding What the Adjuster Missed
This is exactly where a seasoned contractor proves their worth. Adjusters are human; they’re often overworked and moving fast. They miss things. It happens all the time. A good contractor will comb through that insurance scope of work, comparing it line by line against what’s actually needed to do the job right and meet local building codes.
We see the same omissions over and over again:
- Flashing: Essential metal seals around chimneys, skylights, and valleys. They get battered in a storm but are frequently left off the initial estimate.
- Underlayment: Modern building codes often require an upgraded synthetic underlayment, but the estimate might only cover basic felt paper.
- Drip Edge: This metal edging is a small detail that’s crucial for water management, yet it’s another commonly missed item.
- Ventilation: Damaged roof vents are easy to overlook, but proper ventilation is a code requirement.
- Labor Rates: The software adjusters use often spits out generic, outdated labor costs that don't reflect the market reality here in Dallas–Fort Worth or East Texas.
When our team at Hail King Professionals spots these gaps, we don’t just point them out. We document them with photos and detailed explanations. This becomes the evidence for a supplemental claim—a formal request for the additional funds needed to cover what was missed. This isn't a fight; it's a professional negotiation based on facts.
Blindly accepting that first offer without an expert review is one of the costliest mistakes a homeowner can make, and it can leave you with an incomplete repair or an unexpected bill.
What to Do When Your Claim Is Underpaid or Denied
That moment when you open the letter from your insurance company and see a lowball offer—or worse, an outright denial—can feel like a punch to the gut. You’ve documented everything, waited patiently, and now this? It’s frustrating, but I’m here to tell you that this is rarely the end of the road.
Think of it this way: their first offer is just that, an offer. It’s their opening position based on a quick, initial look. It’s not the final word, and you absolutely have the right to challenge it. The key is to do it with the right evidence and a solid strategy.
Supplements vs. Appeals: Know Your Next Move
First things first, you need to understand the path you're on. Are you dealing with a settlement that's too low, or was your claim denied entirely? The answer determines your next step.
A supplemental claim is what you file when your claim is underpaid. This is incredibly common in North Texas. Maybe the adjuster’s estimate missed the cost of replacing the rotted decking they found after your roofer tore off the hail-damaged shingles. Or perhaps they didn't include the cost of ice and water shield, which is now required by city code.
In this scenario, your contractor (that’s us!) documents the newly discovered damage or required upgrades with photos and a detailed cost breakdown. We then submit this new package to your adjuster, essentially adding these necessary costs to your existing claim. It's less of a fight and more of a clarification.
An appeal, on the other hand, is a more formal challenge to a complete denial. This is when the insurer says the damage isn’t covered at all. We see this when they try to blame the damage on "wear and tear" instead of the recent hailstorm. An appeal means you’re formally asking them to reconsider their fundamental decision to deny coverage.
How to Build a Rock-Solid Case for More Money
Whether you’re filing a supplement or an appeal, simply saying "this isn't enough" won't get you very far. Success comes from presenting a factual, evidence-based argument that clearly shows what was missed, miscalculated, or wrongly denied.
Your Game Plan for Challenging the Insurer:
- Get It In Writing: Your first move is to formally request a written explanation from the insurer. They are required to tell you exactly why specific items were left out or why the entire claim was denied, pointing to the specific language in your policy.
- Go Line-by-Line: This is where we come in. Sit down with your Hail King Professionals project manager and compare the adjuster's report side-by-side with our detailed estimate. We’ll find every discrepancy, from missing materials like drip edge and starter shingles to outdated labor rates that don’t reflect the current market.
- Bring in Fresh Evidence: A good contractor is your best asset here. We can provide documentation on local building code requirements, pull manufacturer specifications for materials, and take high-resolution photos of damage that the initial adjuster completely overlooked from the ground.
A lowball offer is often just a test to see if you're paying attention. By professionally and methodically pointing out the gaps with clear evidence, you demonstrate that you understand the true cost of repairs and won't accept an incomplete settlement.
Taking Your Claim to the Next Level
What if your initial challenge doesn't work? Don't lose hope. The insurance claim process has a ladder, and you just need to know how to climb it.
Your next step is to request a re-inspection, but this time, ask for a different adjuster to be sent out. A fresh set of eyes can make a world of difference, especially if the first adjuster was inexperienced or just having a bad day. If that doesn't move the needle, it's time to escalate. Ask to speak directly with a claims manager or a supervisor. Present your evidence binder to them calmly and professionally.
Throughout this entire ordeal, keep updating that communication log. Every phone call, every email, every person you talk to—write it all down. If you hit a total brick wall and feel the insurance company is operating in bad faith, your next call might be to the Texas Department of Insurance for guidance. Having an expert contractor on your side gives you the power and the confidence to fight for the full settlement you’re owed.
Your Top Storm Damage Claim Questions, Answered
Going through an insurance claim after a nasty Texas storm can feel overwhelming, and it's completely normal to have a ton of questions. We hear the same concerns from homeowners all over DFW and East Texas. Let's clear up some of the most common ones so you can feel more in control of the process.
How Long Do I Have to File a Storm Damage Claim in Texas?
Legally speaking, Texas gives you two years from the date of the storm to file a property damage claim. But here's the reality: you should never wait that long.
Think of it this way—your insurance policy almost certainly has a clause that says you must report damage "promptly." If you wait weeks or months, the insurance company could argue that new problems popped up or that the original damage got worse because you didn't act quickly. That just opens a can of worms you don't want to deal with. The best move is always to file your claim right after the storm has passed and you've had a chance to safely check things out.
Will My Insurance Premium Go Up if I File a Claim?
This is probably the number one fear we hear, and the short answer is no, not because of your individual claim. Texas law prevents insurance companies from penalizing you with a rate hike just because you filed a legitimate claim for damage from a natural disaster.
Now, could rates go up for everyone in your area? Yes. When a massive hailstorm hammers an entire region, insurers reassess the risk for that whole area. If they decide to raise rates, it will likely happen for everyone at their next renewal, whether you filed a claim or not. Your claim isn't the trigger.
A catastrophic weather event that impacts an entire ZIP code or county is what drives regional rate adjustments. Your individual, legitimate claim for storm damage is not the trigger for a premium increase.
Can I Pick My Own Roofer?
Absolutely. In fact, you should. Your insurance company might have a list of "preferred vendors," but you are under no obligation to use them.
This is one of the most important decisions you'll make. You need to find a local, trusted, and fully insured contractor who knows the insurance game inside and out. A roofer you hire works for you, not the insurance company. Their job is to make sure your home is restored correctly according to local codes, not to save the insurance company money.
What's the Deal with ACV vs. RCV?
Getting a handle on these two acronyms is key to understanding your insurance settlement. They sound complicated, but the concept is pretty simple.
- Replacement Cost Value (RCV): This is the big number. It's what it would cost to replace your roof or repair damage with brand-new materials today, without any deduction for how old your stuff was.
- Actual Cash Value (ACV): This is the RCV minus depreciation. Depreciation is just the value your roof lost over the years from normal wear and tear.
Most good homeowner's policies today are RCV policies. You'll typically get paid in two chunks. The first check is for the ACV. Once you get the work done and show the final invoice to the insurance company, they send the second check for the rest of the money (the depreciation they held back).
You don't have to figure all this out by yourself. The crew at Hail King Professionals lives and breathes this stuff. We can give you a free, no-pressure inspection and help you make sense of the entire process. Reach out to us today at https://hailkingpros.com and let’s make sure you get the fair settlement you’re owed.