


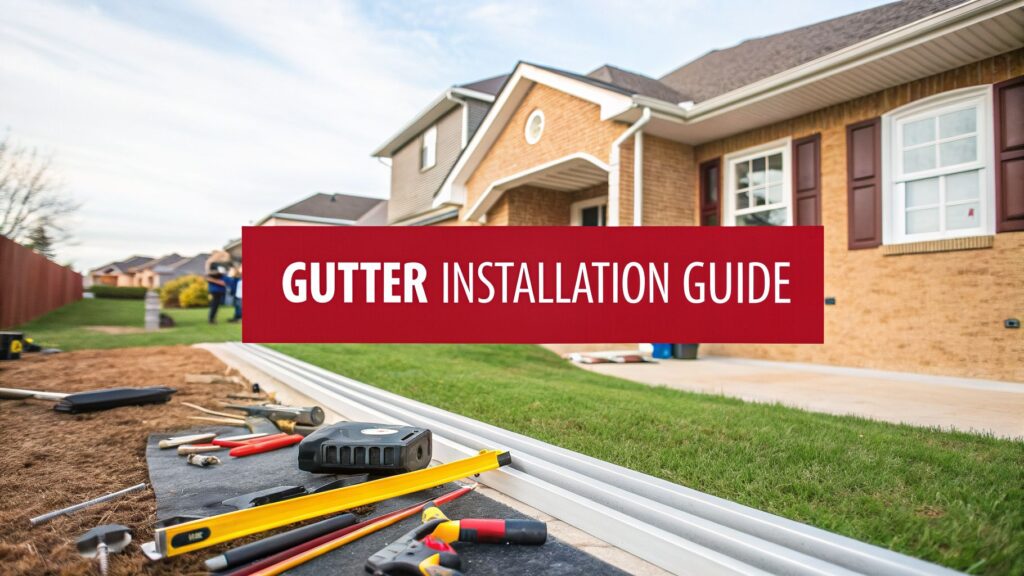
Expert Gutter Installation Guide: Protect Your Home in 2026
It’s easy to overlook your gutters, but thinking of them as just a finishing touch on your house is a costly mistake. A proper gutter system is your home's single most important defense against water damage, especially here in Texas where we get everything from torrential downpours to serious hail. Get it right, and you're protecting your foundation, siding, and landscaping. Get it wrong, and you're inviting a whole host of expensive problems.
Why A Good Gutter System Is Your Home's Unsung Hero

Think about what happens during a heavy storm. Your roof collects an enormous amount of water. Without a functional gutter system, that water has nowhere to go but straight down, pooling right against your foundation.
This is a huge deal in places like Dallas-Fort Worth and across East Texas. Our clay-rich soil expands and contracts like a sponge, and uncontrolled water flow is a direct threat to your home's structural integrity. That’s why a working gutter system isn’t just a recommendation—it’s essential.
What Your Gutters Are Actually Doing
On the surface, gutters just move rainwater from point A to point B. But what that simple job accomplishes is far more significant than just keeping you from getting drenched on your way out the door.
A well-installed system is a multi-tasking protector:
- Protecting Your Foundation: By channeling water safely away from your home, gutters prevent the soil saturation that causes foundations to crack, shift, and settle. These are not cheap repairs; they can easily run into the tens of thousands.
- Preserving Siding and Masonry: Gutters stop the constant waterfall that stains, rots, and wears away your siding, brick, or stone over time.
- Saving Your Landscaping: Unchecked runoff will carve trenches through your yard, washing away mulch, topsoil, and expensive plants. A good gutter system gives you control over where that water drains.
- Keeping Basements and Crawlspaces Dry: This is your first and best line of defense against water seeping into your home's lower levels, which leads to mold, mildew, and bigger structural issues.
A properly installed gutter system isn’t just another weekend DIY project; it's a strategic investment in your home's health and value. It’s the difference between simple upkeep and facing catastrophic repairs down the road.
It's no surprise that more homeowners are recognizing this. The global rain gutter market is expected to climb from $6.86 billion in 2026 to an estimated $8.76 billion by 2030. This growth reflects a clear understanding that professional water management is key to avoiding the billions spent annually on water damage repairs, as detailed in this rain gutter market report.
Choosing The Right Gutter Material For Texas Weather
Now, let's talk about what your gutters are actually made of. This choice is a big one, affecting everything from durability and cost to how your house looks. Living in Texas, some materials just hold up better than others.
To help you decide, here’s a quick rundown of the most common options you'll encounter.
Gutter Material Quick Comparison
| Material | Average Cost (per ft) | Pros | Cons |
|---|---|---|---|
| Aluminum | $6 – $15 | Lightweight, rust-proof, variety of colors, cost-effective. | Can be dented by heavy hail or ladders if not a thick gauge. |
| Steel | $9 – $20 | Extremely strong, holds up to heavy rain and impacts, durable. | Heavier, can rust if the galvanized coating is scratched. |
| Copper | $25 – $40+ | Very durable (lasts 100+ years), beautiful patina, low maintenance. | Significantly more expensive, requires expert installation. |
As you can see, there's a trade-off between cost, strength, and looks.
Aluminum is the go-to for most homeowners, and for good reason. It’s rust-proof, comes in a ton of colors, and won’t break the bank. If you’re in a hail-prone area, I always recommend going with a thicker gauge for better impact resistance.
Steel, especially galvanized steel, is a beast. It offers incredible strength for handling our heaviest downpours and is much tougher against impacts. The main thing to watch for is any deep scratches that get through the protective coating, which can lead to rust.
Copper is the premium choice. It's incredibly beautiful, developing a classic greenish patina over the years, and it can literally last a lifetime. That durability comes with a much higher price tag, so it's a bigger investment upfront.
If you're still getting a feel for why this all matters so much, our article on why a house needs gutters is a great place to start. Understanding the fundamentals really drives home why every single step of the installation process counts.
The Blueprint: Nailing Your Gutter Plan Before You Climb the Ladder
I’ve seen it a hundred times: a weekend project goes sideways fast, all because of a few missed details in the planning stage. Before you even think about grabbing a ladder, the most important work happens on the ground with a notepad and a tape measure. Trust me, getting this part right saves you from extra trips to the hardware store and ensures your gutters actually work when the Texas skies open up.
First things first, you need a simple map of your home’s roofline. Walk the perimeter and measure every straight run of fascia board where a gutter will hang. Sketch it out and label each measurement. As you do, think about where your downspouts will go. A good rule of thumb, especially for our heavy rains, is to plan for one downspout for every 30 to 40 feet of gutter.
Getting the Slope Just Right
Proper drainage isn’t some trade secret; it’s just gravity. But for gravity to do its job, your gutters need a slight, consistent slope toward the downspouts. If they're perfectly level, you'll end up with standing water, mosquito breeding grounds, and overflowing messes.
The industry standard we all use is a drop of about 1/4-inch for every 10 feet of gutter.
Let's put that into a real-world context. Say you have a 30-foot run of fascia needing a single downspout at one end.
- Your starting point, furthest from the downspout, is your high point.
- Over 30 feet, you'll need a total drop of 3/4 of an inch (that's 3 x 1/4 inch).
- When you snap a chalk line to guide your installation, you'll simply make sure the end by the downspout is 3/4-inch lower than the start. It’s a tiny adjustment that makes all the difference.
Pro Tip: For extra-long runs over 40 feet, the best practice is to place a downspout in the middle. This makes the center your lowest point, with the gutters sloping down toward it from both directions.
Your Master Materials List
With your measurements and slope figured out, you can build a shopping list that leaves no room for error. Nothing kills momentum faster than being two-thirds done and realizing you're short one corner piece.
Here’s a checklist of what you'll almost certainly need:
- Gutter Sections: Buy enough to cover your total linear footage, plus at least 10% extra. This buffer is your insurance against bad cuts or a damaged piece. They usually come in 10-foot lengths.
- Downspouts: One for each location you marked on your map.
- Hangers: Plan to install one every 24 to 32 inches. Don't skimp here; this is what holds everything up during a torrential downpour.
- Downspout Outlets: The piece that connects the gutter floor to the downspout.
- End Caps: You'll need these to cap off any run that doesn't terminate at a corner.
- Corners (Inside & Outside): Whatever your roofline requires.
- Elbows: Crucial for snaking the downspout from the outlet and back against the house wall.
- Downspout Straps: These secure the downspouts firmly against your siding.
- Gutter Sealant: Don't just grab any caulk. You need a high-quality, weatherproof sealant specifically for gutters to create durable, leak-proof seams.
- Screws: Get the right fasteners. 1/4-inch hex-head screws are the standard for a reason—they're strong and easy to drive.
A detailed list helps you stick to your budget. To get a solid idea of what to expect financially, our breakdown of gutter installation cost per linear foot is a great resource that covers costs for different materials and project sizes.
The gutter services industry is a serious business. The U.S. market hit $778.4 million in 2025, with nearly 5,000 businesses competing for work. With an average project lead valued at $1,200 and profit margins that can reach 20-40%, there's a strong incentive to do the job right. This competition is a huge plus for homeowners, as it drives installers to use better materials and techniques. You can find more compelling gutter industry statistics that show just how important this part of your home is.
Finally, think hard about your material choice. Aluminum is the go-to for its affordability and rust resistance, but if you're in a hail-prone area like North Texas, it's worth considering more impact-resistant options. A thicker gauge aluminum or even galvanized steel might get dented in a storm, but it's far less likely to be punctured or ruined. A little extra thought during planning sets you up for a gutter system that performs perfectly for years to come.
The Hands-On Installation From Cutting To Hanging
Alright, you've got your plan and your materials. Now for the satisfying part: cutting, connecting, and hanging the gutters themselves. This is where your careful measurements really start to pay off. A little patience here will save you a world of headaches later.
My biggest piece of advice? Do as much work on the ground as you can. It’s a lot easier—and safer—to attach end caps, cut in your downspout outlets, and even join shorter sections together before you haul everything up a ladder.
Making Clean Cuts And Solid Connections
A leak-proof gutter system starts with a good, clean cut. I don't care if you're using a hacksaw, tin snips, or an angle grinder with a metal-cutting blade—the old saying measure twice, cut once is gospel here. A straight, burr-free cut is what gives you that tight, professional-looking seal at corners and end caps.
When you need to join two standard 10-foot sections, you'll be using a slip joint connector. Here’s how you get a solid, watertight seam:
- First, lay down a generous bead of gutter sealant on the inside of the connector where the gutters will overlap.
- Slide the gutter pieces into the connector, making sure they overlap by about 1.5 to 2 inches.
- Lock it all together with a few short, self-tapping screws (we call them zip screws). Drive them through the connector and both layers of gutter.
You'll follow a similar process for corners. You can either miter-cut your gutter sections (usually a 45-degree cut for a standard 90-degree corner) or just use the pre-made corner pieces, which I recommend for most DIYers. Either way, sealant is non-negotiable. Don't be stingy with it; a leaky corner will undermine all your hard work.
This hands-on work is the direct result of good planning, as the process below illustrates.
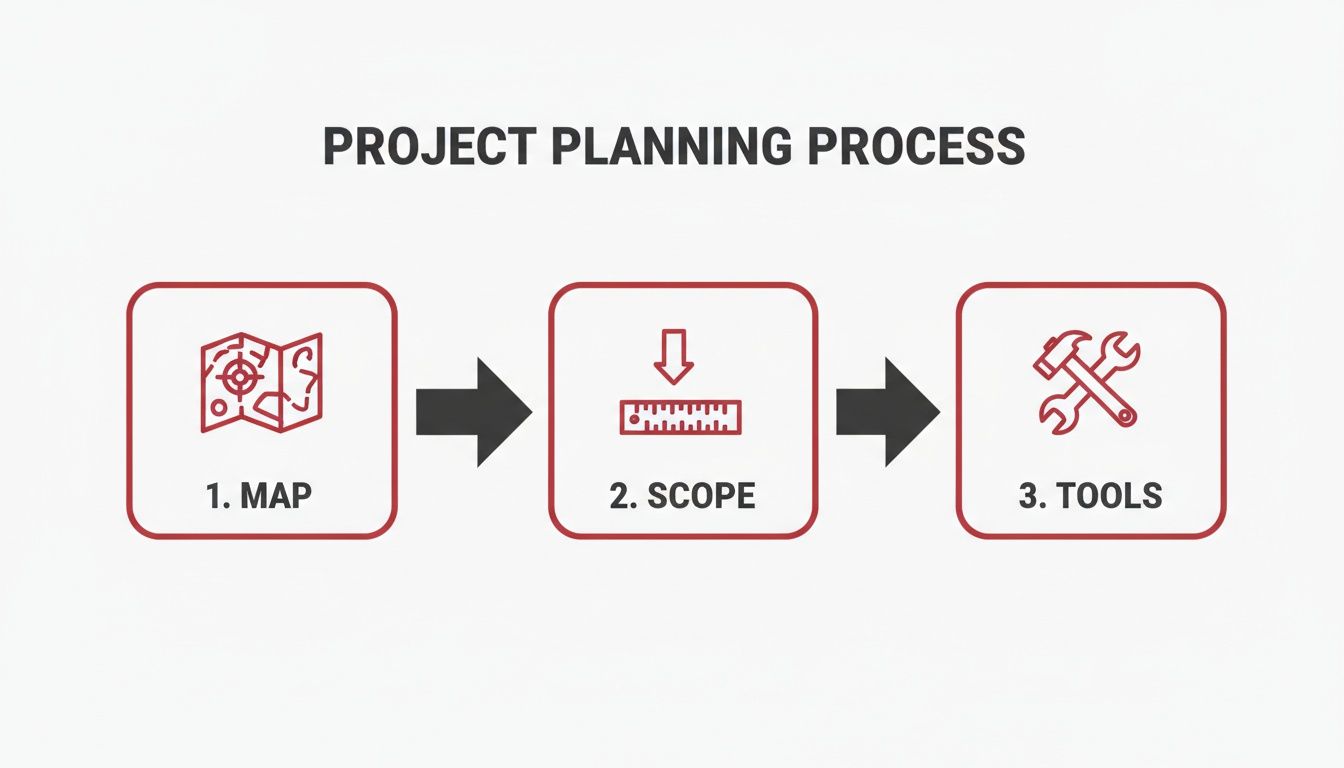
As you can see, mapping out your runs, figuring out the slope, and getting your tools in order are the foundation for a smooth installation.
Choosing And Installing The Right Hangers
Hangers are the workhorses of your gutter system. They have to support the immense weight of rainwater during a heavy downpour, so this isn't the place to cut corners. Spacing them too far apart is a surefire way to end up with sagging, useless gutters. The rule of thumb is to place one hanger every 24 to 32 inches on center.
You'll mainly see two types of hangers:
- Hidden Hangers: These are my go-to. They clip neatly inside the gutter and screw directly to the fascia board, giving you a very clean, modern look. They're strong and the top choice for nearly all new jobs.
- Spike-and-Ferrule Hangers: You'll see this older style on many homes. It’s a long spike driven through the face of the gutter, through a metal tube (the ferrule), and into the fascia. They're strong initially but can work themselves loose over time.
For any DIY project, I’d stick with hidden hangers. You just clip them into the gutter at your marked intervals before lifting the whole section into place. It makes life much easier.
Pro Tip: Always start hanging your gutter at the high point (farthest from the downspout). Attach that first hanger, then work your way down toward the outlet, making sure you follow the chalk line you snapped for your slope. Having a friend to hold the other end of the gutter steady is practically essential here.
One quick safety note: if you’re working on an older house, be mindful of what you're drilling into. Some older building materials, like certain types of siding or roofing, can contain asbestos. Before you start disturbing old structures, it's smart to know what materials like corrugated roofing asbestos look like.
Securing The Gutter To The Fascia
With your hangers clipped in and your helper holding the section, it’s time to make it permanent. The goal is to drive the hanger screws through the fascia board and directly into the wooden rafter tails behind it. This creates a much stronger anchor than fastening to the fascia board alone.
Use a cordless drill to drive the screws, but don't go crazy and overtighten them. You want the hanger flush and snug against the fascia, but cranking down too hard can strip the screw hole or even warp the hanger.
Take your time on this final step. A securely mounted gutter with the right slope is what you're after. I like to double-check the slope with my level every few feet as I attach the hangers. Focus on these fundamentals—clean cuts, good seals, and secure hangers—and you’ll build a system that can handle whatever Mother Nature decides to throw at it.
Mastering Downspouts for Effective Water Management
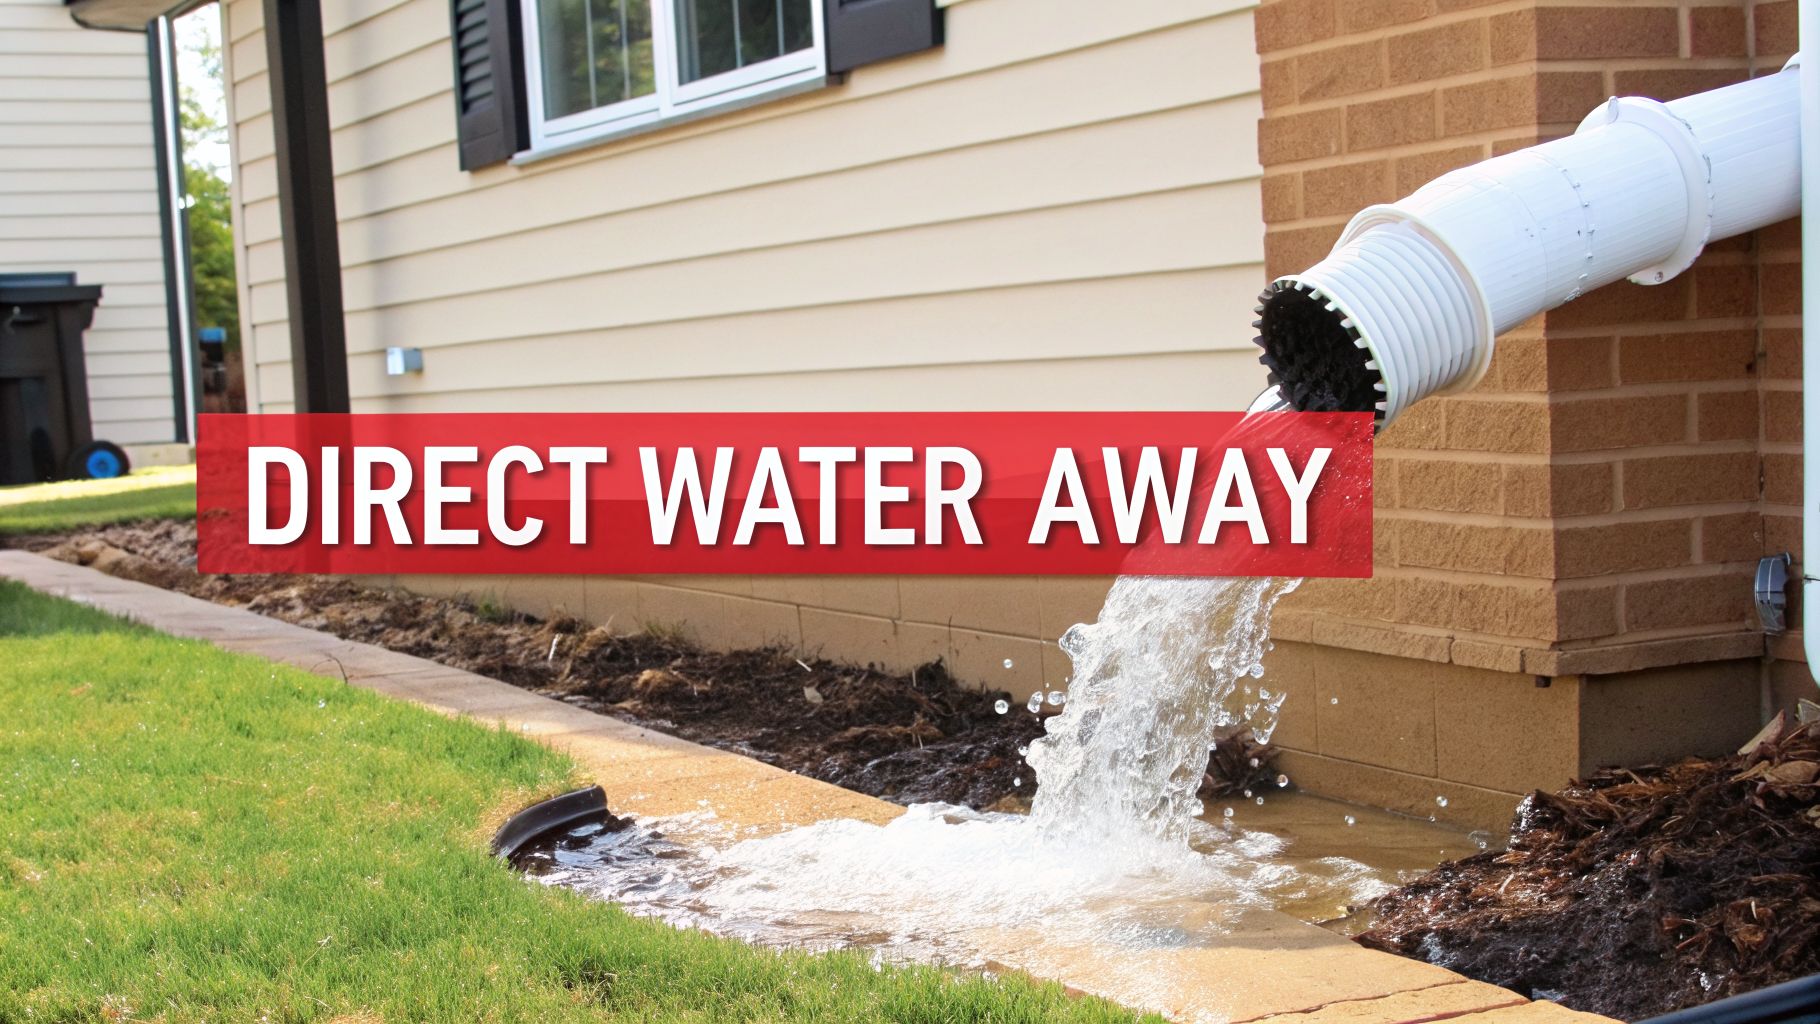
Think of your downspouts as the final, critical piece of the puzzle. You can hang a perfectly sloped gutter, but if that collected water has nowhere to go—or worse, dumps right next to your foundation—you've wasted your time. This is where we focus on getting that torrent of roof water managed and moved safely away.
The main job of a downspout is to get water far away from your home's foundation. A good rule of thumb, especially when you're dealing with the kind of heavy rain we see in Texas, is to plan for at least one downspout for every 30 to 40 feet of gutter. This simple guideline keeps any single section from being overwhelmed during a serious downpour.
Pinpointing Downspout Placement
Deciding where to put your downspouts is more strategic than you might think. You're looking for spots where you can easily route water away from sidewalks, patios, and most importantly, the foundation itself. The corners of a house are almost always the most natural and effective locations.
To start, you’ll use a hole saw to cut an opening in the bottom of the gutter where you want the downspout to go. After drilling the hole, run a thick bead of gutter sealant around the flange of the outlet, press it firmly into place from inside the gutter, and then pop in a few short screws to lock it down.
With the outlet set, you can start putting the downspout itself together. It’s really just a simple series of elbows and straight sections that fit together.
- An "A" style elbow makes the first turn, directing water from the outlet down toward the wall.
- A short straight piece connects to a "B" style elbow, which turns the flow back so it's running parallel with the wall.
- From there, the long downspout sections carry the water all the way to the ground.
These pieces are designed to slide right into one another. I always put a couple of short screws into each connection. It's a quick step that keeps everything from rattling or getting pulled apart during high winds.
A correctly installed downspout is the difference between a functional water management system and a decorative trough that dumps water right where it can do the most damage. Take your time to get the connections tight and the ground-level drainage right.
Securing Downspouts to the House
Once the downspout is assembled, you need to anchor it to the wall. A loose, flapping downspout looks terrible and is just asking to be ripped off in a storm. For this, you’ll use downspout straps.
Wrap one strap near the top of the downspout and another near the bottom. If you have a long run, especially on a two-story house, add a third strap in the middle for extra stability. Simply wrap the strap around the downspout and drive screws through its tabs into your home's siding.
Proper sizing is just as critical. While 5-inch gutters work for most homes, it's smart to upgrade to 6-inch gutters if you have a large or steep roof that has to handle Texas-sized deluges. Making the right choice here is key, especially when you consider that 15-20% of home insurance claims are directly tied to poor water drainage.
Managing Water at Ground Level
Getting the water to the ground is only half the job. Now you have to tell it where to go next. If you just let water pool up at the base of the downspout, you’re defeating the entire purpose of your gutter system.
Here are a few of the most common and effective ways to handle drainage at ground level:
- Splash Blocks: The simplest solution by far. A basic concrete or plastic block placed under the downspout elbow disperses the water flow and keeps it from eroding the soil right next to your foundation.
- Downspout Extensions: You can attach a flexible or rigid pipe to the end of your downspout to carry water several feet further out into your yard, away from the house.
- Underground Drains: For the cleanest look, you can run a solid PVC pipe underground. This can lead to a pop-up emitter out in the lawn or to another designated drainage area.
- French Drains: If you have serious standing water problems, a French drain is the heavy-duty solution. It’s a gravel-filled trench with a perforated pipe inside that can collect and redirect massive amounts of water.
To make sure your new downspouts work as part of a larger system, it helps to understand how smart drainage design protects property and the environment. Also, don’t forget to check your local building codes—some cities have specific rules about where you can direct stormwater runoff.
Final Details and When to Call in the Pros
Getting the gutters and downspouts hung is a huge milestone, but don't pack up the tools just yet. A few final details will elevate your installation from just "done" to done right, protecting your hard work for the long haul.
One of the smartest upgrades you can make, especially here in Texas, is adding gutter guards. We've all seen it—the yellow-green blanket of pollen, the constant shedding from live oaks, and the leaves that seem to appear out of nowhere. Gutters can get clogged in a hurry. Gutter guards are essentially screens or covers that let water in but keep all that debris out.
They won't make your gutters a "no-maintenance" system, but they come pretty close. You'll be swapping out a messy, time-consuming cleanout for a quick seasonal inspection.
Setting Up a Simple Maintenance Routine
A brand-new gutter system is a beautiful thing, but keeping it that way only takes a little bit of routine attention. For most homes in our area, a quick check-in twice a year is all it takes to keep things flowing smoothly.
- A Late Spring Check-Up: Once the pollen dust has settled and the trees are done dropping seeds, it’s the perfect time for a quick look. Your main goal is to clear out any of that fine, grainy debris that can slip through guards and make sure you have a clear path for the heavy summer rains.
- The Big Fall Cleanup: After the last of the autumn leaves have fallen, it's time for the most important inspection of the year. Getting all those leaves out prevents a heavy, water-logged mess from sitting in your gutters all winter, which is a leading cause of ice dams and costly damage.
On each inspection, keep an eye out for any sagging sections, hangers that have worked themselves loose, or drips at the seams. Spotting these little things early on saves you from having to fix much bigger problems down the road.
I always tell homeowners that spending 30 minutes twice a year looking over your gutters is one of the best investments you can make. It's so much easier to tighten a loose fastener than to replace a rotted fascia board or repair a cracked foundation.
If you want to dive deeper into what a thorough cleaning involves, our guide on professional gutter cleaning services has some great tips that are useful whether you do it yourself or bring someone in.
Knowing When to Hang It Up and Call a Professional
Tackling your own gutter installation is a fantastic way to save a significant amount of money—often hundreds, if not thousands, of dollars. It’s a truly rewarding project. But it's also important to be honest with yourself about the risks and your own comfort level. Sometimes, making the call to a pro isn't giving up; it's the smartest and safest move you can make.
Knowing your limits is just as crucial as knowing how to use a pair of snips. A few common factors can take a project from a straightforward DIY to a risky and complex job better left to an experienced crew.
Scenarios That Justify a Professional
| Situation | Why It's Best to Hire a Pro |
|---|---|
| Two-Story or Taller Homes | The risk of a serious fall multiplies with height. Professionals arrive with the right safety harnesses, leg levelers for their ladders, and the experience to work safely 20+ feet off the ground. |
| Complex Rooflines | If your roof has a lot of gables, steep pitches, or tricky inside and outside corners, the cuts have to be perfect. Experts have the skill to fabricate and seal these complex joints so they remain leak-proof for years. |
| Seamless Gutter Installation | For ultimate leak prevention, nothing beats seamless gutters. However, they can't be bought off the shelf. They are custom-extruded on-site from a roll-forming machine mounted on a truck—definitely not a DIY job. |
| Existing Wood Rot or Damage | If you pull off the old gutters and find that the fascia or soffit is soft and rotten, that damage has to be repaired first. A professional gutter contractor can handle the necessary carpentry and ensure the new gutters are mounted to a solid structure. |
If you're working on a single-story ranch with long, straight runs, a DIY installation is very achievable. But if your home fits any of the descriptions above, investing in a professional crew is money well spent. It guarantees the job is done safely and correctly, giving you peace of mind that your home is protected.
Your Gutter Installation Questions, Answered
Thinking about putting up new gutters? It’s a smart move for protecting your home, but it’s natural to have a few questions before you start. Whether you're planning to tackle it yourself or call in a pro, getting some clear answers on cost, sizing, and the work involved is the first step.
We hear the same questions from homeowners all the time. Let's walk through them so you can feel confident about your project.
How Much Should Gutter Installation Cost in Texas?
Honestly, the final price can swing quite a bit. It really boils down to the material you pick, how many feet of gutter you need, and who's doing the work. If you're handy and planning a DIY project on a standard, single-story home, you could be looking at a materials bill somewhere between $500 and $1,500 from your local hardware store.
But for most folks, hiring a professional is the way to go, especially for the seamless aluminum gutters that are so common around Dallas-Fort Worth. In that case, you'll usually pay by the foot. Expect a range of $7 to $12 per linear foot for a professional job. For a typical 2,000-square-foot house needing around 180 feet of gutters, that puts the total cost between $1,260 and $2,160.
Just a heads-up: things like tearing off old gutters, working on a second story, or navigating a tricky roofline will likely add to the final quote. Always make sure you get a detailed estimate upfront.
What Size Gutters Do I Actually Need?
For the vast majority of homes here in Texas, the standard 5-inch K-style gutters do the job just fine. They have plenty of capacity for average rainfall and are what you'll see on most houses. But as we all know, Texas weather isn't always "average."
You should seriously consider upgrading to 6-inch gutters if your house has:
- A really large roof that funnels a massive amount of water into one area.
- A steep pitch, which makes rainwater rush down like a waterfall.
- Lots of big, beautiful trees that are constantly dropping leaves.
Why the upgrade? A 6-inch gutter can handle almost 50% more water than a 5-inch one. That extra capacity is your best defense against the torrential downpours we get, preventing overflows that can wreak havoc on your foundation, siding, and landscaping.
Can I Just Install Gutters Myself?
You absolutely can, but with a few big "ifs." A DIY gutter project is totally doable if you're working on a simple, single-story house with a straight roofline. You'll need to be steady on a ladder, own the right tools, and be really precise when setting the slope and sealing the seams.
However, there are times when calling a licensed and insured pro is simply the smarter, safer bet. I’d strongly recommend hiring out the job for:
- Any house that's two stories or taller. The risk of a serious fall is just too high.
- Homes with complicated rooflines that have a lot of corners and angles.
- Any project involving seamless gutters, since they require a specialized roll-forming machine that only professionals have.
How Often Should I Clean My Gutters?
Around here, you should plan on cleaning your gutters at least twice a year. The ideal times are late spring, after all the oak tassels and spring pollen have dropped, and again in late fall, after the trees have shed most of their leaves for the winter.
If your house is tucked under big, mature trees, you’ll probably need to check them more often, especially right after a big storm blows through. And while gutter guards are a huge help in cutting down on clogs, they aren't a magic bullet. They still need a quick inspection every now and then to make sure they're clear and working as they should.
If you're looking at a complex job or just want the confidence that comes from a professional installation, the team at Hail King Professionals is ready to help. We specialize in gutter and downspout systems built to handle the demands of Texas weather. Reach out to us today for a free, no-obligation inspection and quote.