


How to Apply Roof Coating for Lasting Protection
If there's one thing I've learned over the years, it's this: trying to apply a roof coating without proper prep work is a recipe for disaster. It’s like painting a car without sanding it first—the new coat just won't stick.
Honestly, getting the surface ready is 90% of the job. Get this part right, and you're setting yourself up for a long-lasting, leak-free finish that will actually protect your home.
Mastering Roof Preparation for a Flawless Finish

Think of your roof as a canvas. You can't just slap a coating over dirt, damp spots, or damaged areas and expect it to work. Any coating applied to a dirty, compromised surface will start to peel, blister, or crack in no time, leaving you right back where you started.
The whole point of prep is to create a clean, dry, and solid surface for the coating to grab onto. This is your best defense against premature failure, especially with the brutal Texas sun and unpredictable storms we get.
The Initial Roof Inspection
Before you break out the power washer, get up on a ladder and take a good, hard look at your roof. You're hunting for any issue, big or small, that could undermine the coating later on.
Here’s what I always look for:
- Damaged Flashing: Check the metal strips around chimneys, vents, and skylights. Are they rusted, bent, or pulling away from the roof?
- Worn or Damaged Shingles: Look for any shingles that are cracked, curling up at the edges, blistering, or missing their protective granules.
- Open Seams and Laps: On flat or metal roofs, every seam needs to be watertight. Check for any that are separating or look weak.
- Ponding Water Areas: Notice any low spots where water sits after a rain? These areas are trouble and need special attention.
A solid inspection prevents you from just painting over a serious problem. For homeowners here in North Texas, a professional eye can be a huge help. It’s worth understanding what a comprehensive Dallas roof inspection covers so you don't miss anything critical.
To help you stay on track, follow this simple checklist. Taking the time to do this right ensures your roof is in the best possible shape before you apply a single drop of coating.
Essential Roof Preparation Checklist
Follow these steps to ensure your roof is perfectly prepared for a long-lasting coating application.
| Task | Objective | Pro Tip |
|---|---|---|
| Visual Inspection | Identify all existing damage, from cracked shingles to failing flashing. | Take photos of problem areas with your phone. This helps you track repairs and is useful for insurance purposes. |
| Thorough Cleaning | Remove all dirt, algae, moss, and loose debris that could prevent adhesion. | For stubborn stains, use a 50/50 mix of water and bleach in a garden sprayer, let it sit for 15-20 mins, then rinse. |
| Repair & Seal | Fix all identified issues like open seams, cracks, and loose hardware. | Use a sealant that’s specifically designed for your roof type (e.g., elastomeric for metal, asphaltic for shingles). |
| Ensure Dryness | Confirm the roof is 100% dry before applying primer or coating. | Wait at least 24-48 hours after cleaning or a heavy rain. Trapped moisture is the #1 cause of coating blisters. |
Walking through these steps methodically will save you headaches down the road and give your new coating the best possible chance to perform as it should.
Deep Cleaning Your Roof Surface
After your inspection, it’s time for a deep clean. Dirt, algae, and loose grime are the biggest enemies of good adhesion. How you clean really depends on what kind of roof you have.
An electric pressure washer can be a great tool, but be careful. If you have asphalt shingles, too much pressure will blast the protective granules right off, doing more harm than good.
For flat roofs, I usually find a stiff-bristled broom and a good biodegradable roof cleaner do the trick. You need to scrub away every bit of contamination to ensure the coating can form a solid, waterproof layer.
Making Essential Repairs
Now that the roof is clean, it's time to fix everything you found during the inspection. Don't rush this part. Use high-quality elastomeric sealants or roofing cement meant for your specific roof to patch cracks, seal seams, and lock down any loose flashing.
In storm-heavy areas like Dallas-Fort Worth and East Texas, a properly applied coating is a smart investment. When done right, a coating can add 10-15 years to the life of an asphalt shingle roof. The key is starting with a clean, dry surface; industry data shows that simply power washing properly can cut failure rates by 40%.
A coating can't fix a failing roof, but it can make a good roof even better. Never apply a coating as a 'band-aid' for significant structural problems or widespread leaks. Address the root cause first.
Choosing the Right Coating for Your Texas Roof
Picking a roof coating isn't as simple as grabbing a can of paint. The wrong choice for our intense Texas climate—from scorching summers to sudden hail—can lead to peeling, blistering, and a complete waste of money. The right one, however, can add years to your roof's life and put a real dent in your energy bills.
It all comes down to your specific roof and what you need the coating to do. A flat commercial roof in rainy East Texas has entirely different demands than a sloped shingle roof baking in the DFW sun. Let's break down how to make the right call.
Matching the Coating to Your Roof Material
Every roofing material has its own chemistry, and your coating needs to be compatible. Some coatings bond beautifully with metal but will fail spectacularly on asphalt. It pays to know the difference.
Here’s a look at the most common pairings we see in Texas:
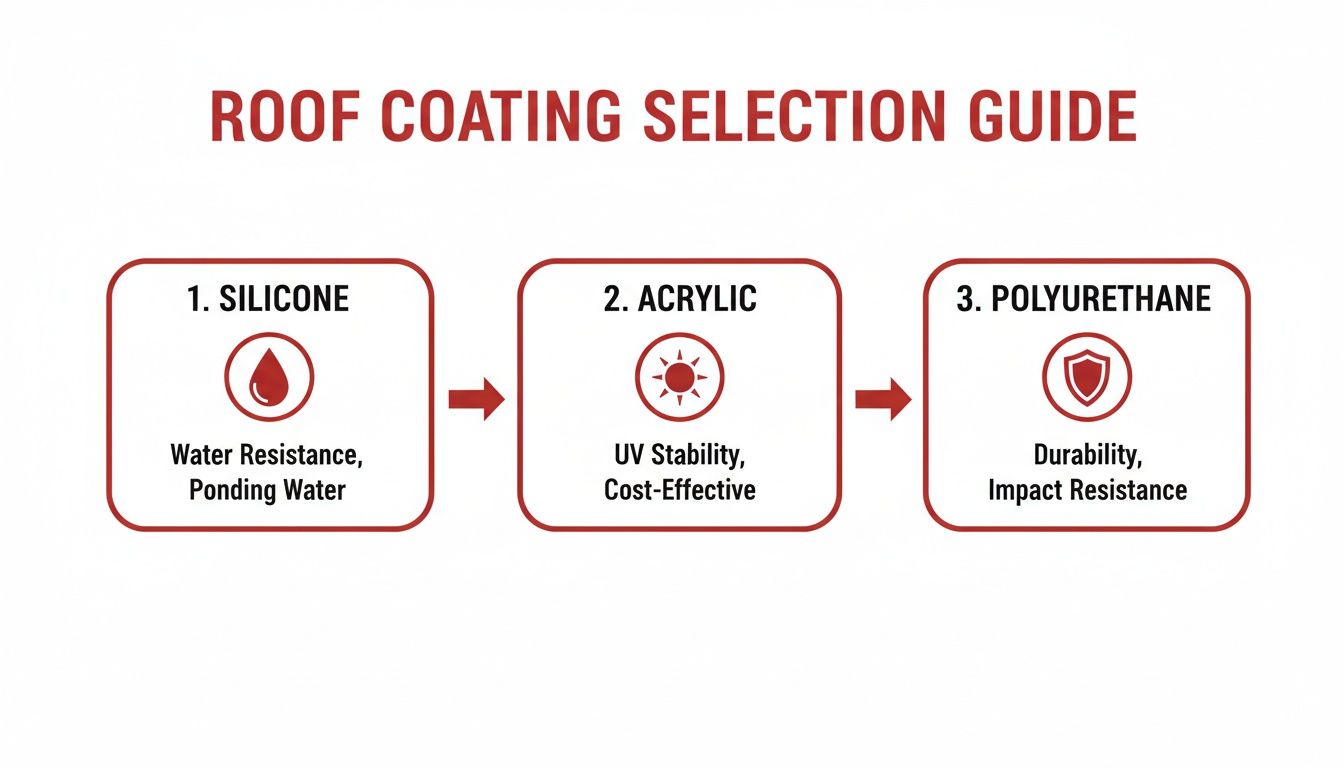
Acrylic Coatings: These water-based coatings are the workhorse for many sloped roofs, especially asphalt shingles and metal. Their high solar reflectivity, or albedo, makes them a fantastic "cool roof" solution. They bounce the sun's heat away from your building, keeping the inside cooler and your AC from working overtime. They’re also breathable and budget-friendly.
Silicone Coatings: Got a flat or low-slope roof? Is it prone to puddles after a heavy downpour? Silicone is your answer. Unlike acrylics that can soften with standing water, silicone is moisture-cured and creates a seamless, rubber-like membrane that laughs at ponding water.
Polyurethane (Urethane) Coatings: Think of these as the heavy-duty option. Urethane coatings deliver incredible durability and impact resistance. This makes them perfect for roofs with a lot of foot traffic or for areas where hail is a constant threat.
As you shop around, you'll see new advancements like durable and flexible elastomeric coatings that offer fantastic, long-lasting protection. It's always worth seeing what's new on the market.
Comparing Roof Coatings for Texas Climates
To simplify your decision, here’s a table that breaks down the best coating for your roof based on performance, cost, and how it holds up to Texas weather.
| Coating Type | Best For (Roof Type) | Key Benefit | Consideration |
|---|---|---|---|
| Acrylic | Sloped, Metal, Asphalt Shingles | Excellent UV reflection ("cool roof"), cost-effective | Can degrade with ponding water |
| Silicone | Flat, Low-Slope, Commercial Roofs | 100% waterproof, great for ponding water areas | Attracts dirt, can be slippery when wet |
| Urethane | High-Traffic, Hail-Prone Roofs | Superior durability and impact resistance | More expensive, requires professional application |
Choosing the right coating means balancing your roof's specific needs with the unique challenges of our climate. This table should give you a solid starting point for finding the perfect match.
Key Factors for Texas Climates
Beyond simple compatibility, you have to think about how a coating performs under pressure from Texas weather. Don't just look at the price tag.
A common mistake is choosing a coating based solely on price. The most expensive option isn't always the best, and the cheapest option will almost certainly cost you more in repairs and re-application down the road. Focus on performance for your specific roof.
For flat commercial roofs, a good urethane coating can prevent 90% of UV degradation, which can translate into saving $0.50 to $1.00 per square foot on cooling costs every year. In a state where hail damages one in five roofs annually, pairing impact-resistant Class 4 shingles with a tough coating can increase durability by 50%. We've seen this lead to insurance premium reductions of up to 30%. You can dig into these industry-backed performance metrics on IndustryArc.com if you want to see more of the data.
This is exactly why understanding the different roofing system types is the first, most critical step. You have to know what you're working with before you can protect it properly.
Applying Your Roof Coating Like a Professional
Alright, all the prep work—the cleaning, patching, and priming—is done. Now for the satisfying part: laying down the protective membrane that will guard your roof for years to come. This is where your patience and attention to detail really shine. A smooth, methodical application is the key to a seamless finish that not only stops leaks but looks fantastic.
First things first, you need to decide how you're going to get the coating from the bucket onto the roof. You've basically got two choices, and the right one really boils down to the size and complexity of your roof, your comfort with the equipment, and the coating you're using.
Choosing Your Application Method
You can either roll the coating on or spray it. Both methods work well when done right, but they're suited for different situations.
Rolling on the Coating
For most homeowners, a heavy-duty, ¾-inch nap roller is the way to go. It’s a straightforward approach that gives you total control over how much coating you're putting down. It’s perfect for smaller residential roofs or any roof with a lot of vents, skylights, and other obstacles to work around.
- The upside: It’s easy to get the hang of, lets you be precise, and cleanup is relatively simple.
- The downside: It’s definitely slower than spraying, can be a real workout on a large roof, and you can end up with "lap marks" if you aren't careful to keep a wet edge.
Using an Airless Sprayer
If you're tackling a massive, wide-open surface like a commercial flat roof, an airless sprayer is what the pros use. It lays down a flawless, even coat incredibly fast. The catch? It has a pretty steep learning curve and requires a ton of prep and a meticulous cleaning process afterward.
- The upside: It's blazing fast and delivers a beautiful, factory-like finish.
- The downside: The equipment is expensive to rent, there's a real risk of overspray getting everywhere, and it takes skill to operate correctly.
Bottom line: For the vast majority of residential projects, especially on shingle or smaller metal roofs, a roller is the much more practical and forgiving choice.
The Art of the Application Process
Putting on a roof coating isn’t like slapping paint on a wall. You're not just aiming for color; you're building a protective membrane to a very specific thickness. We measure this in dry film thickness (DFT), and it's this thickness that provides the real waterproofing and reflective muscle.
Every manufacturer will specify a target DFT, usually somewhere between 15 and 30 mils (a mil is just one-thousandth of an inch). A classic rookie mistake is trying to get there in one super-thick coat. That's a recipe for disaster—it can lead to cracking, prevent the coating from curing properly, and cause it to fail way too soon.
The professional standard is to apply two or more thin, even coats. This approach allows each layer to cure fully, building a stronger, more flexible membrane that can handle your roof's natural expansion and contraction without breaking down.
Think of it like putting on sunscreen. You get far better coverage and protection from two thin layers than one thick, goopy one. You’re building a consistent, bulletproof barrier.
Techniques for a Seamless Finish
To avoid those dreaded weak spots or visible lines, the pros rely on a few key techniques. Getting these down will take your project from a simple DIY job to something you can be truly proud of.
- Cut In First: Just like you would when painting a room, use a brush to "cut in" around the roof's perimeter and any penetrations like vents, pipes, and flashing. This is a critical step to ensure these vulnerable transition points are completely sealed.
- Maintain a Wet Edge: As you roll out the coating, always overlap your last pass by about 50% while it's still wet. This prevents those ugly lap marks and creates a truly continuous membrane with no seams for water to exploit.
- Feather Your Edges: When you get to the end of a section or have to stop for a break, use your roller to lightly "feather" the edge of the coating. This creates a fine, tapered transition that will blend in perfectly when you start the next section or apply your second coat.
This infographic gives a great overview of the main coating types, helping you see which material is the right fit for your roof—from silicone's incredible water resistance to acrylic's sun-blocking power.
As you can see, each coating is engineered to solve a different problem, so you can pick the one that gives you the best long-term protection for your specific situation.
A properly applied "cool roof" coating can make a huge difference in your energy bills. For instance, water-based acrylics, which boast an 85% reflectivity, should be applied at 15-25 mils DFT over several passes. Studies have shown these coatings can lower a roof's surface temperature by a staggering 50-60°F. Here in Texas, that translates to a 20-30% reduction in air conditioning costs.
On metal roofs, silicone coatings are a game-changer, resisting ponding water three times better than other types and preventing 70% of corrosion, which can easily double the roof's lifespan. You can dig into more of these industry trends and statistics on Global Banking & Finance Review.
Post-Application Curing and Inspection
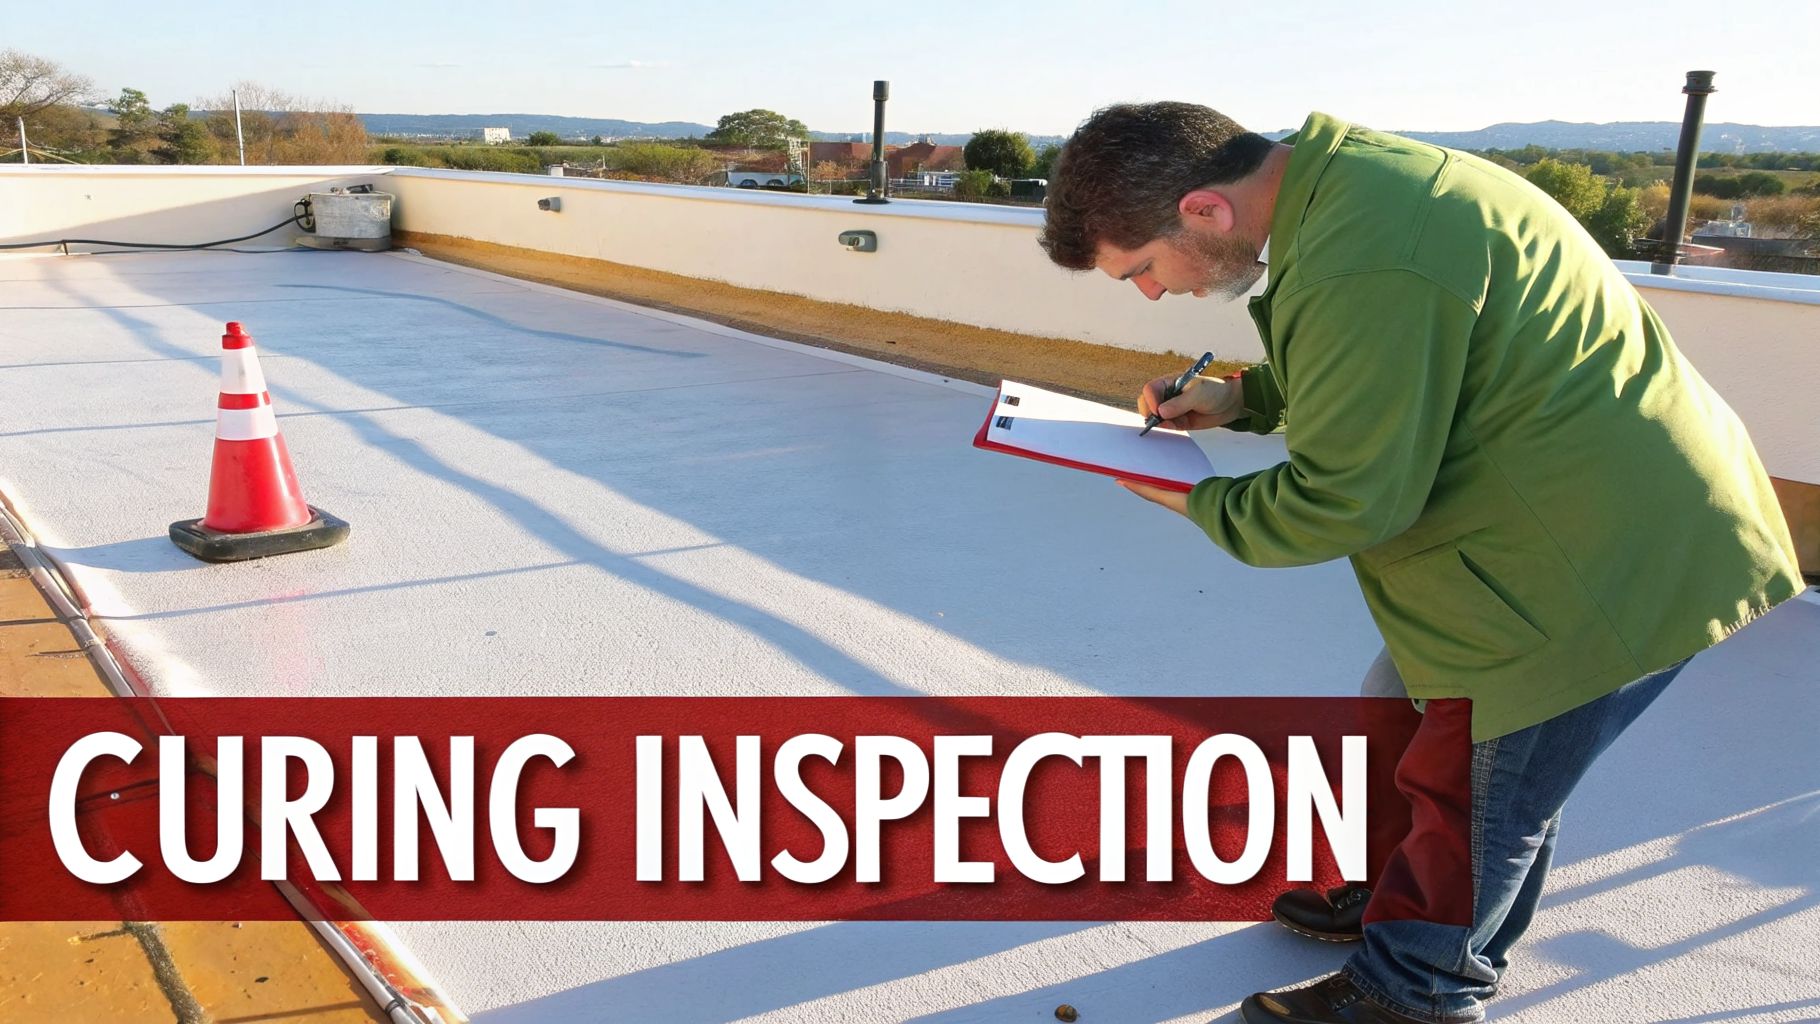
You’ve rolled on the final coat, the roof looks great, and it’s tempting to call it a day. But hold on—the next few days are just as critical as your prep work. This is the period where the coating transforms from a liquid into the tough, seamless membrane that’s going to protect your property.
Here's where a lot of people make a costly mistake: they assume that "dry to the touch" means "ready." It doesn't. You have to understand the difference between drying and curing.
Understanding the Curing Process
Drying is just the first step; it's when the water or solvent in the coating evaporates. This can happen in just a few hours, leaving the surface feeling tack-free. Curing, however, is a much deeper chemical process. This is when the polymer chains inside the coating cross-link and bond, creating the durable, flexible, and waterproof layer you're paying for.
Think of it like concrete. You can walk on a new slab in a day, but it takes almost a month for it to reach its full strength. A roof coating is the same idea. A full cure can take anywhere from 24 hours to over a week.
Several things will speed up or slow down that timeline:
- Temperature: Warm, sunny weather is your best friend here. It accelerates the chemical reaction.
- Humidity: This is a big one for us in East Texas. High humidity can dramatically slow down the curing time, especially for water-based acrylics.
- Coating Thickness: Thicker coats take way longer to cure all the way through. It's a key reason why applying multiple thin, even coats is always the right way to do it.
- Airflow: A little breeze helps, but you don't want strong winds kicking up dust and leaves that will get permanently stuck in your new roof.
During this crucial curing window, the roof is extremely vulnerable. Keep all foot traffic off—no exceptions. One misplaced boot can create a weak spot or even puncture the membrane before it has a chance to fully harden. And keep a close eye on the weather; you absolutely cannot have rain for at least 24-48 hours after application.
The most important thing you can do after applying a coating is to be patient. Protecting that fresh surface from foot traffic and rain while it cures is non-negotiable. It's what ensures the coating forms the seamless, waterproof barrier you worked so hard to create.
Conducting a Post-Application Inspection
Once the manufacturer’s recommended cure time has passed, it’s time to put on your sunglasses (that new white roof will be bright!) and do a final quality check. Walk the entire roof methodically, looking for any small imperfections that could turn into big problems later.
Here’s what you should be looking for on your final walkthrough:
- Pinholes or Blisters: These are tiny holes or bubbles that often show up when moisture gets trapped underneath or the coating was applied in direct, scorching heat.
- Uneven Coverage: Scan for any spots that look thin or where you can almost see the old roof surface showing through.
- Poor Adhesion: Find an out-of-the-way spot near an edge and gently try to lift the coating with your fingernail. It should be bonded tight. If it peels up easily, your surface prep probably wasn't good enough.
- Embedded Debris: Look for any leaves, twigs, or other gunk that might have blown onto the roof and got stuck while it was tacky.
If you find a minor issue, like a single pinhole or a small thin patch, you can usually fix it with a quick touch-up from your leftover material. But if you see widespread blistering or areas where the coating is peeling, it's time to call a professional. A thorough final inspection is your best guarantee that the job was done right and your investment is ready to handle whatever the Texas weather throws at it.
Common Mistakes to Avoid and When to Call an Expert
Even if you've done everything by the book, a few common slip-ups can completely undo all your hard work. Knowing what these pitfalls are—and more importantly, knowing when a project is just too big to handle—is every bit as crucial as the application process itself.
One of the most frequent mistakes we see, especially out here in Texas, is simply working at the wrong time of day. Trying to lay down a coating under the blazing midday sun is a surefire way to ruin the job. That intense heat makes the solvents evaporate way too fast, leading to a weak bond and ugly surface blisters.
On the flip side, starting too late in the afternoon means the coating gets hit with evening dew before it has a chance to properly set. This traps moisture right where you don't want it and messes with the curing process. Always stick to the manufacturer's sweet spot, which is usually between 50°F and 90°F.
The Most Costly DIY Application Errors
Timing is huge, but a few other application mistakes are behind nearly every failed DIY roof coating project. Getting these right from the start will save you a ton of money and headaches down the road.
1. Skimping on Surface Prep
I know we’ve already talked about prep, but it's worth saying again: this is not the place to cut corners. Applying a fresh coating over a dusty, grimy, or algae-covered roof is like trying to put a sticker on a sandy beach ball. It’s just not going to stick. When you skip proper cleaning, you’re pretty much guaranteeing widespread peeling and delamination within the first year.
2. Applying the Coating Too Thinly
It’s really tempting to stretch that five-gallon bucket to cover as much ground as possible, but this is a critical mistake. A coating’s ability to waterproof and reflect heat is entirely dependent on hitting the right dry film thickness (DFT). If you go too thin, you get almost no real protection, and it won't be able to seal up the small cracks that let water in.
3. Ignoring Seams and Penetrations
Leaks almost never start in the middle of a wide-open roof. They start at the weak points—the seams, the flashing around your chimney, the vents, and the skylights. If you don't reinforce these vulnerable spots with roofing fabric and extra sealant before you apply the main coating, you’re practically inviting water to find a way in.
Recognizing When to Call a Professional
There's nothing wrong with a little DIY spirit, but some jobs are just better, safer, and ultimately cheaper when left to a licensed contractor. Being honest about your own limits is the smartest thing a homeowner can do.
A coating is meant to preserve and protect a roof that's still in decent shape, not bring a dead one back to life. If you're looking at widespread structural damage, soggy insulation, or a roof that's clearly past its prime, a coating is just a band-aid on a much bigger problem. It won't work, and you'll end up spending more in the long run.
Here are some clear signs that it’s time to hang up the roller and call a pro:
- A Very Steep Roof Pitch: Safety first, always. If the slope of your roof is steep enough to make you uncomfortable, it's too steep for a DIY job. Professionals have the safety harnesses, training, and specialized equipment to work on high pitches without taking unnecessary risks.
- Extensive Damage: During your inspection, did you find a lot of rot, soft spots in the roof deck, or large areas that feel mushy from saturated insulation? These are major structural issues, not cosmetic ones, and a coating can't fix them.
- Complex Roof Layouts: A roof with a bunch of gables, valleys, dormers, and vents makes the job exponentially harder. Every one of those transitions is a potential failure point that a professional knows how to seal correctly.
Bringing in a contractor gives you more than just their expertise; it gives you peace of mind. A licensed professional gets the job done to code, uses commercial-grade materials you can't get at a big-box store, and provides a warranty on their work. They can also be a huge help in navigating insurance claims if the work is tied to storm damage. If you have a larger commercial or residential low-slope roof, you might find our guide on what to look for when hiring a flat roof coating service near you helpful.
Here in Texas, where 25% of property claims are related to storm water getting in, a professionally applied coating can cut the need for future repairs by up to 60%. The right polyurethane or acrylic system, sprayed to the correct 30-50 mils of thickness with proper seam treatment, creates a 99% waterproof membrane that can save you $2 to $5 per square foot over a decade compared to a full replacement. You can find more details about these protective coating statistics on intelmarketresearch.com.
Frequently Asked Questions About Roof Coating
Even after walking through the whole process, you probably still have a few questions. That's completely normal. Let's tackle some of the most common ones I hear from homeowners around DFW and East Texas.
How Much Does Roof Coating Cost?
That's the big question, isn't it? The honest answer is: it depends. Generally, you can expect to pay somewhere between $1.50 and $5.00 per square foot for a professional installation.
What causes that big price range? It usually comes down to three things:
- Roof Condition: A roof that needs a ton of cleaning, patching, or rust removal before we can even start is going to have higher labor costs. Prep work is everything.
- Coating Type: A high-end silicone or polyurethane coating designed for maximum durability will cost more upfront than a standard acrylic.
- Roof Complexity: A simple, low-slope commercial roof is a lot faster (and therefore cheaper) to coat than a steep residential roof with a bunch of dormers, vents, and tricky angles.
Think of it as an investment. You're spending some money now to push a full, multi-thousand-dollar roof replacement way down the road, all while getting some energy savings in the meantime.
How Long Does a Roof Coating Last?
When it's done right, a quality roof coating can give your existing roof another 10 to 20 years of life. The final number really hinges on the product we use, how thick we apply it, and the weather it has to endure.
Here in Texas, the sun is relentless. That intense UV exposure means a thicker, highly reflective coating is going to outlast a thin, budget-friendly one every time. A little maintenance, like a simple wash-down every few years to keep it clean, will go a long way in getting the most out of your investment.
What Is the Best Weather for Application?
This is critical. You need the weather on your side for the coating to cure properly. We're always looking for a clear forecast with Goldilocks conditions—not too hot, not too cold, and definitely not wet.
The perfect window for applying a roof coating is a string of warm, dry, sunny days. Your sweet spot is a temperature between 50°F and 90°F, with zero chance of rain for at least 24-48 hours after the final coat goes down.
If you try to apply it in the scorching midday sun, it can flash-dry and blister. On the flip side, high humidity or applying it too late in the evening can trap dew or moisture underneath, which messes up the curing process. Always, always check the forecast before you pop the first bucket.
Can You Put a Coating Over Existing Shingles?
I get this question all the time, but the answer is a hard no. Major industry groups, including the Asphalt Roofing Manufacturers Association (ARMA), strongly advise against it, and for good reason.
Shingle roofs are designed to breathe and shed water in a specific way. Slapping a coating over them traps moisture, which can rot the deck and cook the shingles from the inside out. It often causes them to curl and fail even faster. Coatings are fantastic for flat/low-slope roofs and metal, but they just aren't meant for shingles. With a shingle roof, your best bet is always proper maintenance and replacement when it's time.
If you're not sure if your roof is a good candidate for a coating, or if you're dealing with storm damage, the smartest first step is to get a professional opinion. The team at Hail King Professionals offers free, no-obligation inspections across Dallas-Fort Worth and East Texas. We’ll give you a straight, honest assessment of your roof's condition and help you figure out the most cost-effective way to protect your home.
You can learn more and schedule your inspection on our website.