


What Is Flashing on a Roof? A Complete Homeowner’s Guide
A lot of homeowners start asking what is flashing on a roof only after something goes wrong. You notice a stain near the ceiling corner. Maybe it shows up after a hard Texas storm. Maybe it’s a drip around the fireplace, a bubble in the paint, or a damp spot near a vent stack in the attic.
That moment feels bigger than the stain itself. You’re not just wondering where the water came from. You’re wondering what else got wet, how expensive the fix will be, and whether your roof is failing in a place you can’t even see.
Most of the time, the problem isn’t the big field of shingles. It’s the joints, edges, and penetrations. Those small transition points do the hardest waterproofing work on the whole roof. That’s where roof flashing comes in.
That Mysterious Stain The Unsung Hero of Your Roof
A homeowner sees a brown ring spread across the ceiling after a night of wind-driven rain. The shingles still look fine from the driveway. Nothing seems missing. The gutters are attached. So where did the water get in?
Usually, water doesn’t need a giant opening. It needs a seam. A corner. A pipe penetration. A place where one material meets another and the roof system changes direction. Those are the exact places flashing is supposed to protect.

That’s why flashing feels invisible until it fails. You don’t admire it the way you notice new shingles or fresh gutters. But it’s doing some of the most important work on the house, steering water away from vulnerable roof details before moisture reaches your decking, framing, insulation, or drywall.
Why homeowners miss it
Flashing is easy to overlook for three reasons:
- It hides in plain sight. Most flashing sits tucked under shingles, against siding, around pipes, or behind chimney masonry.
- It doesn’t fail dramatically at first. A loose edge or rusting corner can leak slowly for a while before you see interior damage.
- People confuse it with sealant. Homeowners often assume a bead of caulk is the waterproofing. In a proper roof system, sealant helps. Flashing handles the primary water-directing.
A good way to think about it is this. Your shingles shed most of the rain. Your flashing protects the weak spots where shingles alone can’t do the job.
When a ceiling stain appears, the visible damage is inside. The cause is often outside at a transition point the homeowner rarely notices.
If you understand flashing, you understand where roofs are most likely to leak. That makes you much better at spotting trouble early and asking sharper questions when a roofer inspects your home.
What Roof Flashing Actually Does
Roof flashing is the material that protects the joints, corners, and openings on a roof where water is most likely to get in. It is usually metal, and it is installed where roof surfaces meet walls, where pipes or vents pass through the roof, where chimneys interrupt the shingle pattern, and where roof lines channel a lot of runoff into one area.
A simple way to understand it is to compare your roof to a raincoat. The fabric sheds most of the water, but the seams, cuffs, zipper, and hood connection decide whether you stay dry. On a house, shingles handle the broad surface. Flashing protects the seams.
That job sounds small. It is not.
Why shingles cannot do this work alone
Shingles do a good job on wide, open roof slopes because they overlap in rows and let gravity carry water downward. Trouble starts where the roof changes shape or gets interrupted. A chimney creates edges. A wall creates a joint. A plumbing vent creates a round opening in a system made mostly of flat layers. Those are weak spots by design, and they need their own water-control details.
Flashing solves that problem by catching water and directing it back onto the roof surface so it can drain away safely.
- At walls, flashing keeps water from slipping behind siding or trim.
- At chimneys, it closes the gap between masonry and roofing materials.
- At valleys, it helps handle the concentrated flow where two roof slopes meet.
- At vent pipes, it seals around a shape shingles cannot protect on their own.
The main point is simple. Flashing is not there to decorate the roof or cover a gap. It gives water a controlled path to follow.
Practical rule: Sealant helps, but shaped flashing should do the primary work. If a repair depends mostly on caulk, the detail may be temporary or incomplete.
Flashing manages water by layering it
A lot of homeowners hear the word "waterproofing" and picture plugging a hole. Roof systems work a little differently. Good flashing is installed in layers so water lands on top of the next lower piece and keeps moving downhill. Roofers often call this lapping or shingling.
That sequence matters because rain does not always fall straight down in Texas. Wind-driven storms can force water sideways. Hail can dent exposed metal or loosen a flashing edge just enough to create an entry point. Long stretches of heat can age sealants faster than many homeowners expect. Around rooftop solar panels, flashing details become even more important because every mounting point creates another place where water has to be directed correctly.
In other words, flashing has to keep working during calm showers, hard hail, and storm seasons that test every transition on the roof.
Why this matters so much in Texas
Texas homes often face a rough combination of heat, sudden downpours, hail, and insurance questions after a storm. Flashing damage can be easy to miss from the ground, especially if the shingles still look fairly normal. A bent valley metal, lifted pipe boot, or loosened wall flashing may not draw attention right away, but those smaller failures can lead to stained ceilings, damaged decking, wet insulation, and repair disputes later.
That is also why flashing deserves attention during a storm inspection. Homeowners often focus on missing shingles because the damage is easier to recognize. Insurance adjusters and roofers should also look closely at metal details, penetrations, and transitions, particularly on homes with chimneys, skylights, or solar arrays.
Where code fits in
Flashing is part of a proper roof assembly, not an optional add-on. The 2018 International Residential Code, Section R903.2, requires flashing at roof and wall intersections, changes in roof direction, and other areas where water could enter if the transition is not protected correctly. The code also requires kickout flashing at eave-to-wall intersections because those spots can send water into siding and wall cavities if runoff is not pushed away.
If you remember one thing, remember this. Flashing protects the parts of a roof that are hardest for shingles to protect on their own.
A Visual Guide to Common Flashing Types
A roof rarely leaks in the middle of a wide, open shingle field. Trouble usually starts at the joints, corners, and cut-ins. Those are the places where water gets a chance to slow down, turn, or slip underneath. Flashing is the shaped material that closes those weak points.
If shingles are the outer skin of the roof, flashing works like the raincoat over the seams.
For Texas homeowners, that matters more than many people realize. Hail can dent metal without tearing a shingle. Fast wind-driven rain can exploit a tiny gap around a chimney or vent. Solar panel mounts add even more penetrations and transitions that need careful flashing, both to keep water out and to avoid claim disputes after a storm.
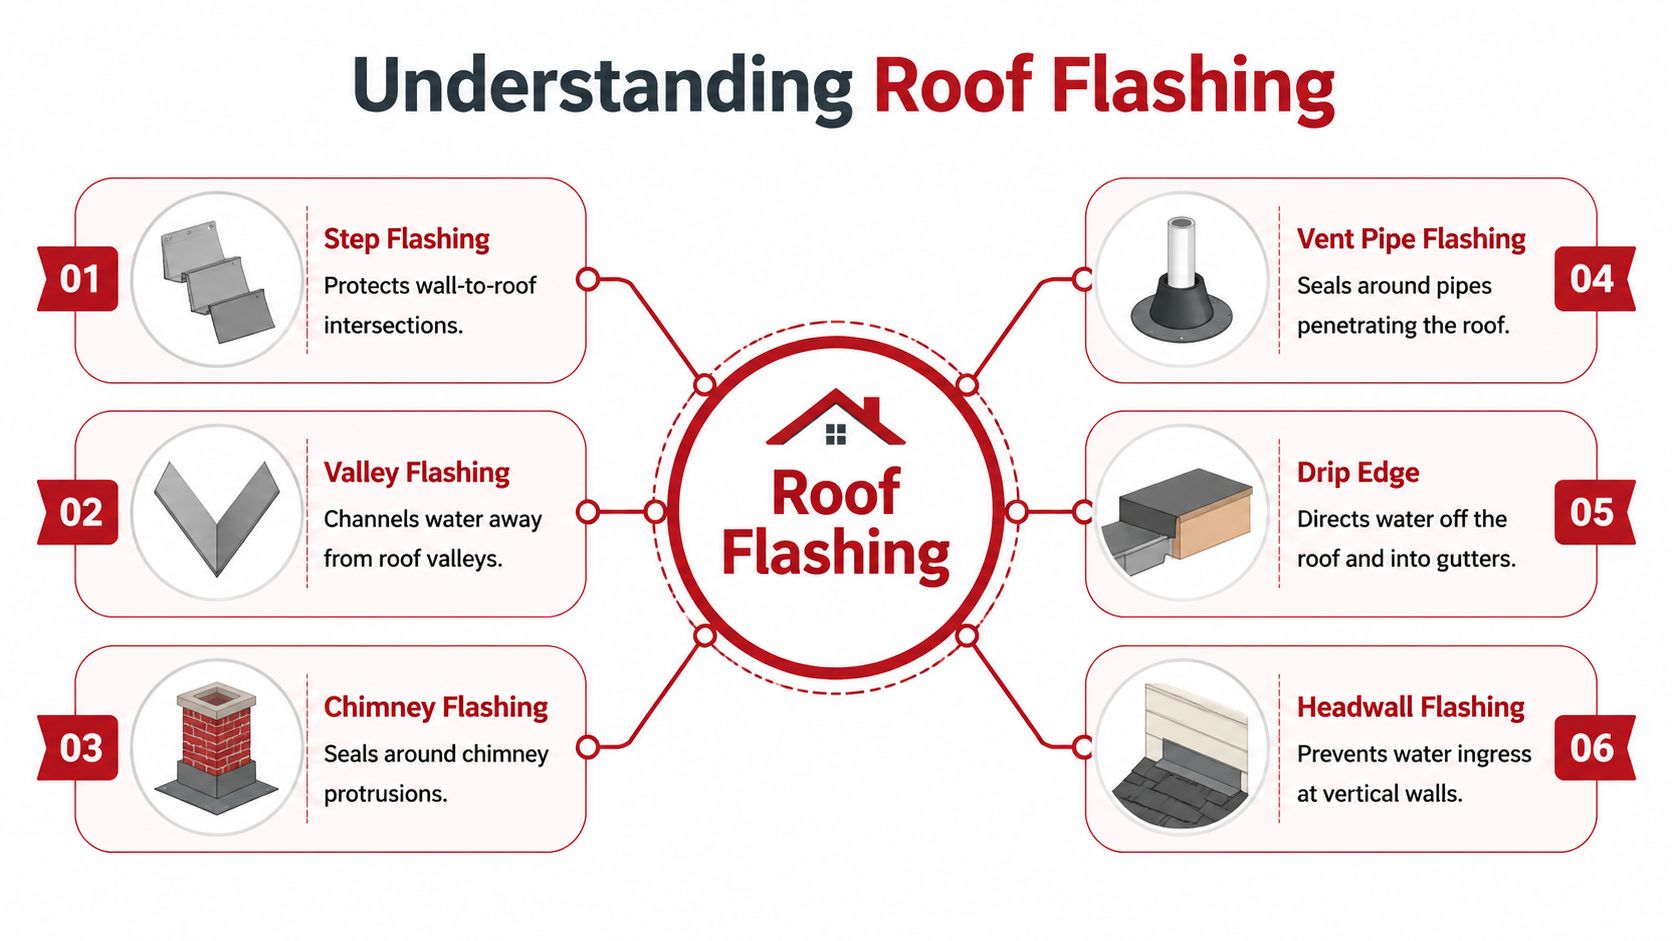
Step flashing
Step flashing protects the side of a roof where it meets a wall, such as a dormer wall or the side of a chimney. Roofers install it as a series of small bent pieces, one piece per shingle course, so water is directed back onto the roof surface as it moves downward.
That piece-by-piece layering is the whole point. A long continuous strip in the wrong spot can let water run behind the shingles and into the wall. Proper step flashing breaks that path and redirects runoff outward, one course at a time.
Water follows gravity, but it also follows openings. Step flashing closes those openings in stages.
Counter flashing
Counter flashing covers the top edge of base or step flashing, especially around chimneys and masonry walls. On brick chimneys, it is typically cut or set into the mortar joint so water cannot slip behind the lower flashing pieces.
A chimney uses several overlapping parts, not one single strip. That is why chimney leaks are so often misunderstood by homeowners and sometimes missed during quick storm inspections. The National Roofing Contractors Association’s chimney and wall flashing guidance explains this layered approach clearly.
If your home has a chimney, ask whether the flashing was rebuilt as a system or just patched with sealant.
Valley flashing
A roof valley is the channel where two roof slopes meet. During a Texas downpour, that channel can carry a surprising amount of water in a short time, along with grit, leaves, and hail impact.
Valley flashing lines or protects that water path. On some roofs, you can see exposed metal in the valley. On others, the metal is buried under the roofing material. Either design can work if it is installed correctly, but valleys need close attention after storms because they collect runoff from two roof planes at once.
If a valley is bent by hail, clogged with debris, or installed with poor overlaps, water can push sideways under the roofing instead of continuing downslope.
Drip edge flashing
Drip edge sits along the roof perimeter at the eaves and rakes. Its job is simple. It pushes water off the roof edge cleanly so moisture does not curl backward toward the fascia or roof decking.
That sounds small, but edge details affect a lot. Gutters work better when runoff drops where it should. Wood trim stays drier. The edge of the roof system, including the roof underlayment beneath the shingles, gets better protection from wind-driven rain.
Pipe boot or vent pipe flashing
Every plumbing vent or round pipe sticking through the roof needs its own flashing assembly. A pipe boot combines a flat base that tucks into the roofing with a fitted collar that seals around the pipe.
This is one of the most common leak points on aging roofs because the collar, often rubber or a similar flexible material, sits in direct sun year after year. In Texas heat, that material can dry out, split, or pull away from the pipe. A small crack here can lead to a ceiling stain several feet away because water often travels along the roof deck before it drips inside.
Kickout flashing
Kickout flashing belongs where a roof edge meets a sidewall near the gutter. Its job is to divert water away from the wall and into the gutter instead of letting runoff stream behind the siding.
This detail is easy to overlook from the ground and easy to miss during rushed repairs. Yet it can prevent expensive wall damage. On Texas homes with hard rain and wind from changing directions, missing kickout flashing can soak sheathing, trim, and framing long before interior damage becomes obvious.
Headwall and apron flashing
When a sloped roof runs straight into a vertical wall, roofers use headwall flashing, often called apron flashing, across that front-facing joint. It sheds water back over the shingles below.
Homeowners often confuse this with step flashing because both involve a roof meeting a wall. The difference is location. Step flashing handles the side intersection. Headwall or apron flashing handles the front where the roof stops at the wall.
A quick way to identify flashing on your own home
Stand back and scan the roof like water would.
- Where the roof meets a wall on the side: step flashing
- Where the roof runs into a wall head-on: headwall or apron flashing
- Where two roof slopes form a trough: valley flashing
- Where a pipe or vent sticks through: pipe boot or penetration flashing
- Where the roof edge ends beside siding and a gutter: kickout flashing
- Along the roof edges: drip edge
Once you know these names, storm damage gets easier to discuss with a roofer or insurance adjuster. You can describe a dented valley, a cracked pipe boot, loose chimney counter flashing, or flashing disturbed around solar attachments with far more clarity, which often leads to a more accurate inspection.
Choosing Materials for Durability in Texas Weather
A flashing detail can be shaped correctly and still fail early if the metal is a poor match for Texas weather.
That catches homeowners off guard. The piece looks small, so it is easy to assume one metal is about the same as another. On a Texas roof, that shortcut can get expensive. Flashing sits in the path of punishing sun, fast temperature swings, wind-driven rain, and in many neighborhoods, hail strikes that can bend or loosen thinner materials.
Flashing works like a raincoat for your roof’s seams. The coat still has to fit the climate. A light jacket may be fine in a mild region, but a Texas roof often needs something tougher at exposed edges, chimneys, valleys, and around solar attachments.
Common materials homeowners will hear about
Most residential flashing is made from aluminum, galvanized steel, stainless steel, or copper. Roofers also use pipe boots and other penetration flashings that combine metal with rubber or synthetic components.
The practical differences come down to four things: how easily the material can be formed, how well it resists corrosion, how it handles impact, and how long it is likely to stay watertight in its specific location.
| Material | Typical Lifespan | Relative Cost | Pros | Cons |
|---|---|---|---|---|
| Aluminum | Commonly used for long service life in the right application | Lower to moderate | Lightweight, rust-resistant, easy to form | Can dent more easily and may not be the best choice in high-impact areas |
| Galvanized steel | Often durable for many years when coating and installation remain intact | Moderate | Strong, rigid, widely used on residential roofs | Protective coating can wear down, especially in harsh exposure |
| Stainless steel | Known for very long service life and strong corrosion resistance | Higher | Strong, durable, resists rust well | Higher upfront cost and harder to form than softer metals |
| Copper | Often chosen for long-term performance and appearance | Higher | Durable, corrosion-resistant, premium look | Expensive and not always necessary for every roof or budget |
What makes sense in Texas
Texas homeowners should ask a more useful question than “Which flashing is best?” Ask, “Which material makes sense in this exact spot on my roof?”
A sheltered wall intersection may perform well with a different metal than a chimney that takes direct weather on every storm. A simple vent pipe may need something different from flashing around a solar mounting point, where extra penetrations and foot traffic can add stress. On hail-prone roofs, impact resistance matters just as much as corrosion resistance.
Mixed metals also deserve attention. If one metal reacts poorly with another nearby material, corrosion can start sooner than expected. That is one reason experienced roofers look at the whole assembly, not just the flashing piece by itself.
For many Texas homes, the smartest approach is selective durability. Put stronger, longer-lasting materials in the places that fail first or cost the most to repair if they leak. Valleys, chimneys, wall intersections, skylights, and rooftop solar penetrations usually deserve that extra thought.
Insurance can also affect the decision. After a hail claim, homeowners sometimes focus on shingles and overlook dented or displaced flashing. Adjusters may overlook it too unless the damage is documented clearly. If flashing around a chimney, valley, or solar attachment was compromised in the storm, the replacement material should match the exposure and the repair scope, not just the lowest line-item cost.
If you want to see how flashing works with the water-shedding layers below it, this guide on what roof underlayment does helps connect the pieces. Underlayment backs up the field of the roof. Flashing protects the joints and transitions where leaks often begin.
How to Spot Flashing Failure Before It Causes Damage
A good roof inspection starts with simple questions, not special tools. What changed since the last storm? Does any metal look bent, lifted, rusted, or out of place? Did a stain appear after wind-driven rain but not after a calm shower?
Those clues matter because flashing failures often start small.
Look for movement, not just holes
Homeowners often expect damage to look dramatic. Sometimes it does. But many flashing problems are about separation and movement.
Check these areas from the ground with binoculars or from a safe vantage point:
- Lifted edges that no longer sit flat against the roof or wall
- Bent metal after hail or wind impact
- Gaps at joints where overlapping pieces should stay tight
- Loose counter flashing at chimneys or masonry
When flashing shifts, water gets a path. It may not pour in immediately. It may only leak under certain wind directions or after hours of steady rain.
Watch for rust, cracking, and failed sealant
Metal tells you a lot if you know what to watch for. Rust streaks suggest the protective finish has broken down. Cracks or splits mean the piece itself may no longer carry water where it should. Dried, shrinking, or peeling sealant usually means the detail is aging and needs review.
Step flashing is a good example of why this matters. According to MetalFormers’ guide to flashing types and techniques, step flashing pieces are typically 24-gauge metal and, when installed sequentially, can reduce wall-wicking risk by 85% compared with improper terminations. If that sequence is interrupted by damage or poor repair, water can start working into fascia and wall areas.
Inspection shortcut: Don’t only scan the middle of the roof. Spend extra attention on chimneys, sidewalls, valleys, vent pipes, skylights, and roof edges.
Exterior signs and interior clues
Some warning signs show up outside first. Others appear indoors.
Outside, pay attention to:
- Discoloration below roof-to-wall areas that suggests repeated runoff where it shouldn’t be
- Siding or trim deterioration near an eave-wall intersection
- Debris-packed valleys that slow drainage
- Pipe boots that look brittle or distorted
Inside the home, the clues are different:
- Ceiling stains near fireplaces, bathroom vents, or exterior walls
- Peeling paint near upper wall corners
- Musty attic smells
- Damp insulation below a roof penetration or valley line
If you want a structured way to check those signs, this roof inspection checklist template helps homeowners organize what they see before calling a contractor.
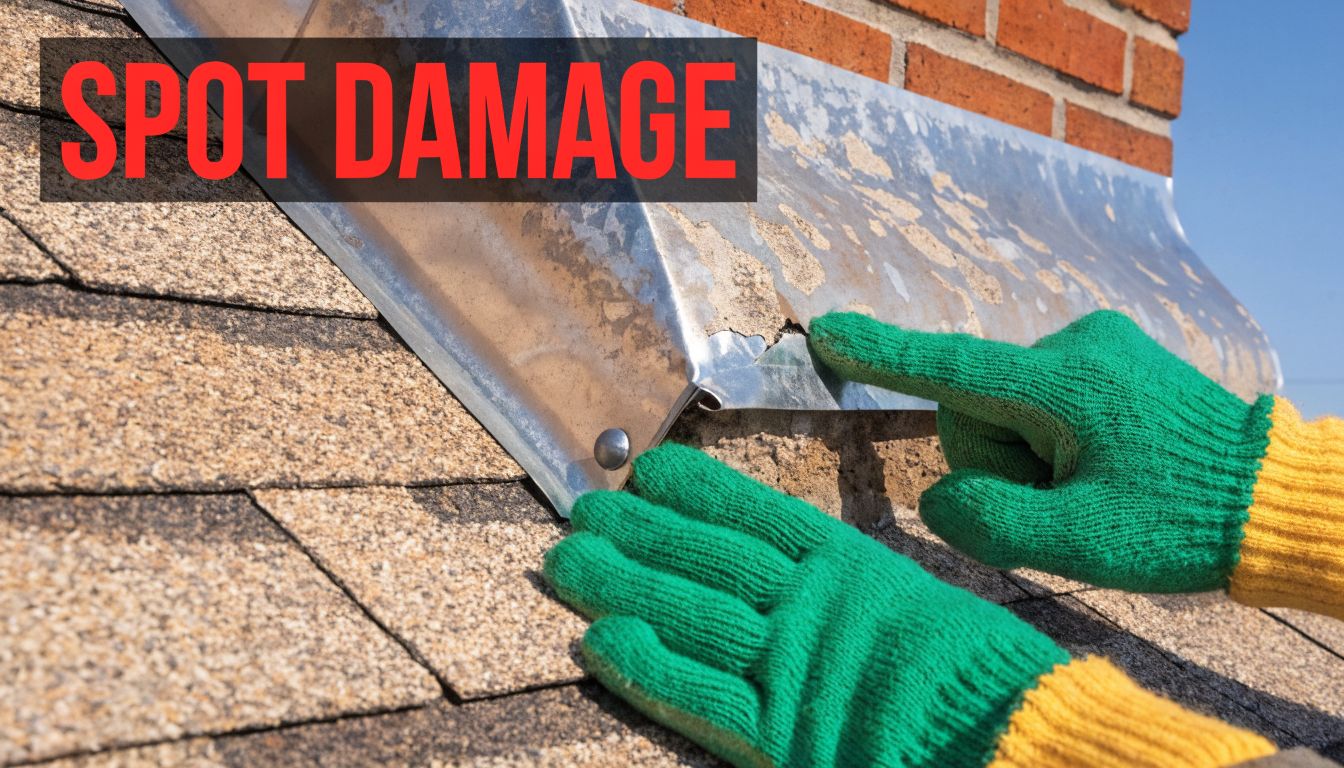
After storms, check the weak points first
Texas weather makes timing important. After hail or high wind, inspect the vulnerable details before you focus on cosmetic issues. A few dented gutters may be visible, but a loosened flashing lap around a chimney or wall can be the damage that causes the leak.
This walkthrough offers a useful visual example of what damaged roof areas can look like in the field:
When to stop looking and call a pro
You don’t need to diagnose every flashing problem yourself. You just need to notice enough to know something deserves closer attention.
Call for a professional inspection if:
- You see active leaking during or after rain
- Metal flashing looks displaced or visibly damaged
- A stain keeps growing even after a prior patch
- Your home has complex roof features like chimneys, skylights, or multiple wall intersections
- A recent storm hit your neighborhood and the roof hasn’t been checked
Flashing failures can stay hidden behind siding, under shingles, or around penetrations. That’s why even careful homeowners should treat early signs as a prompt for expert review, not a reason to climb a steep roof and experiment.
Flashing Damage Insurance Claims and Solar Panel Factors
Storm damage claims get complicated fast when flashing is involved. A shingle bruise is easier to recognize. Flashing damage can be subtle. Hail may dent metal without tearing it open. Wind may shift a lap joint or loosen a wall transition enough to create a leak later, not the same day.
That delay causes problems during insurance conversations. A homeowner sees staining weeks after the storm and assumes the claim window has passed or the issue won’t count because the metal wasn’t ripped off the roof.
How to document flashing-related storm damage
Start with photos from multiple distances. Get wide shots showing the roof area and close-ups of the actual transition point if it’s visible. Write down the storm date, what you noticed first, and where the interior symptoms appeared.
Useful documentation often includes:
- Ceiling or wall stains with dates
- Exterior photos of chimneys, valleys, vent stacks, and roof-to-wall areas
- Notes about new leaks that appeared only after a specific storm
- Prior repair records if the area was patched before
If the claims process feels unfamiliar, this guide to filing home insurance claims gives a homeowner-friendly overview of how to organize the basics before you speak with your carrier.
Insurance adjusters and roofers don’t just look for visible holes. They look for whether a storm compromised a roof detail enough to stop doing its job.
Why solar homes need extra care
Solar adds another layer of complexity because every mount is a roof penetration or a system tied closely to one. The flashing at those mounting points has to remain weathertight before, during, and after any reroof work.
Many standard roofing articles often fall short by discussing chimneys and vent pipes but barely mentioning solar attachment points, even though they create their own leak risks and coordination challenges.
Industry professionals indicate that poor flashing at solar penetrations can cause 30% to 50% of solar-related leaks, as noted in IKO’s discussion of flashing around roof penetrations. That doesn’t mean every solar roof leaks. It means the flashing details at mounts deserve serious attention during inspections, storm claims, and reroof planning.
Detach and reset changes the flashing conversation
When a solar-equipped home needs roof replacement, the panels usually need to come off and go back on. That process changes the scope of the job because the contractor has to evaluate not just the shingles but the condition of the mount flashings and the penetrations they protect.
Homeowners with solar can save themselves a lot of future trouble by understanding how solar panel removal for roof repair works. The key question isn’t only whether the panels can be removed. It’s whether the roof details beneath them will be rebuilt correctly when the system is reinstalled.
If your home has solar, ask these two direct questions before any claim or reroof starts: Which flashing details will be replaced, and who is responsible for making the roof penetrations watertight after reinstall?
Repair Costs and When to Call Hail King Professionals
Flashing repair costs can be surprisingly hard to pin down because “flashing repair” covers a wide range of work. One home may need a small fix around a vent. Another may need shingles removed, metal replaced, underlayment rebuilt, and damaged wood addressed around a chimney or wall. The flashing itself is often a small piece of metal, but it sits in the places where water is most likely to test the roof.
That is why the actual cost question is bigger than the metal.
A simple repair usually costs far less than a leak that has already spread into roof decking, attic insulation, drywall, paint, or trim. In Texas, hail and wind can also turn a flashing problem into an insurance question. A dented or lifted flashing detail may look minor from the ground, but if it lets water in after a storm, the scope changes quickly.
Situations that justify a professional inspection
Flashing problems deserve fast attention because they happen at roof joints and penetrations. Those areas work like the raincoat seams of your house. If the seam opens up, water does not need a large gap to get inside.
Call a roofer if:
- A new ceiling stain shows up near a chimney, skylight, wall, or vent
- You recently had hail or high winds, especially in Dallas-Fort Worth or East Texas storm season
- A repair in the same spot keeps failing
- You are buying or selling a home and want the roof details checked closely
- Your house has solar panels and there may be flashing hidden under mounts or attachment points
A good inspection should answer three practical questions. Where is the water entering? What failed: the metal, the seal, the installation, or the surrounding roofing materials? Has the problem stayed local, or has it spread beyond the flashing detail?
Repair or replacement
Many flashing problems can be repaired without replacing the whole roof. Some cannot.
If the shingles around the area are brittle, if the original flashing was woven in the wrong order, or if storm damage affects several roof transitions at once, a spot repair may only buy a little time. Chimneys, sidewalls, valleys, and solar penetrations are detail-heavy areas. They need the layers rebuilt in the right sequence so water sheds out and over the roof surface instead of behind it.
Good flashing repair means more than adding metal and sealant. It means finding the failure point, opening the area as needed, rebuilding the overlap correctly, and checking the nearby materials for hidden damage.
For Texas homeowners, that experience matters even more. Hail claims can involve disputed damage at vents, pipe boots, wall flashings, and other roof accessories. Solar adds another layer because the panels and mounts may need coordinated removal, inspection, and reinstallation so the roof is watertight again.
If you’ve noticed a stain, suspect storm damage, or want a second opinion on flashing around chimneys, walls, vents, or solar mounts, Hail King Professionals can help. They’ve served Dallas-Fort Worth and East Texas since 1991, offering free, same-day roof inspections, clear repair or replacement options, and code-compliant solutions built for Texas weather.