


Installing Gutter End Caps: Your 2026 Leak Prevention Guide
You usually notice a bad gutter end cap when you're not even looking for it. Water drips off one corner during a hard rain. A mulch bed gets gouged out. The siding below that corner stays dirty. A few months later, the soil line next to the slab looks lower than the rest.
In Dallas-Fort Worth and East Texas, that small leak doesn't stay small for long. We get long hot stretches that bake sealant, then sudden downpours that test every joint in the system. Add hail, tree trash, and the expansion you get from metal sitting in Texas sun, and the end cap at the end of the run becomes one of the first places a gutter system tells you it's unhappy.
A homeowner can handle a simple end-cap repair if the gutter is accessible and the metal is still sound. But the job only lasts when the cap fits the gutter correctly, the fastening method matches the material, and the seam is sealed like a joint that will move over time, not like a crack you're just smearing over.
Why a Small Cap Plays a Big Role in Protecting Your Home
A lot of homeowners call after a storm and say the same thing. The gutter only leaks at one corner, so it seems like a small repair. Then you look down and see the underlying issue: trenching in the bed, mud splash on brick, and water landing right beside the foundation instead of leaving through the downspout.
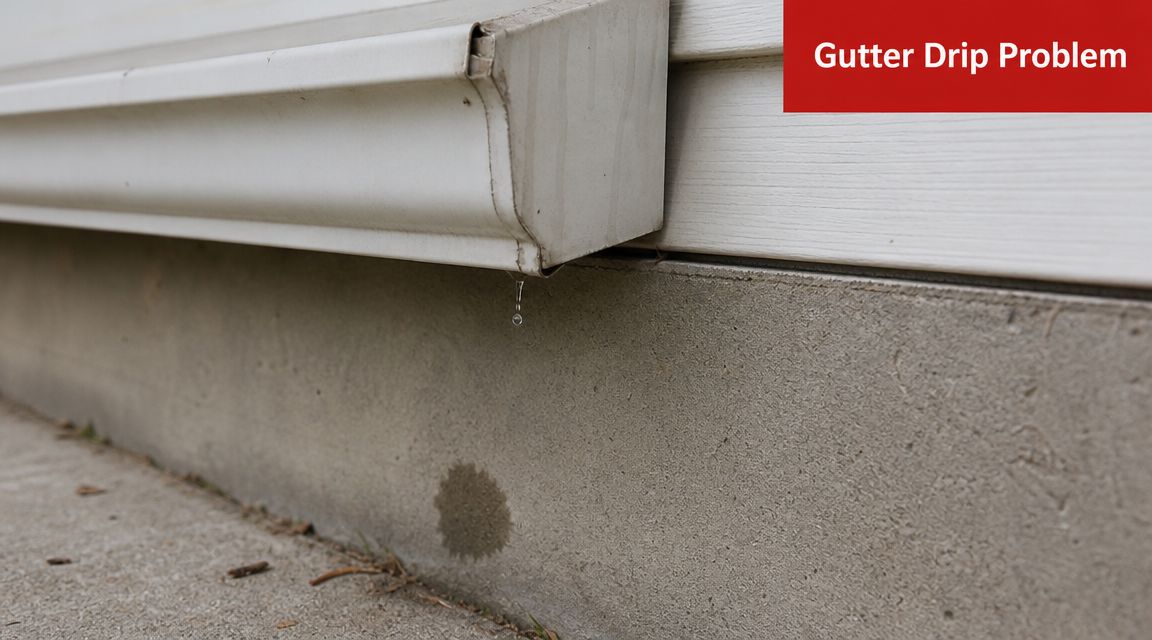
The end cap closes the run and keeps water inside the gutter long enough to reach the outlet. If that joint fails, the system can still look fine from the yard while dumping runoff exactly where you do not want it. That is why it helps to understand what a gutter does as a system instead of treating the cap like a cosmetic trim piece.
In Dallas-Fort Worth and East Texas, that leak creates a different set of headaches than it would in a milder climate. Our clay soil swells when it gets soaked and shrinks when it dries out. Repeated wetting at one corner can lead to movement around walkways, flower beds, and slab edges, especially where the grade already pitches water back toward the house. A failed end cap can start as a drip and turn into a drainage pattern.
Heat makes the repair harder too. Aluminum expands in the sun, sealants age faster under heavy UV, and hail can loosen a cap that was only glued on and never mechanically fastened. Then a hard spring storm or one of those fast summer downpours fills the gutter quickly and forces water against the weakest seam in the run.
I see this on older homes all the time.
The end cap also catches more abuse than homeowners expect. Wind-driven oak leaves, pine straw, seed pods, and roof granules collect at the closed end, keeping that corner wet and dirty longer than the straight sections. Once debris packs into that spot, water stands there, sealant breaks down faster, and the metal around the joint starts to show wear.
If you want the bigger picture on prevention, this article on gutter maintenance ROI for homeowners is worth reading.
Practical rule: If water is escaping at the end cap, treat it as a failed joint, not a surface blemish. Fresh caulk smeared over oxidation, old sealant, or hail-stressed metal rarely lasts through another Texas season.
Choosing the Right End Caps and Gathering Your Tools
A lot of end-cap leaks start at the supply counter. The homeowner brings in a small gutter scrap, buys a cap that looks close enough, and gets back on the ladder with a tube of sealant. In DFW, that shortcut usually fails fast. Our gutters bake in long stretches of UV, then get hit with hail, wind-driven debris, and heavy rain that loads the very end of the run.
Start by matching the gutter profile exactly. Left and right matter, but profile matters just as much. A 5-inch K-style cap will not forgive a close-enough fit on an oversized front bead, a box profile, or a gutter that was formed on site with a slightly different shape. If the cap rocks, twists, or leaves daylight at the corners during a dry fit, stop there and get the correct piece.
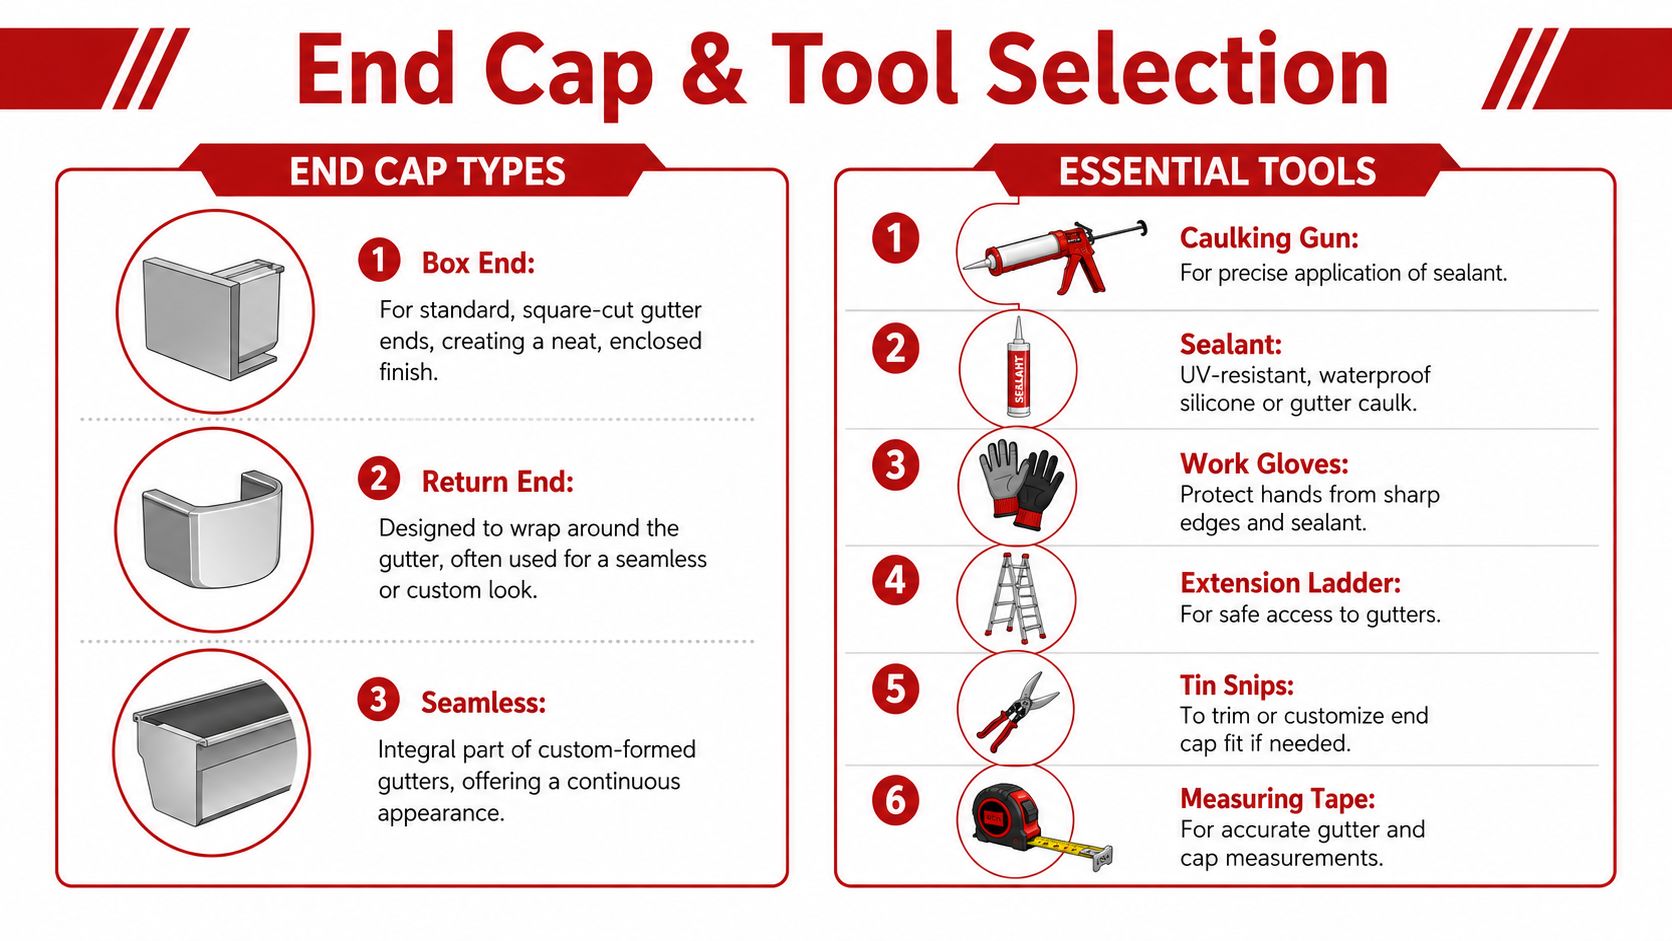
End cap types that show up most often
On older DFW homes, the common repair is a standard K-style or box end cap on aluminum gutters. Higher-end homes and custom builds sometimes use return-style caps for a cleaner finished edge, and those details can change how the cap wraps the face and back of the gutter. Homes with gutter guards add another complication because the guard can block access or force a specific order for fitting and fastening.
Tree debris matters here more than a lot of DIY guides admit. Live oak leaves, pine straw, seed pods, and roof granules often pack into the closed end of the run. That debris traps moisture, stains the metal, and keeps the cap area under more stress than the middle of the gutter. On East Texas homes with heavier tree cover, I pay closer attention to any cap that already shows pitting, surface wear, or distortion from repeated cleanings.
Material choice matters in DFW
For most homes around Dallas, Fort Worth, and East Texas, aluminum is still the practical match because most existing residential systems are aluminum. It cuts cleanly, fastens well with rivets, and is easier to tune up on a small repair than steel. The catch is that thin aluminum does not hide mistakes. A cap that gets bent during installation or hit by hail can lose its shape enough to break the seal at the corners.
Vinyl is where I see homeowners waste time. It may fit a budget repair, but Texas UV makes plastic parts brittle sooner, and hail can crack them or loosen the connection after one rough storm. Steel has better impact resistance, but it adds weight and can create corrosion problems if you mix metals carelessly or try to patch a tired aluminum run with a part that does not belong there.
Here's the simple homeowner version:
| Material | Durability | Cost | Best For |
|---|---|---|---|
| Aluminum | Good long-term match for most local residential systems | Moderate | Standard aluminum gutters on most DFW and East Texas homes |
| Vinyl | Weaker against UV exposure, heat cycling, and hail impact | Lower | Temporary or budget repairs where longevity is not the priority |
| Steel | Stronger against impact, but heavier and less forgiving on small repairs | Higher | Existing steel systems or specific areas that need added rigidity |
The fastening style to look for
Choose a cap designed to be mechanically secured, not just glued in place. In this climate, sealant alone is asking too much from one material. Heat expansion, hail vibration, and debris sitting at the end of the run work that joint harder than many homeowners expect. A proper cap gives you a way to rivet, crimp, or otherwise lock the piece in position before the sealant does its part.
That is why snap-on repairs have such a short life here. They may hold through mild weather, then a hot August week or a spring hailstorm opens the seam back up.
What to buy before you get on the ladder
You do not need many tools for one end cap, but each one has a job. Missing one usually leads to a sloppy shortcut.
- Correct left or right end cap: Match the exact gutter profile, not just the width and color.
- Gutter-rated sealant: Use a product intended for exterior metal gutter seams.
- Pop rivets: Standard for aluminum systems and cleaner than makeshift screw combinations.
- Rivet gun: A basic hand riveter handles most small repairs.
- Drill and matching bit: Needed for clean rivet holes.
- Crimpers or hand seamers: Helpful for shaping and holding the cap before final fastening.
- Gloves: Gutter edges cut skin quickly.
- Stable ladder: Set it on firm footing and keep it tied off if the location calls for it.
- Rags and cleaner: Dirt, chalking, and old residue ruin bond strength.
- Tin snips: Useful if a guard or cap edge needs minor trimming.
Homeowners planning more than a one-corner repair should also look at the broader gutter installation guide so the end-cap fix makes sense with the rest of the system.
Preparing the Gutter for a Watertight Seal
Most failed repairs can be traced back to prep. The cap gets blamed, but the problem is usually a dirty gutter edge, leftover sealant, bent metal, or a cap that was never test-fit before fastening.
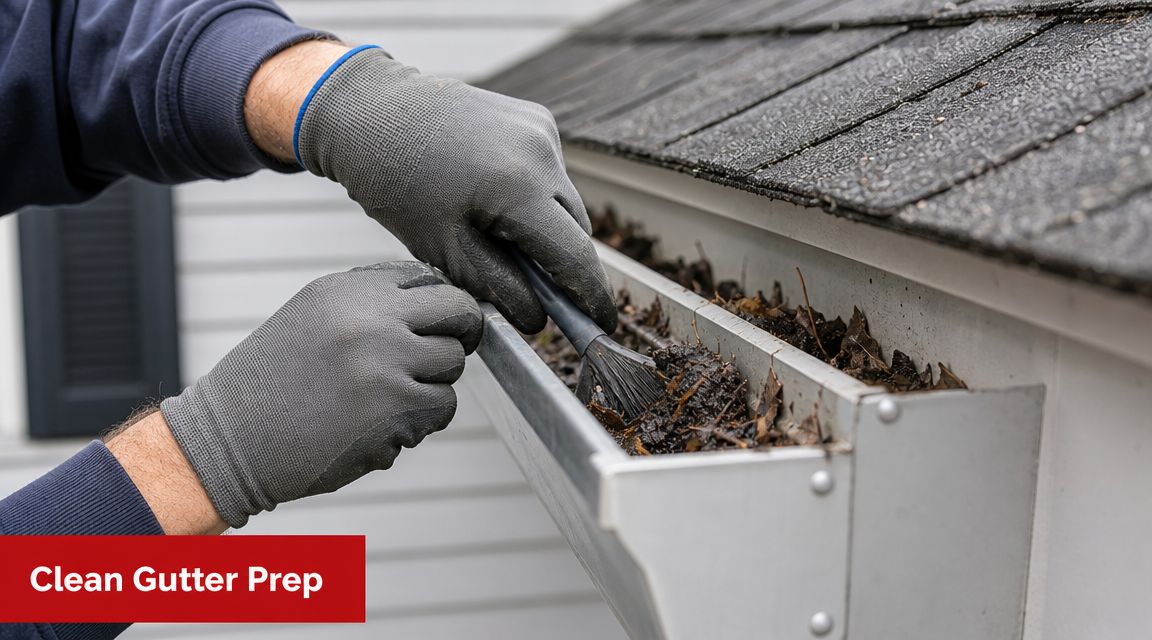
If you're installing gutter end caps on an existing home, treat the last part of the run like a repair surface, not a clean factory edge. In DFW, gutter ends usually collect roof grit, tree debris, and old oxidized sealant. If that stays in place, your new sealant is bonding to contamination, not to the gutter.
Clean first and clean farther back than you think
Clean the inside and outside edge of the gutter end. Then keep going a bit farther into the run. You want the last section dry, dust-free, and stripped of loose material.
A reliable workflow is to clean and dry-fit the gutter, slide or clamp the end cap into position, mechanically secure it with rivets, screws, or crimps, then seal the interior seam with gutter-rated silicone before testing for leaks, according to this end cap installation sheet. The same guide notes that pros often use 2 crimps on the face, back, and bottom to create the hold before the interior seal does its job.
Here's the practical prep checklist I'd use:
- Remove old sealant completely where it's loose or failing. New sealant over brittle material is a patch over a patch.
- Wipe out mud, grit, and granules. Those small particles break the bond line.
- Check the gutter edge for distortion. If the end is flared out or crushed in, the cap won't seat evenly.
- Dry the surface. Even a good sealant won't perform well on trapped moisture.
If the run is packed with debris, a full cleaning before repair is the smarter move. Homeowners dealing with overflow issues can compare that step with this overview of gutter cleaning in Dallas, Texas.
Dry-fit before you drill anything
This is the part many DIY repairs skip. Slide the cap on without sealant first. Check that it sits flush, square, and snug along the face, back, and bottom. If it rocks or leaves an uneven gap, stop there and fix the fit.
A watertight seam starts with metal touching metal where it should. Sealant isn't there to fill a bad shape match.
That dry-fit tells you where your fasteners should go and whether you need a slight adjustment before permanent installation.
For a visual walkthrough of the prep stage and fit-up process, this clip is useful:
Check for system issues before closing the end
An end cap won't fix a gutter that's already failing nearby. Before you install it, look at the last hanger, the pitch near the end of the run, and the fascia behind it. If the gutter is twisted or sagging, the cap may seal today and open back up after the next hard storm.
That's why prep isn't just wiping metal down. It's confirming the end of the gutter is worth repairing.
Fastening and Sealing Your Gutter End Cap
Once the cap fits correctly, the job comes down to two things. Hold it mechanically. Seal it internally. If either part is weak, the repair won't last through a Texas summer and a few heavy rains.
Rivets versus screws
For standard aluminum gutters, pop rivets are the industry-standard fastening method, and one major installation guide specifies using a 1/8-inch drill bit for rivet holes. That same guide recommends sealing the rivet heads and the interior seam so leaks don't form later and trapped moisture doesn't force the joint apart.
Rivets usually make the cleaner repair. They sit tighter, they don't back out the way some screws can, and they don't leave a bulky head inside the gutter flow path. Screws still have a place. They can help hold alignment temporarily or work in certain field fixes when access is awkward. But if I'm repairing a standard aluminum end cap and want the finished joint to stay put, rivets are my first choice.
The fastening sequence that works
Use a simple order and don't rush it.
- Apply sealant inside the cap before placement. Think of it as bedding the joint, not decorating the edge afterward.
- Seat the cap fully. Press it into final position and make sure the corners are tight.
- Hold alignment. A temporary screw can help if the cap wants to shift while you drill.
- Drill and set your rivets. Keep placement even so the cap pulls in uniformly.
- Remove any temporary screw if you used one, then finish fastening.
- Seal the inside seam and each rivet head. This creates the watertight barrier.
If you need to stock basic repair hardware before starting, a broad XTREME EDEALS fasteners and fittings resource can help you compare the kinds of small components commonly used in exterior assemblies.
How much sealant is enough
Too little sealant leaves voids. Too much creates a mess and often tells me the installer was trying to compensate for a bad fit. The right amount fills the cavity and leaves a continuous interior seam once the cap is fastened.
What works best is an internal gasket approach. Put the sealant where the metal laps. Then add a clean bead on the inside seam after the rivets are set. Don't focus on making the outside look glossy. Focus on preventing water from ever reaching the outside edge in the first place.
“If the only sealant you applied is on the outside lip, the joint is already one step behind.”
Texas-specific concerns during install
Heat changes how the job behaves. Sealant gets softer in the tube. Metal expands. A cap that feels snug in the morning can fit differently when the gutter has been sitting in direct afternoon sun. That doesn't mean you can't do the repair. It means your fit needs to be accurate and your fastening pattern needs to control movement.
This is also where one factual option from the local market matters. Hail King Professionals provides gutter installation work in materials including PVC, vinyl, aluminum, and galvanized steel, so homeowners dealing with a mismatched or deteriorated run can compare a small repair with replacing the affected section in the same system.
Let it cure before you test it
This step gets skipped constantly. A homeowner finishes the repair, grabs a hose, and floods the gutter right away. If the sealant hasn't cured, you can disturb the joint before it's ready.
Wait the full cure time for the product you used. Then run water through the system and watch the interior seam, the rivet heads, and the underside of the cap. If it stays dry there, you've got a real repair, not a temporary patch.
Common Installation Mistakes and How to Fix Leaks
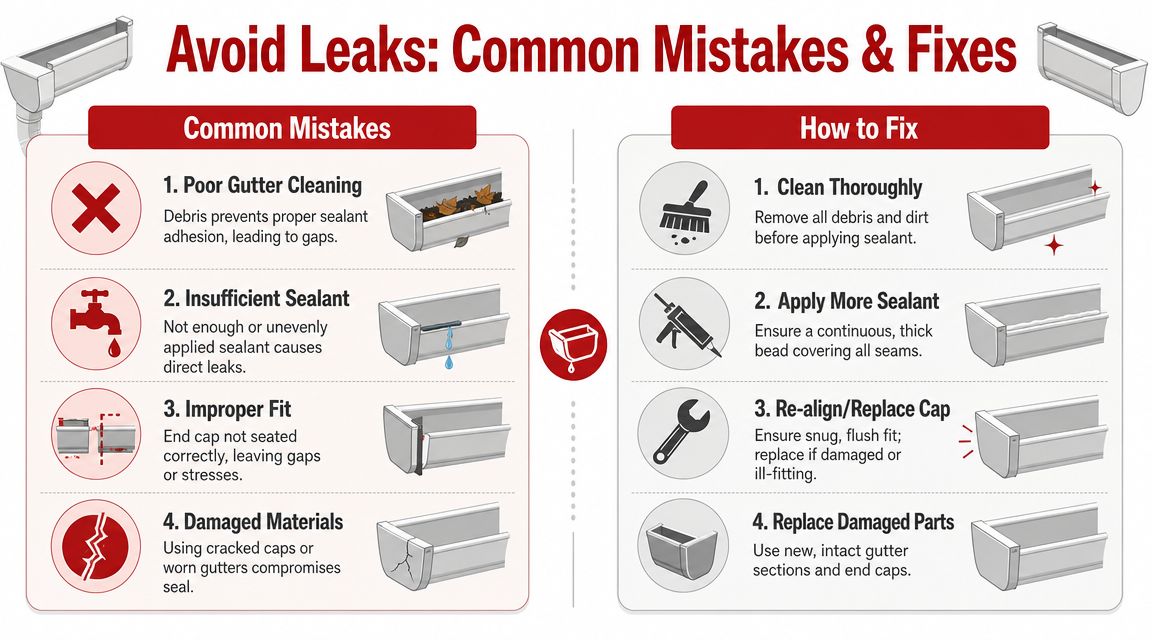
The most common mistake isn't choosing the wrong sealant brand. It's assuming any leak at the end cap can be fixed by adding more caulk to the outside. That approach hides the symptom for a little while and leaves the failure underneath.
A primary reason end-cap joints fail is sealant aging plus moisture intrusion. Guidance on gutter durability notes that trapped water can expand through freezing or thermal cycling and pry joints apart, which is why the most durable method uses sealant as an internal gasket, not just a surface coating, as explained in this discussion of long-term gutter joint failure.
Mistakes that create repeat leaks
Some problems show up immediately. Others don't appear until the next season.
- Dirty metal before sealing: Dust, oxidation, and debris keep the sealant from bonding.
- Wrong cap for the profile: Even a small mismatch leaves stress points at the corners.
- Fasteners doing all the work: A dry riveted cap without a proper seal line will leak.
- Sealant doing all the work: A cap held only by caulk won't stay put under movement.
- Ignoring heat movement: Texas expansion can open a weak seam that looked acceptable on install day.
How to diagnose the actual failure point
Don't start tearing the whole thing apart until you know where the water is escaping.
If water appears at the underside corner only during heavy flow, the interior seam is usually the issue. If you see drips around one fastener location, that rivet or screw head likely wasn't sealed or has loosened. If the cap itself has a split, kink, or impact crack, no amount of seam sealant is going to make that a durable repair.
Use this quick field check:
| Symptom | Likely Cause | Practical Fix |
|---|---|---|
| Drip from bottom corner | Failed interior seam | Remove loose sealant, re-bed or replace cap, reseal inside joint |
| Water around fastener | Unsealed or loose rivet/screw | Refasten if needed, seal rivet head and seam |
| Leak continues after resealing | Cap misfit or distorted gutter end | Remove cap, reshape edge or replace with correct part |
| Visible crack in cap | Material damage | Replace the cap, then fasten and seal correctly |
When a repair isn't enough
Sometimes the end cap leak is just the visible clue. The gutter end may be bent, the fascia may be soft, or the whole run may be nearing replacement age. In that case, a patch keeps you busy but doesn't solve the drainage problem.
If you're trying to decide whether to keep repairing sections or start over, this article on when to repair or replace gutters gives a helpful framework.
Fix the leak you can see, but also check the metal and support around it. End caps often fail where the rest of the gutter has already started to move.
A good leak fix restores the joint, not just the appearance.
DIY or Call a Pro Your DFW Gutter Decision Guide
A homeowner can absolutely handle installing gutter end caps in the right situation. If the gutter is on a one-story section, the ladder setup is safe, the metal is still in good condition, and you have the correct cap and tools, this is a manageable repair.
A DIY repair makes sense when
The project is usually reasonable for DIY if these conditions are true:
- The gutter is easy to reach: No steep roof lines, no awkward access above landscaping or concrete steps.
- The damage is isolated: One failed cap, one clean section of gutter, no obvious sagging nearby.
- The profile is standard: Basic aluminum K-style sections are far easier than custom, round, or guard-covered systems.
- You can wait for cure time: Rushed repairs before a storm usually fail.
A pro is the smarter choice when
In DFW and East Texas, I'd hand the job to a professional faster when the weather and roof conditions complicate the repair.
- The roof is high or steep: Ladder safety changes everything.
- There's hail impact or storm damage nearby: The end cap may not be the only problem.
- The system is nonstandard: Guards, oversized gutters, and custom profiles change the fit and sequence.
- The metal is failing at the end of the run: Once the gutter edge is distorted or the fascia is compromised, the job stops being a simple cap replacement.
- You want the repair to match the rest of the system: A pro can often address alignment, support, and drainage at the same time.
Why Texas weather shifts the decision
Texas heat is hard on sealants. UV exposure shortens the life of sloppy work. Hail can loosen joints you thought were solid. Intense rainfall punishes every shortcut.
That's why professional installation often makes better long-term sense here, even for a part that looks small. A pro can tell whether the leak is only at the cap or whether the run has movement, poor pitch, hidden fascia damage, or multiple weak seams waiting to open up in the next storm.
For homeowners, the question isn't “Can I attach this cap?” It's “Will this repair still be tight after summer heat, fall debris, and the next hard rain?” If the answer is uncertain, getting a trained set of eyes on it usually costs less than dealing with recurring overflow and water damage.
If you're in Dallas-Fort Worth or East Texas and you're not sure whether you need a simple end-cap repair or a broader gutter fix, Hail King Professionals can inspect the system and explain what's happening without turning a small problem into guesswork. That's especially useful after hail, on taller rooflines, or when the gutter end is leaking for more than one reason.