


Vinyl Siding Installation: A Texas Homeowner’s Guide
If you're looking at warped panels, loose corners, faded color, or water stains near your exterior walls, you're probably asking the same question many Texas homeowners ask: is this just cosmetic, or is the siding starting to fail? In Dallas, Fort Worth, Arlington, Plano, and across East Texas, siding has to handle brutal sun, heavy rain, humidity, and storm-driven wind. When vinyl siding installation is done right, it holds up well. When it isn't, the problems usually show up fast.
A lot of homeowners focus on color and curb appeal first. That matters, but performance matters more. In Texas, the details behind the panels often decide whether your siding protects the house or traps moisture, buckles in the heat, and starts pulling loose after storms.
Is It Time for New Siding? Key Signs and Style Options
Old vinyl usually tells on itself. The warning signs are visible if you know what to look for.

What damage looks like in Texas
In North Texas, heat exposure often shows up as warping, rippling, and panels that look like they're pushing outward. After hail storms or high winds, you may also see cracks at the panel edges, loose sections near corners, or pieces that rattle when the wind hits the wall.
In East Texas and other humid parts of the state, the bigger concern may be what you can't see. Moisture can get behind failing siding, especially around windows, trim, and roof-to-wall transitions. If the wall assembly wasn't built correctly, that moisture doesn't dry the way it should.
According to a 2025 NIBS moisture damage note summarized here, in hot, humid markets like Dallas-Fort Worth, unvented vinyl installations without a proper underlayment can trap moisture, leading to mold and rot, and 42% of vinyl-clad homes in humid zones had hidden moisture damage due to this issue.
Practical rule: If siding is cracked, loose, or visibly distorted, don't stop at the surface. Check whether water has already moved behind it.
A few signs usually mean it's time to have the wall system inspected:
- Panels don't sit flat: Buckling often points to installation problems, not just aging.
- Corners or seams look open: Wind can force rain behind those gaps.
- Interior clues show up: Peeling paint, musty smells, or staining near exterior walls can point to hidden moisture.
- Storm damage is obvious: Hail impacts and wind-loosened panels rarely improve on their own.
If moisture is already a concern, this guide to siding water damage is worth reviewing before you decide between repair and replacement.
What new vinyl siding can change
Replacement isn't only about fixing damage. It's also a chance to improve how the house looks and how the exterior system performs.
Homeowners usually choose from a few common profile directions:
| Option | Best fit | What homeowners like |
|---|---|---|
| Horizontal lap siding | Traditional homes | Clean, familiar appearance |
| Vertical panels | Modern and accent walls | Strong lines and visual height |
| Shake-style accents | Gables and entry features | More texture without wood upkeep |
| Board-and-batten look | Farmhouse and mixed-style exteriors | Bold contrast and dimension |
Color matters in Texas because sun exposure changes how a house reads from the street. Lighter tones can keep the exterior look bright and classic. Darker colors can look sharp, but they also make installation precision even more important because any waviness is easier to spot.
The Professional Vinyl Siding Installation Process
A proper vinyl siding installation follows a sequence. Good crews don't just start hanging panels and hope they line up.
What happens before new panels go on
The job usually starts with removal of damaged or outdated siding. Once the old material is off, the crew can inspect the sheathing, trim areas, penetrations, and transitions at windows, doors, and roof lines. This step matters because siding shouldn't cover soft spots, rot, or previous water entry.
After inspection, the wall gets prepared with the proper weather-resistive layer and accessory pieces. That includes starter strips, corner posts, and J-channel at the right locations so the siding has a clean path to lock together and terminate correctly.
The key point most homeowners should know is simple: vinyl is not installed rigidly like trim lumber. It has to move.
How the system is assembled
Professionals install from the bottom up, keeping rows level and checking alignment as the courses rise across the wall. Every opening and edge condition has to be handled so water sheds out and the panels can still expand and contract without binding.
That includes the expansion room at receiving channels. CertainTeed's installation guidance states that the gap is typically 1/4-inch if the temperature is above 40°F, but increases to 3/8-inch if it's below 40°F.
A homeowner doesn't need to memorize every accessory name, but it helps to know what a careful process looks like:
- Remove failing materials carefully so hidden damage can be found.
- Inspect the wall assembly before anything new covers it.
- Install the weather-resistive layer and trim accessories in the right order.
- Set starter strips and layout lines so courses stay straight.
- Hang panels to allow movement instead of pinning them tight.
- Finish penetrations and terminations cleanly at lights, vents, soffits, and roof intersections.
A clean-looking wall on day one doesn't prove the job was done right. The real test is whether the siding still lays flat after Texas heat, rain, and wind have worked on it.
The best crews move methodically. That's what keeps a house in McKinney, Garland, Irving, or Tyler from developing the same problems again a season later.
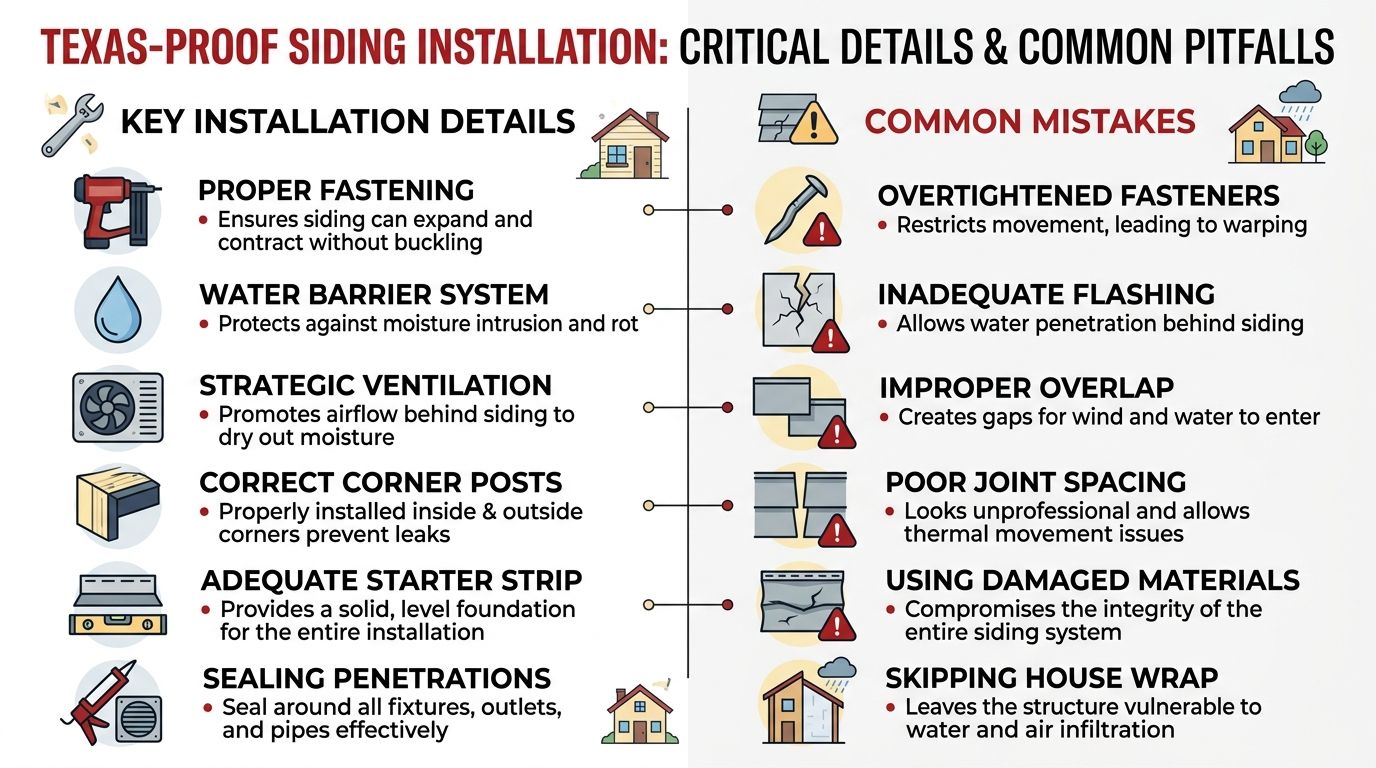
Why a Texas-Proof Installation Is in the Details
A siding job can look straight and clean on the day it goes up, then start waving, rattling, or trapping water after one Dallas summer and a few hard storms. I see that problem more often on installs where the panels were the focus and the wall assembly was treated like an afterthought.
Heat changes the rules
Vinyl siding moves. In Texas, it moves enough that small setup errors show up fast.
According to this installation reference video on vinyl expansion, vinyl siding expands approximately 0.004 inches per foot for every 10°F temperature change, and a 20-foot panel can expand up to 1.2 inches in a 100°F temperature swing. On a west-facing wall in Dallas, Frisco, or Round Rock, that kind of temperature swing is realistic over the life of the siding. If the installer cuts panels too tight at the ends, or leaves no room at J-channel and corner posts, the siding has nowhere to move. That is when walls start to ripple and courses stop laying flat.
Dark colors, long wall runs, and full sun make the margin for error smaller.
Underlayment and water control matter just as much
A lot of homeowner guides spend all their time on panels and trim pieces. The part that decides whether the wall lasts is usually behind the siding.
Texas homes deal with wind-driven rain, humid stretches, and sudden storm cycles. Vinyl is a water-shedding cladding, not a waterproof barrier by itself. The wall needs a properly installed weather-resistive barrier, flashed openings, and clean integration at roof lines, vents, light blocks, hose bibs, and meter penetrations. If those layers are skipped, lapped wrong, or cut carelessly, water can get behind the siding and stay there long before you see staining indoors.
That is one reason siding work is not in the same category as a small exterior project like DIY screen door installation. A screen door mistake is usually visible and localized. A siding water-management mistake can sit inside the wall for months.
Fastening has to balance movement and storm resistance
Fasteners cause a lot of preventable siding problems, especially after high wind. The panel has to be held securely, but it also has to slide side to side as temperatures change. If a crew drives nails tight against the hem, the siding binds. If the fastening is sloppy, storm gusts can pull at loose sections and expose weak points at laps and edges.
Here is the practical trade-off homeowners should understand:
| Installation choice | What happens |
|---|---|
| Fastener driven too tight | Panel binds, distorts, and can buckle in heat |
| Fastener left too loose | Wind can chatter the panel or work sections loose |
| Fastener placed and set correctly | Panel stays attached and still has room to move |
Field advice: I pay close attention to nail pressure, slot placement, and wall flatness on every elevation. In Texas, those small details decide whether the siding still looks right after August heat and spring storm season.
Here's a visual explanation of the same principle in action:
The failures usually show up at transitions
The trouble spots are rarely the middle of an open wall. They show up where siding meets soffits, windows, doors, roof edges, brick ledges, and service penetrations. Those areas need correct clearances, backing, flashing, and trim details so water sheds out and the panel can still move.
That is what a Texas-proof installation really means. The siding has to handle heat, humidity, hail, thunderstorms, and strong wind without warping, loosening, or feeding water into the wall system. A neat appearance on install day is only the start. The details are what keep it performing.
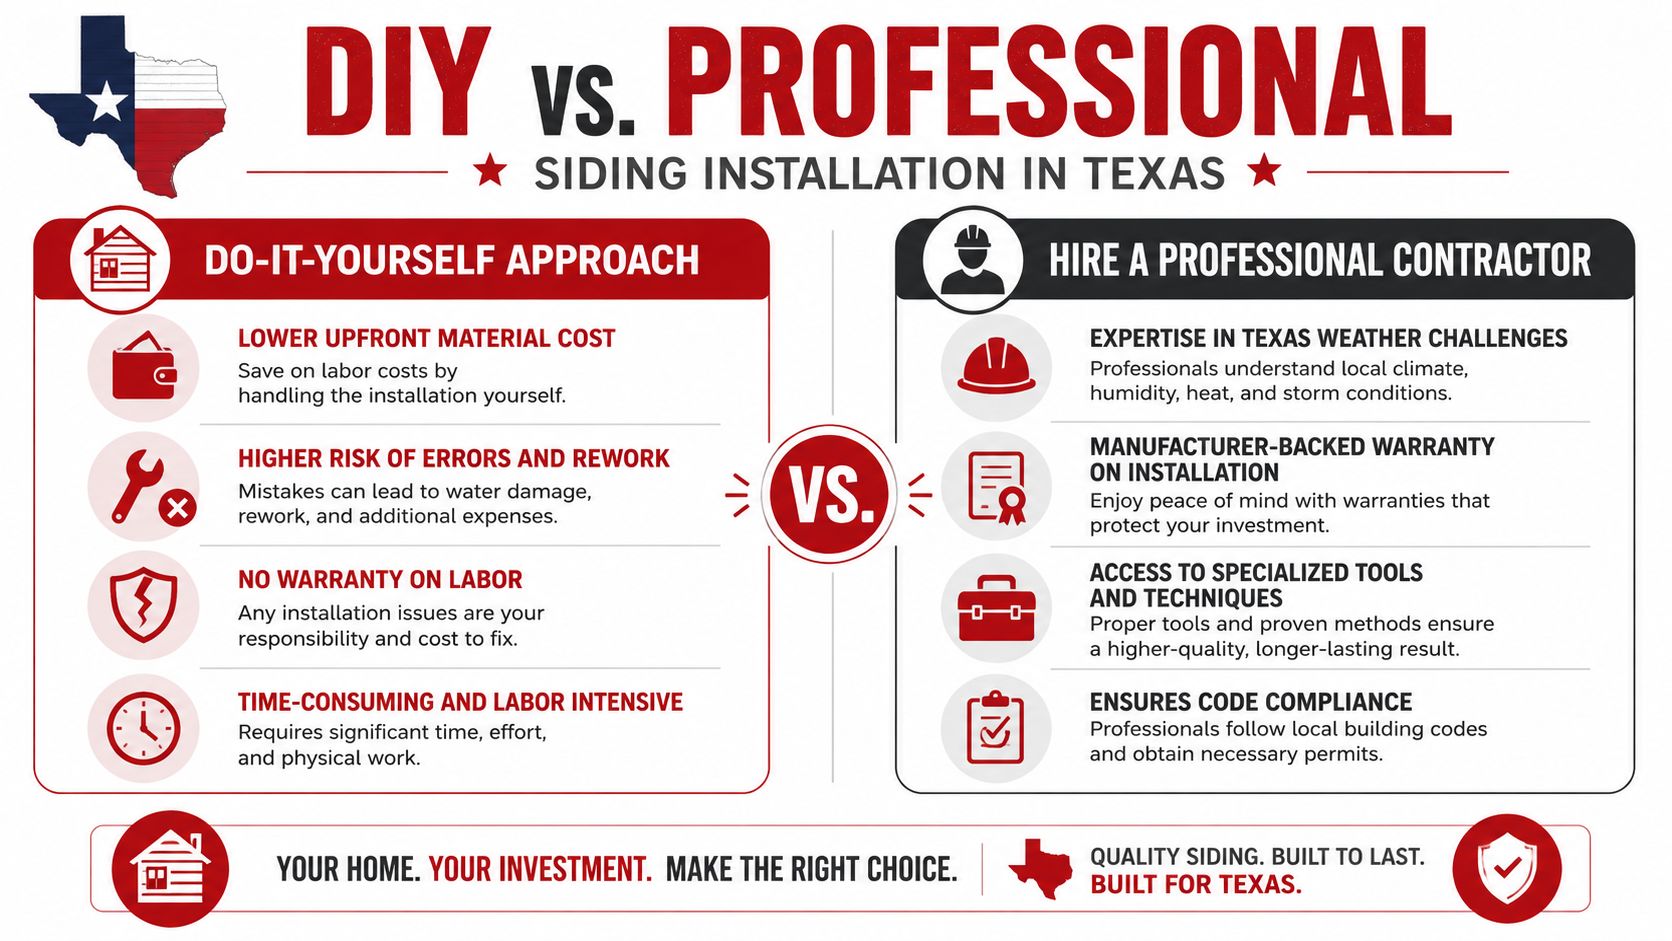
DIY vs Hiring a Professional Siding Contractor in Texas
A Dallas homeowner can hang a few panels on a mild Saturday and feel good about the progress. Then August hits, the west wall bakes all afternoon, a thunderstorm pushes water at the trim, and the shortcuts show up fast. That is usually the point where a siding project stops being a carpentry job and starts acting like a weather-management job.
Where DIY can make sense and where it usually doesn't
If you're replacing a screen door, adjusting hardware, or handling light trim work, a homeowner with patience and the right tools can often get through it. Something like DIY screen door installation is a good example of a smaller exterior task that can be approachable.
Vinyl siding has less forgiveness. The first row has to be dead level. Corner posts, starter strips, housewrap integration, and window trim all have to line up with the way water moves down the wall. In Texas, the installer also has to leave the right room for expansion so panels can move in heat without looking loose in cooler weather.
That balance takes practice.
The risk side of the decision
The biggest DIY risk in Texas is hidden failure. The wall may look fine from the driveway and still be set up for buckling, rattling, or water intrusion once the heat and storm season work on it.
I see homeowners focus on panel color and profile, then underestimate the technical details behind the panels. Fasteners need consistent placement and pressure so the siding can move without blowing loose. Cuts around light blocks, hose bibs, and vents need to stay clean and watertight. Underlayment and flashing need to be installed as a system, not as separate parts.
A DIY installer has to get all of this right at the same time:
- Layout control: A small error at the bottom of the wall keeps showing up in every course above it.
- Expansion allowance: Panels need room to move in Texas heat, especially on long runs and sun-exposed elevations.
- Water management: Windows, doors, roof lines, and penetrations need flashing and trim details that shed water outward.
- Wall prep: Uneven sheathing, damaged wood, or missing weather barrier can telegraph through the siding and shorten its service life.
- Storm resistance: Loose accessory installation and poor fastening often show up after strong wind, not on install day.
Why professional installation usually wins
A qualified contractor brings judgment as much as labor. That matters on Texas homes, where walls are rarely perfect once the old cladding comes off. You may find swollen sheathing, missing flashing, hard-to-handle transitions, or storm damage that needs repair before any new siding goes up.
That is why many homeowners choose a professional siding contractor in Dallas, TX instead of treating this as a weekend project.
A good crew also understands the trade-offs. Tight panels can buckle in the heat. Loose panels can chatter in the wind. Trim installed for appearance alone can trap water at windows and roof intersections. The right installation thread is narrow, and experienced installers stay inside it because they do this work every week.
Hiring a pro also gives you clearer accountability for permit questions, manufacturer requirements, punch-list corrections, and warranty support if something goes wrong later. On a small repair, DIY can make sense. On a full siding project in Texas, professional installation is usually the lower-risk choice.
Siding Costs, Financing, and Vetting Your Contractor
Most homeowners start with the same question. What will this project cost? The honest answer is that vinyl siding pricing depends on the size and shape of the house, the condition of the wall underneath, the trim complexity, and whether the project includes related exterior work such as gutters or roofing tie-ins.
What affects the final price
A straightforward home with simple elevations is different from a two-story house with lots of gables, trim breaks, and storm-related repairs. Tear-off conditions also matter. If the crew finds damaged sheathing or moisture issues behind the existing cladding, the scope changes because the wall needs to be corrected before new siding goes on.
That means the right estimate should break out the scope clearly instead of hiding it inside a single lump sum. Ask what is included for removal, wall prep, weather barrier work, trim accessories, cleanup, and any related repairs.
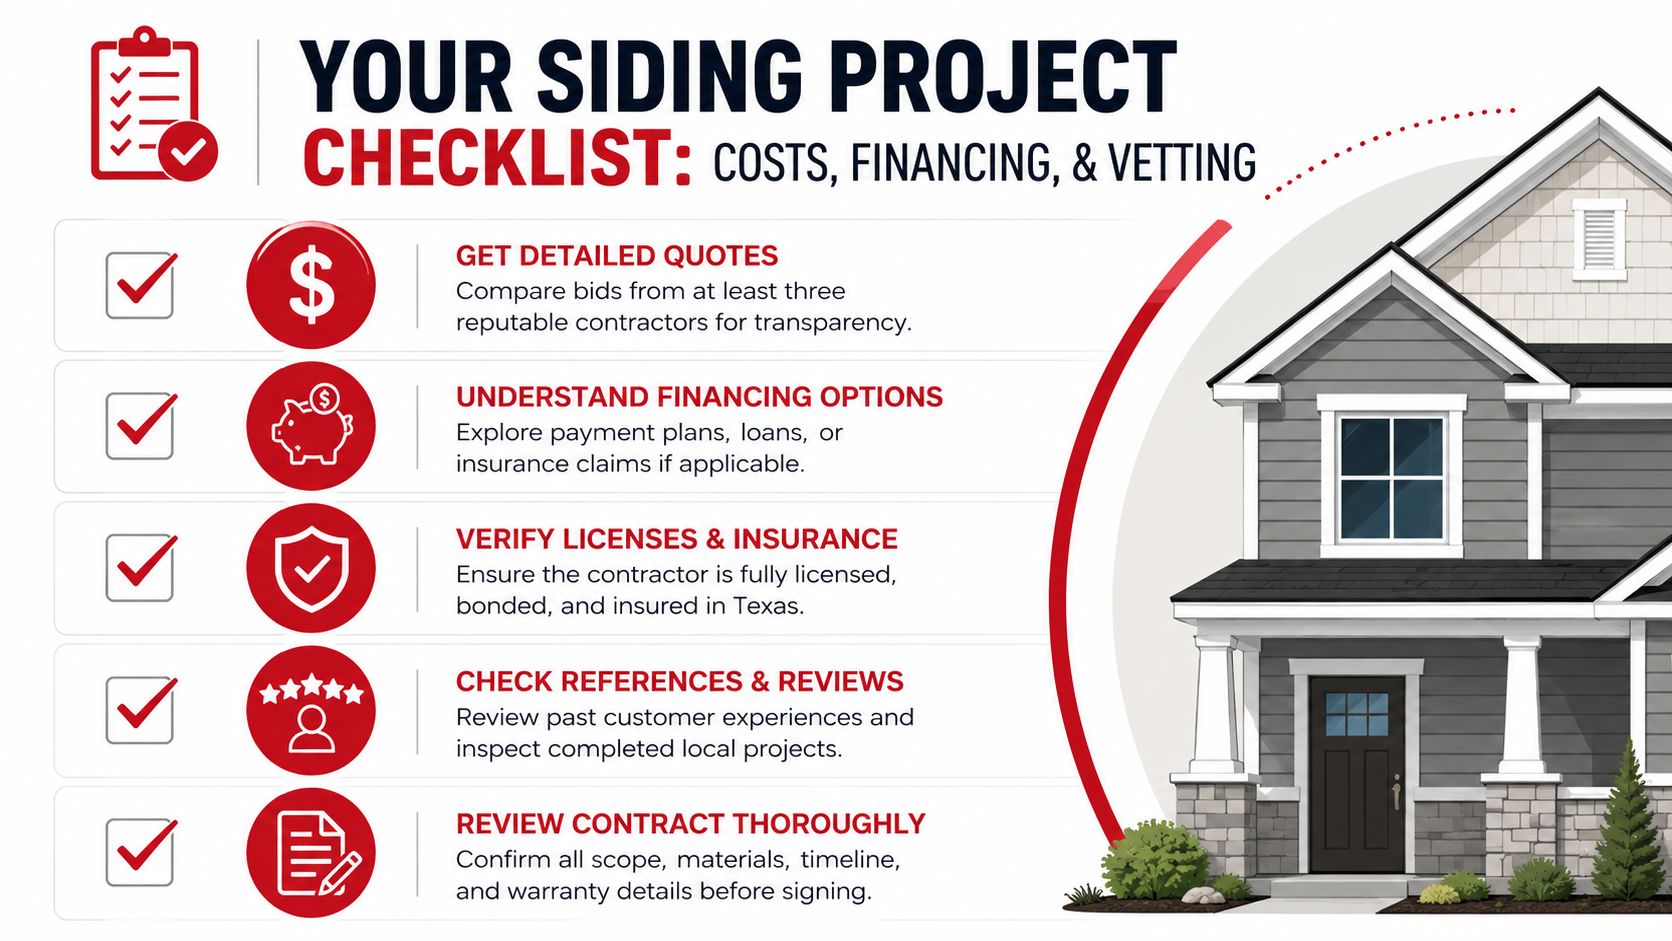
A few practical checkpoints help:
- Compare scope, not just price: One bid may include wall repairs and another may exclude them.
- Ask about financing early: It helps you compare realistic project options instead of delaying needed work.
- Review insurance and documentation: A contractor should be able to show coverage and explain responsibility clearly.
If you want a plain-language explanation of why contractor coverage matters, this overview of home improvement contractors insurance is a useful starting point.
How to vet the contractor
The contractor you hire should understand that siding doesn't live in isolation from the rest of the exterior envelope.
One detail many homeowners miss involves reroofing and solar-equipped homes. As noted in this polymeric exteriors installation reference, many guides miss the interaction between siding and roofing, especially for homes with solar panels, and improper siding fastening can distort the roof-to-siding transition during solar panel detach-and-reset work required for a reroof.
That's a serious issue in Texas because many homes need coordinated exterior work after storms. If the contractor only thinks about the wall and not the roof edge, flashing zone, gutters, or solar-related access, the weak point shows up later.
Use a short vetting checklist:
| What to ask | Why it matters |
|---|---|
| Are you licensed and insured in Texas? | It protects the property owner and sets a baseline for professionalism |
| Can you provide a written scope? | It reduces surprises and clarifies materials and responsibilities |
| Do you understand roofing-to-siding transitions? | Storm-prone homes need coordinated exterior protection |
| Can you show local project experience? | Local weather and local building conditions matter |
For homeowners comparing local providers, this page on choosing a siding contractor in Dallas, TX can help frame what a strong contractor relationship should look like.
Project Timeline, Maintenance, and Long-Term Warranties
Once you've chosen the contractor and finalized materials, most of the stress comes from not knowing what happens next. A well-run project should feel organized, not chaotic.
What to expect during the job
The process usually starts with the site review, measurements, and material coordination. Then comes delivery, tear-off, wall preparation, installation, detail work, cleanup, and a final walkthrough. Weather can affect pacing in places like Mesquite, Longview, Marshall, Boerne, and New Braunfels, especially during thunderstorm season.
Homeowners can help the job go smoother by clearing access around the walls, moving fragile items off patios, trimming back shrubs, and making sure crews can reach power and work areas safely.
A good final walkthrough should confirm:
- Panels are straight and secure
- Corners, trim, and channels are finished cleanly
- Debris and nails are removed from the property
- Any punch-list items are addressed before sign-off
Keeping vinyl siding in good shape
Vinyl is popular because maintenance is simple compared with many other exterior materials. In most cases, the main job is routine visual inspection and gentle cleaning when dirt, mildew film, or storm residue builds up.
For homeowners wondering whether pressure washing is a good idea, this guide to safe vinyl siding cleaning methods gives a practical overview of what helps and what can cause damage.
Clean siding gently and inspect it after storm season. The goal isn't just appearance. It's catching loose panels, cracked trim, and early water entry before they spread.
Why warranties matter
Material warranties and workmanship warranties cover different risks. One addresses defects in the product itself. The other addresses installation mistakes. You want both explained in writing before the job starts.
That's especially important in Texas, where heat, hail, high winds, and heavy rain test every exterior system hard. A professional installation backed by clear warranty terms gives the homeowner confidence that the project wasn't just finished. It was built to last.
If your home has loose, warped, or storm-damaged siding, or if you're planning exterior work that also involves roofing, gutters, or solar detach-and-reset, Hail King Professionals can help you evaluate the full system. Their team serves homeowners across Dallas-Fort Worth, East Texas, Austin, and San Antonio with inspections, clear recommendations, and exterior solutions built for Texas weather.