


Storm Damage Roof Replacement: A DFW Homeowner’s Guide
The hail stops and the neighborhood goes quiet. Then you start noticing the details. Granules in the downspouts. A wet ceiling spot that wasn't there yesterday. A bent gutter run. Maybe a cracked window screen. That's usually the moment a homeowner in DFW realizes this might not be a simple repair call.
A storm damage roof replacement feels overwhelming because several problems hit at once. You're protecting the house, documenting damage, dealing with insurance, sorting out code issues, and trying to avoid the wrong contractor while every truck in town suddenly says “storm specialist.” The good news is that this process is manageable when you break it into decisions instead of reacting to noise.
Your Roof After the Storm
A roof claim isn't just a maintenance item anymore. In the U.S., roof damage has become a major insurance cost driver. The Insurance Information Institute says about 70% to 90% of total insured residential catastrophic losses come from roof-related damage, and convective storms that include hail caused about $30 billion in damage in 2022, rising to $60 billion in the following year according to industry reporting on storm-resistant roof efforts. That's why a storm damage roof replacement now lands in the same category as other major home capital decisions.
In North Texas, the stress usually comes from uncertainty more than anything else. Homeowners want a straight answer to three questions. Is the roof damaged badly enough to matter. Can it be repaired properly. And if it needs replacement, how do you keep the claim and construction process from turning into a second problem?
What most homeowners miss in the first day
The roof is only part of the story. Storm-driven moisture can move into insulation, drywall, attic decking, and HVAC areas before a leak shows up in a living room. If you notice a musty smell, new staining, or damp areas around vents or registers, it's smart to check broader indoor air warning signs too. A practical place to start is Can Do Duct Cleaning's mold detection tips, especially if water may have entered the attic or ceiling cavities.
Practical rule: The first goal after a storm isn't to decide on shingles. It's to stop the house from taking on more water while you gather clean documentation.
A calm process works better than a fast guess. Start with visible damage. Then protect exposed areas. Then get a real inspection that goes beyond what's obvious from the driveway. Once those pieces are in place, the insurance side gets cleaner and the repair-versus-replace decision gets a lot less emotional.
The project is easier when you think in phases
Most successful storm jobs move through a clear sequence:
- Stabilize the property: Stop active leaks and secure vulnerable areas.
- Document before cleanup: Photos and video matter more when they show untouched conditions.
- Inspect for full scope: Surface damage is only one part of a roof system.
- Price the right fix: A cheap patch can become the expensive mistake.
- Close out with paperwork: Final scope, code items, supplements, warranty documents.
That's the lens to keep through the whole job. Don't let anyone rush you into a scope before the roof system, interior, and attached components have all been considered.
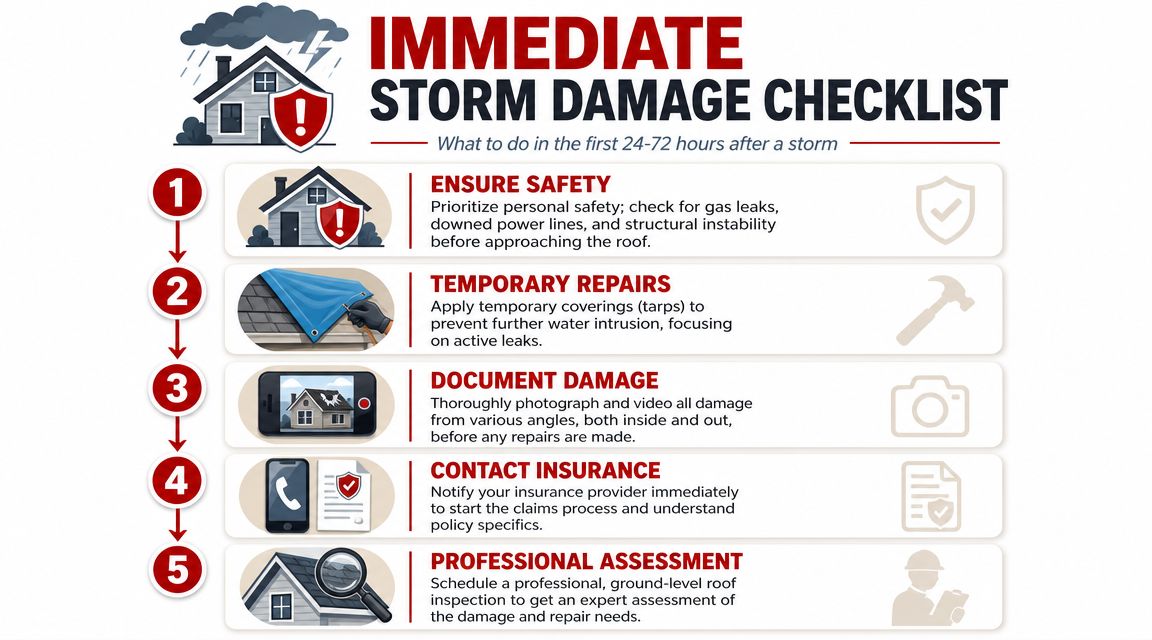
Immediate Steps for Damage Control and Documentation
The first hours matter because the house is exposed and the claim file is being built at the same time. Industry guidance emphasizes inspection and photo documentation within 72 hours where possible, plus emergency tarping within 24 to 48 hours to prevent secondary water intrusion, followed by a full diagnostic inspection to check for concealed deck saturation, as outlined in this Texas hail damage roof repair guide.
Start with a simple visual flow:
What to do first from the ground
Don't climb the roof. A storm-damaged roof can have bruised shingles, displaced tabs, slick surfaces, soft decking, or metal edges hidden by debris.
Use your phone and walk the property slowly.
- Check the soft targets: Window screens, gutters, downspouts, vents, and fence lines often show hail evidence before the roof does.
- Look for fresh debris patterns: Shingle fragments, exposed mat, flashing pieces, and granules near downspouts are useful clues.
- Scan inside the house: Ceiling stains, bubbling paint, attic drips, and wet insulation should all be photographed before cleanup.
- Record the date and storm timing: Keep a simple note with when you first observed the damage and where.
If you want a more detailed checklist of what inspectors look for, this roof inspection after storm guide is a useful reference before the contractor visit.
Protect the home before the next storm cell
Temporary dry-in work is not cosmetic. It's a damage control step.
If water is actively entering the home, arrange for tarping or secured temporary covering as soon as safely possible. Take photos before and after the temporary repair. Save invoices, material receipts, and all communication. Insurers usually want to see that you acted reasonably to prevent additional damage, not that you waited for a permanent scope before protecting the interior.
A homeowner who documents first and dries in fast usually has a cleaner claim file than a homeowner who cleans up immediately and tries to recreate the evidence later.
Video can help too, especially if you have active dripping, attic intrusion, or wind-lifted sections that are visible from the ground.
Later in the process, it helps to see how crews handle emergency response and project flow in the field:
Build a claim-ready record
The best documentation set is boring, complete, and organized.
- Wide shots first: Front, back, both sides, roofline, detached structures.
- Then close-ups: Dented metals, torn shingles, interior staining, saturated insulation.
- Keep damaged items if practical: Broken vent caps, displaced flashing, or detached pieces can help show impact.
- Make one folder per area: Front slope, rear slope, garage, patio cover, interior bedroom, attic, and so on.
Don't authorize permanent repairs before the damage has been properly inspected and the insurance process is underway, unless a safety issue leaves you no choice. Emergency stabilization is one thing. Permanent scope decisions are another.
Navigating Your Insurance Claim and Adjuster Meeting
In Texas, roof claims are common enough that the process should feel routine. For homeowners, it rarely does. The National Insurance Crime Bureau notes that Texas had more than $500 million in hail-related claims in 2022, which helps explain why insurers and contractors here focus heavily on code-compliant replacement scopes in storm-prone areas, as described in this NICB report on roof claims.
The typical claim starts with a phone call or online notice to your carrier. You give the date of loss, a short description of what happened, and the visible damage you've found so far. After that, most homeowners deal with two different insurance roles, even if they only hear one company name.
The desk adjuster and the field adjuster
The desk adjuster usually manages the file, paperwork, estimate revisions, and payment flow. The field adjuster is the person who comes out to inspect, or the person whose inspection report feeds the estimate.
That distinction matters because homeowners sometimes assume the first on-site opinion is the final scope. It often isn't. The field inspection gathers facts. The desk side may later revise, approve, deny, or request more documentation.
A good plain-English explanation of that process is understanding insurance claims, especially if this is your first storm claim.
What the adjuster meeting should look like
The strongest meetings are calm and specific. The contractor walks the adjuster through each elevation, marked damage, soft-metal evidence, accessory items, and any code-related concerns. The homeowner doesn't need to argue technical roofing points. The homeowner needs a documented inspection and a contractor who can explain what the adjuster is seeing.
At this juncture, a lot of claims either stay clean or get messy. If the inspection only focuses on visible shingle hits and ignores underlayment issues, flashing damage, ventilation details, or accessory components, the first estimate may come in incomplete. That can be corrected later, but it slows everything down.
For a step-by-step breakdown of how that back-and-forth typically unfolds, this storm damage insurance claim process guide covers the practical sequence homeowners usually face.
Bring your contractor to the adjuster meeting if possible. A field adjuster is evaluating one property on a schedule. Your contractor is evaluating one roof system that has to be rebuilt correctly.
What to have ready before the visit
Set out the basics so nobody wastes inspection time looking for paperwork:
- Claim information: Carrier name, claim number, adjuster contact details.
- Your evidence folder: Date-stamped photos, videos, attic photos, temporary repair receipts.
- Past roof history: Prior repairs, prior claims, known leaks, solar paperwork if applicable.
- Access notes: Gate codes, locked sheds, steep areas, detached garage, pool equipment zones.
If you have rooftop solar, mention that before the adjuster arrives. It affects access, detach-and-reset planning, and sometimes scheduling for final scope.
Where homeowners get tripped up
The most common mistake is treating the first estimate like the final word. The second is authorizing work from whoever knocked first after the storm. The third is assuming a roof that “doesn't look too bad” from the yard must be repairable.
Insurance claim handling gets easier when the roof scope is tied to code, manufacturer method, and documented damage instead of opinions.
Choosing the Right Contractor in DFW and East Texas
After a major hail event, the contractor market gets noisy fast. Some crews are competent and local. Some are temporary sales operations working a storm map. In DFW and East Texas, that difference matters because the job isn't just removing shingles. It's interpreting damage correctly, handling supplements cleanly, and installing a roof system that passes code and holds up in the next storm.

One code threshold should come up in any serious conversation. Under the International Residential Code framework cited by industry sources, if more than 25% of a roof's area is repaired or replaced within 12 months, the entire roofing system must be brought up to current code, as explained in this roof repair versus replacement discussion. If a contractor can't explain how that affects your roof planes, flashing, ventilation, and scope, you're not getting a complete review.
Non-negotiables when you vet a roofer
A contractor should be easy to verify.
- Local footprint: Ask for a physical local address, not just a temporary yard sign presence.
- Insurance documentation: Confirm general liability coverage and workers' compensation details if applicable to their operation.
- Written scope clarity: The estimate should identify materials, accessories, tear-off, underlayment, flashings, and cleanup.
- Storm claim fluency: Ask how they handle supplement requests when field conditions differ from the first estimate.
If you want a homeowner-focused screening checklist, this guide on how to choose a roofing contractor is a practical place to compare what different companies are offering.
Questions that separate pros from sales crews
Ask questions that force specifics.
- How are you determining repair versus replacement? A real answer references roof area, damage pattern, matching issues, code triggers, and hidden components.
- What happens if decking or flashing issues are discovered during tear-off? You want a process answer, not a shrug.
- Who handles communication with the insurer if the approved estimate misses required items? That tells you whether they understand supplements.
- How do you handle solar detach-and-reset coordination? If the home has rooftop solar, this can't be an afterthought.
A contractor who talks only about shingle color and deductible before discussing scope, code, and dry-in is selling speed, not managing risk.
The red flags I'd take seriously
Low-pressure professionalism matters after a storm. So do paperwork habits.
Watch out for contractors who want a large cash commitment before materials are ordered, who won't provide proof of insurance, or who avoid discussing code requirements because they “can patch anything.” That last phrase causes a lot of expensive problems later.
It's also reasonable to compare more than one local firm. A company such as Hail King Professionals can be evaluated alongside other established local contractors based on inspection detail, written scope, insurance coordination, solar handling, and warranty documentation. That's the right comparison. Not who can promise the fastest verbal approval.
Selecting Materials and Planning for Upgrades
A lot of bad post-storm decisions happen here. The check is approved, the crew is lined up, and the homeowner feels pressure to pick a color fast. In DFW, material selection is not just a style choice. It affects how the roof holds up in the next hail season, how the insurer views the replacement, and how complicated the job becomes if the house has solar.
Start with the house you own. A steep two-story roof with long valleys, chimney flashing, and multiple penetrations has different priorities than a simple one-story gable. If you plan to sell soon, the right answer may be a clean, insurable replacement that fits the neighborhood. If you plan to stay through a few more storm cycles, it often makes sense to spend money on impact resistance, upgraded underlayment where appropriate, flashing replacement, and ventilation corrections that reduce future headaches.
Material trade-offs for Texas homes
The right material depends on budget, roof geometry, HOA rules, and how long you expect to keep the property.
| Material | Initial Cost (per sq. ft.) | Lifespan | Hail Resistance | Insurance Discount |
|---|---|---|---|---|
| Architectural asphalt shingles | Varies by product, roof complexity, and local labor conditions | Commonly chosen for balanced cost and appearance | Standard impact performance varies by shingle line | May vary by carrier and policy |
| Class 4 impact-resistant shingles | Higher than standard architectural asphalt in many cases | Similar category to asphalt, with product-specific differences | Built for stronger impact resistance and often preferred in hail markets | Some policies may offer discounts for qualifying products |
| Metal roofing | Usually higher upfront than asphalt systems | Often selected for long service life | Generally favored for durability, but performance depends on panel type and installation | Discounts vary by carrier and policy |
That table is a starting point.
Architectural shingles remain the default choice across North Texas because they usually keep the project inside insurance scope plus a manageable homeowner upgrade. Class 4 shingles deserve a serious price comparison in hail-prone areas because they are tested for higher impact resistance under UL 2218, as explained by the Insurance Institute for Business & Home Safety. Metal roofing can be a smart long-term option on the right home, but it needs a real discussion about panel type, trim details, attic assembly, appearance, and budget. On some homes, metal is a strong upgrade. On others, it is money spent in the wrong place.
Where Texas homeowners should spend upgrade dollars first
The upgrades that age well are usually the ones nobody notices from the street.
Spend first on items that improve performance: better impact-rated shingles if the budget works, full flashing replacement instead of reusing questionable metal, corrected ventilation, and underlayment choices that fit the roof design and local code requirements. If the property has mixed roof types, such as shingles on the main house and low-slope sections over a patio cover or addition, treat those as separate assemblies with separate material decisions. A low-slope section should not be priced or built like a steep-slope shingle field.
Cosmetic upgrades come later. If funds are tight, I would rather see a homeowner choose a stronger system in a standard color than stretch the budget for premium aesthetics while keeping weak details underneath.
Solar homes need tighter planning
A reroof under solar is a different project than a standard tear-off. The roof crew, solar company, and electrician have to work from the same schedule, and the documentation needs to be clean before a single panel comes off. The post-storm reroofing guide for severe weather damage notes the need for detach-and-reset coordination and close timing between trades. That matches what we see in the field.
These jobs usually go better when the contractor addresses four points early:
- Pre-removal documentation: Panel layout, rail locations, attachment points, and existing wiring paths should be recorded before detach begins.
- Roofing and electrical sequencing: The roof needs to dry in on schedule so the solar reset does not leave the home exposed or the array offline longer than necessary.
- Attachment and flashing review: Every penetration needs fresh attention during reset. Shortcut work at this stage causes leaks months later.
- Warranty clarity: Homeowners should know who is responsible for the roof system, the detach-and-reset work, and any future issue at a solar penetration.
Solar also changes the replacement-versus-repair decision. If a damaged slope sits under panels, a small-looking repair can become expensive once detach-and-reset labor enters the picture. In that situation, a full replacement often makes more financial sense than trying to preserve an older roof section that may not match well and may not last.
Choose for the next storm cycle, not the last one
The smartest upgrade plan is usually simple. Build back with materials that fit your budget, your insurer, and the roof's actual exposure to hail, heat, and future service work. If the house has solar, plan the reroof and reset as one coordinated job. If the house has multiple roof types, scope them correctly from the start.
Homeowners rarely regret spending on durability, documentation, and clean installation details. They do regret paying twice for avoidable detach charges, mismatched repairs, and shortcuts hidden under new shingles.
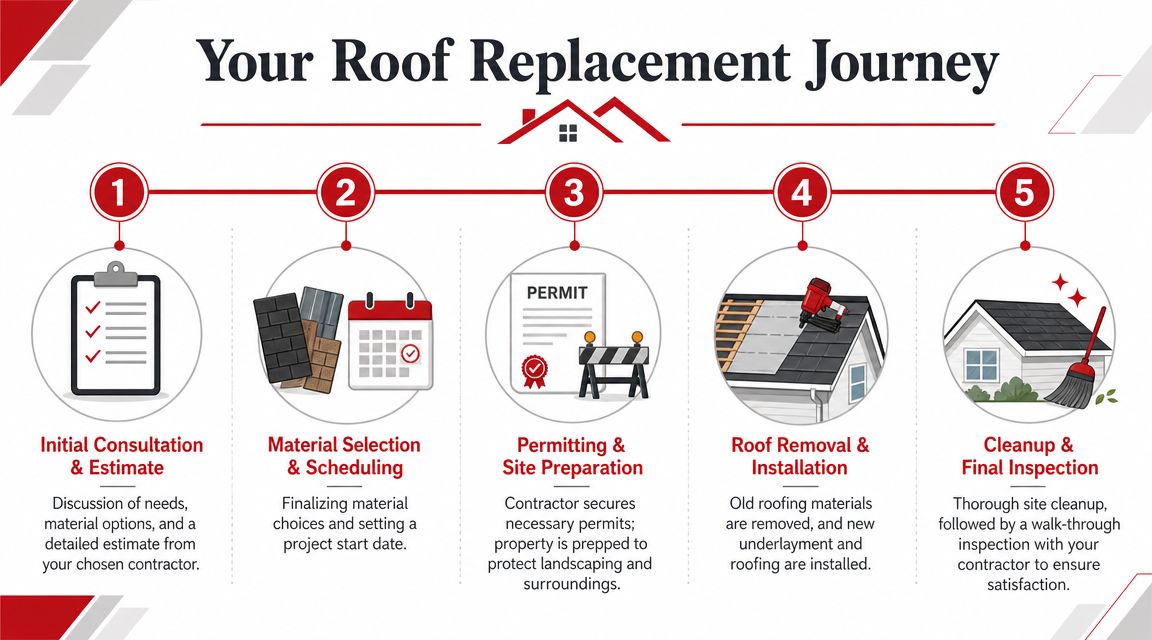
What to Expect During Your Roof Replacement
By the time install week arrives, homeowners in DFW are usually balancing three concerns at once: how long the house will be exposed, how disruptive the crew will be, and whether any new damage will show up once the old roof comes off. Those are fair concerns. A well-run replacement still creates noise, traffic, and a short stretch of inconvenience, but the work should follow a clear sequence and the home should not sit open longer than necessary.
The full process from signed scope to final closeout can stretch based on material availability, supplements, weather delays, and solar coordination. The install itself is usually much shorter. On a standard home, tear-off and dry-in move fast if the contractor has the crew, dumpster, and materials on site before day one.
This visual gives a clean overview of the normal sequence:
What happens on install week
Expect material delivery first, often a day ahead of tear-off. Shingles, underlayment, ridge, starter, and accessory metals may be loaded on the roof or staged in the driveway depending on site conditions. Crews should protect flower beds, windows, patio furniture, and high-traffic areas as much as the property allows, but this is still a construction site. If you work from home, plan for constant impact noise.
Tear-off is the revealing stage. Once shingles and felt come off, the contractor can inspect decking, flashing transitions, pipe penetrations, chimney areas, and any weak spots left by prior repairs. In Texas storm claims, this is often the point where hidden problems show up and a supplement becomes justified.
Common discoveries include:
- Soft or rotted decking around penetrations and valleys
- Metal details that were reused too long or installed wrong the first time
- Ventilation problems that shortened the life of the old roof
- Hail damage spread across enough slopes that a partial repair no longer makes financial sense
- Code-related items the insurer did not include in the first scope
Why some roofs that seem repairable still get replaced
This decision gets harder after a storm because surface damage does not always tell the full story. A slope may look repairable from the ground, but once you factor in bruised shingles across multiple elevations, broken accessory metals, underlayment exposure, and the age of the roof system, repair can become the more expensive choice over the next few years.
That is even more true on solar-equipped homes. If a damaged section sits under panels, the detach-and-reset cost changes the math fast. In that situation, preserving an older section just to avoid replacement often leads to mismatched materials, repeated labor charges, and another reroof sooner than expected. In the DFW market, where hail claims, code issues, and contractor volume all collide after major storms, good judgment matters more than a low initial number.
A replacement should solve the problem once.
Final walkthrough and closeout
Before final payment, the job needs a real closeout, not a quick glance from the driveway. Walk the property with the contractor if possible. Look at shingle lines, ridge caps, valleys, vents, flashings, gutters, paint damage, screens, and cleanup around the beds and fence line.
Ask for the paperwork while the file is still open:
- Manufacturer warranty information
- Workmanship warranty terms
- Final invoice and any approved change orders
- Documentation for supplements, if the claim changed after tear-off
- Solar detach-and-reset scope confirmation, if panels were involved
Good closeout protects you later. If a leak question, warranty issue, or resale disclosure comes up, clear documentation matters just as much as the shingles on the roof.
If you need help sorting out whether your roof should be repaired or fully replaced, Hail King Professionals handles storm inspections, insurance coordination, code-compliant reroofing, and solar detach-and-reset for homeowners across DFW and East Texas. The practical next step is a documented inspection that clarifies scope, identifies hidden issues, and gives you a clean path forward.