


Roof Penetration Sealing: A Complete DFW Homeowner’s Guide
You usually notice a roof penetration leak from inside first. It starts as a ceiling stain that doesn't make sense, a little discoloration near a bathroom, a damp spot by a fireplace chase, or a drip that only shows up during a hard Texas storm. Homeowners look at the big roof surface and assume a shingle failed. A lot of the time, that's not where the problem started.
The trouble is usually one of the small openings cut through the roof system. Plumbing vents, furnace flues, kitchen vents, skylights, satellite mounts, and now solar attachments all interrupt what should be a simple water-shedding surface. In DFW and East Texas, those details take a beating from intense sun, fast temperature swings, hail, and wind-driven rain. A penetration that looks fine from the yard can still be one storm away from leaking if the flashing was rushed or the materials weren't matched correctly.
Good roof penetration sealing isn't about smearing on more caulk. It's about building a layered path that forces water to stay on top of the system and move downhill. That's the difference between a patch that survives one season and a repair that holds up.
Why Small Holes Cause the Biggest Roof Leaks
A roof can handle a lot when the field of the system stays intact. The weak points are the interruptions. Every pipe, vent, bracket, or curb creates edges, transitions, fasteners, and lap lines. Water doesn't need a big opening. It only needs a tiny pathway and enough time.
That's why the most frustrating leaks are often the hardest to trace. Water can enter at a vent boot, travel along underlayment or decking, and show up several feet away inside the house. Homeowners see the stain and think the spot directly above it is the source. Many times, it isn't.
Why caulk-only repairs keep failing
The old habit was simple. See a gap, add mastic or caulk, and hope for the best. That approach still shows up every week on repair calls. It rarely lasts in North Texas weather.
Strong sun cooks exposed sealant. Hail bruises it. Movement around pipes and mounts breaks the bond. Once that bead cracks or pulls away, water gets behind it and the leak starts again.
Practical rule: If sealant is doing all the work, the repair is already on borrowed time.
Modern guidance has moved away from exposed sealant as the primary defense and toward layered flashing systems with integrated parts such as self-adhered membranes, metal or rubber collars, and proper step flashing. That same guidance calls for step flashing overlaps of at least 2 inches and a vertical flashing leg of at least 4 inches so water sheds correctly through the assembly, as outlined in this roof penetration flashing guidance.
What actually works
A durable repair uses parts that work together:
- Underlayment as backup protection beneath the penetration area
- Flashing as the primary water-control component
- Roof covering integrated over and around the flashing
- Sealant only where the detail calls for it
That sequence matters more than the tube label in your hand. On a shingle roof, the right repair should look boring when it's done. No giant blobs of roof cement. No exposed patchwork. Just clean laps, proper placement, and water directed where it's supposed to go.
In Texas, simple-looking details need professional discipline. The smaller the hole, the more exact the waterproofing has to be.
Anatomy of a Roof Identifying Your Penetrations
Before you can judge a leak risk, you need to know what you're looking at. Not all penetrations behave the same way, and they absolutely shouldn't be sealed the same way.
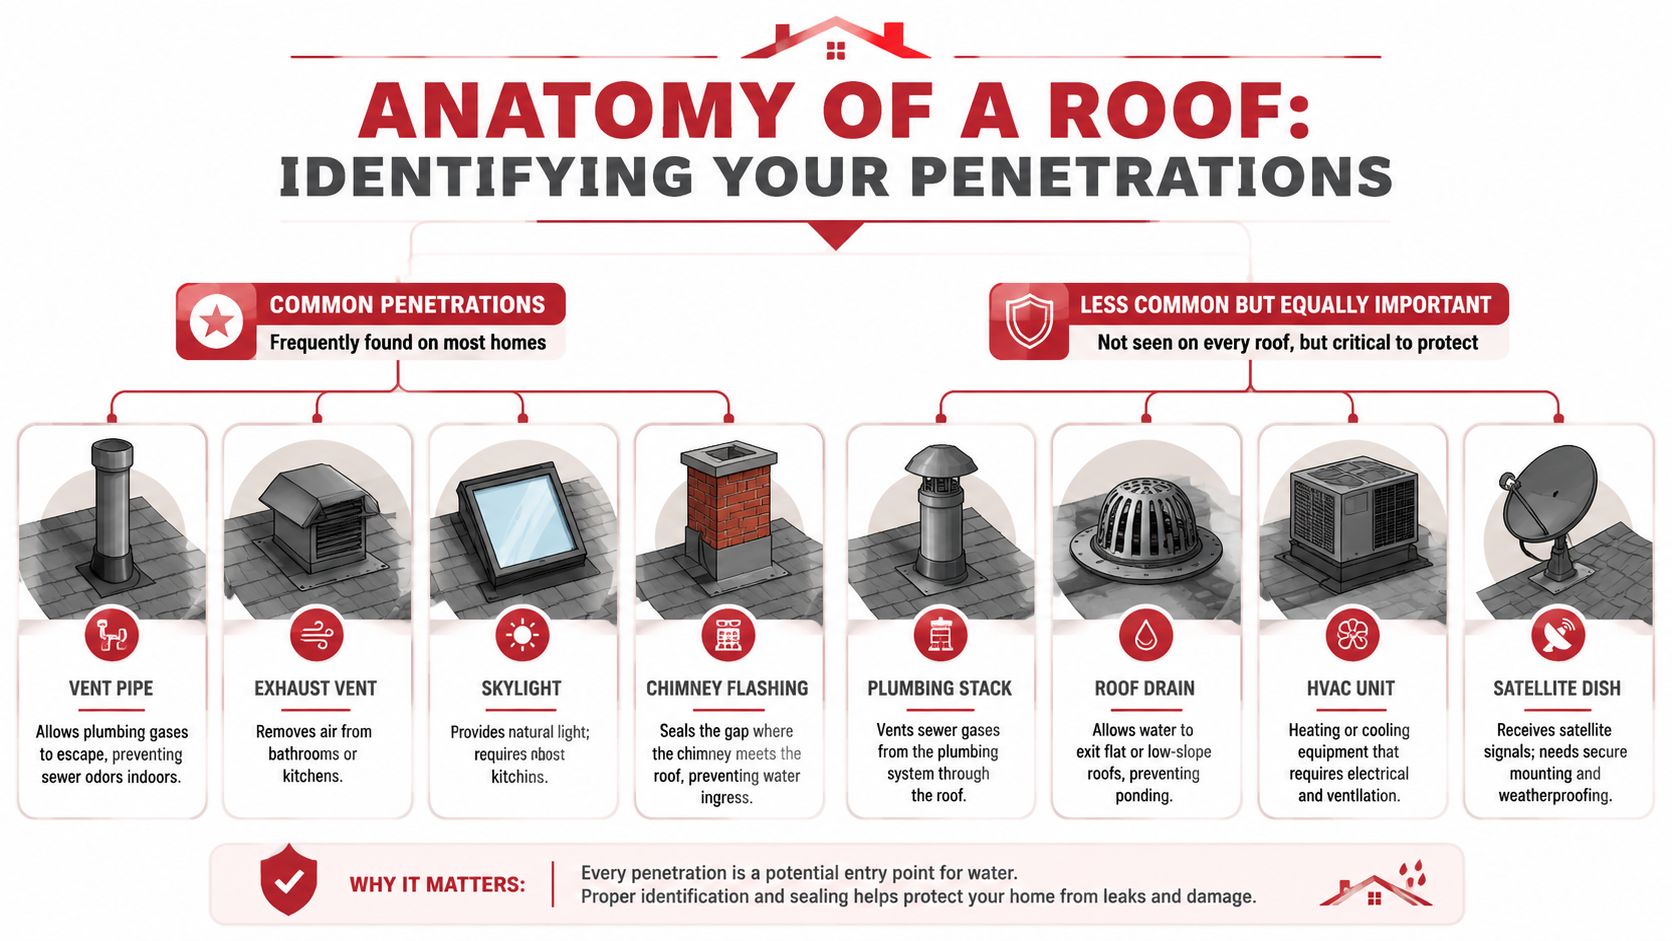
The common penetrations on residential roofs
Most homes in DFW and East Texas have a mix of these:
- Plumbing vent pipes that release sewer gas and pressure from the drain system
- Bathroom and kitchen exhaust vents that move moist air out of the home
- Furnace or water-heater flues that need heat-safe flashing details
- Skylights with perimeter flashing on all sides
- Chimneys that require more complex base flashing and counter-flashing
- Satellite or service mounts that add fastener penetrations
- Solar attachments that create repeated bracket penetrations across multiple roof planes
A pipe boot on an asphalt shingle roof is one thing. A brick chimney on a cut-up roof is another. A solar array with multiple mounting points is a different category again, because now you're dealing with repeated penetrations, layout accuracy, and long-term service access.
Why roof type changes the method
The roof covering controls the repair strategy.
| Roof Surface | Typical Penetration Behavior | What matters most |
|---|---|---|
| Asphalt shingles | Water sheds by overlap | Proper shingle-style layering and concealed laps |
| Metal roofing | Panels move with heat | Flexible, compatible flashing and movement allowance |
| Low-slope or flat roofing | Water drains slower and can concentrate | Fully integrated flashing details, edge sealing, and membrane compatibility |
On steep-slope roofs, gravity helps when the system is layered correctly. On low-slope roofs, small mistakes become major leaks because runoff lingers longer around penetrations.
Difficult penetrations separate real roof work from cosmetic patching.
That's where method selection matters. Industry guidance for low-slope penetrations distinguishes among different approaches and notes that pitch pockets are often a last resort, not the default answer. The same guidance stresses that a proper low-slope seal depends on complete integration of foam support, edge sealing, and final flashing, which you can review in this discussion of low-slope roof penetrations.
The solar factor in Texas roofs
Solar adds a layer of complexity many generic roofing articles ignore. During a reroof, detach-and-reset work isn't just about removing panels and putting them back. Each mounting point has to go back into a roof assembly that still controls water properly after the new system is installed.
That's where bad contractors get exposed. Anyone can run lag bolts into framing. Not everyone can rebuild those penetrations so they still perform after hail, heat, and expansion cycles.
Choosing the Right Flashing and Sealant
Material choice is where a lot of bad roof penetration sealing starts. Homeowners get sold on a sealant brand or a “universal” boot, but roof penetrations aren't universal. The right combination depends on the roof type, the shape of the penetration, and whether the materials touching each other are compatible.
If you want a quick primer on the role flashing plays in the first place, this guide on what roof flashing is and why it matters is a useful reference.
Compatibility matters more than marketing
A good sealant can still fail if it's paired with the wrong flashing or installed over the wrong surface. On shingles, you need a detail that sheds water with the courses. On metal, the assembly has to tolerate movement. On low-slope roofing, the flashing and sealant have to belong to the membrane system instead of fighting it.
Here's the practical way to look at it.
| Roof Type | Penetration Type | Recommended Flashing | Recommended Sealant | Key Consideration |
|---|---|---|---|---|
| Asphalt shingle | Plumbing vent pipe | Metal base flashing with a fitted rubber boot or collar | Compatible sealant used sparingly at designated points | The flange has to integrate with shingle courses, not sit on top like a patch |
| Asphalt shingle | Chimney or wall intersection | Step flashing plus counter-flashing | Sealant only where the flashing detail calls for it | Water has to move over each lap in sequence |
| Asphalt shingle | Solar mounts | Metal flashing plus underlayment integration around each bracket | Compatible sealant as secondary protection | Repeated penetrations multiply the risk of layout or sequencing errors |
| Metal roof | Pipe or conduit | Roof-profile-compatible metal flashing or flexible boot made for metal roofing | Flexible, roof-compatible sealant | Expansion and contraction will punish rigid, over-caulked repairs |
| Low-slope roof | Irregular penetration or support | Membrane-compatible flashing assembly, sometimes custom fabricated | Membrane-compatible sealant only | Surface-applied shortcuts often turn into maintenance problems |
| Tile or specialty profile | Conduit or mount | Formed flashing detail that fits the roof profile beneath the covering | Limited use of compatible sealant | The geometry has to direct water, not trap it |
What works in DFW weather
North Texas and East Texas roofs see long sun exposure and violent storm cycles. That means exposed sealant ages faster than anticipated, especially where installers leave it as the first and only defense.
For that reason, I lean heavily toward repairs where the flashing shape and lap sequence do the primary work. Sealant should support the detail, not replace it. On solar penetrations, that becomes even more important because the roof also has to tolerate service visits, vibration, and future panel work.
Good material choices usually follow these rules
- Match the flashing to the roof system. A detail that works on shingles may be wrong on metal or low-slope roofing.
- Treat heat-producing penetrations separately. Flues and similar penetrations need materials appropriate for temperature exposure.
- Avoid “one tube fixes.” If the product pitch sounds like it solves every roof problem by itself, that's usually the warning sign.
- Plan for movement. Pipes, metal panels, and solar attachments all move. The detail has to accommodate that.
The best-looking repair isn't the one with the most goo on it. It's the one where every layer belongs there.
A Step-by-Step Guide to a Watertight Seal
A DFW roof can look fine on a dry afternoon and still leak the first time a spring storm drives rain uphill under the shingles. I see that after hail events and after rushed solar work. The problem usually starts in the setup, not in the last bead of sealant.
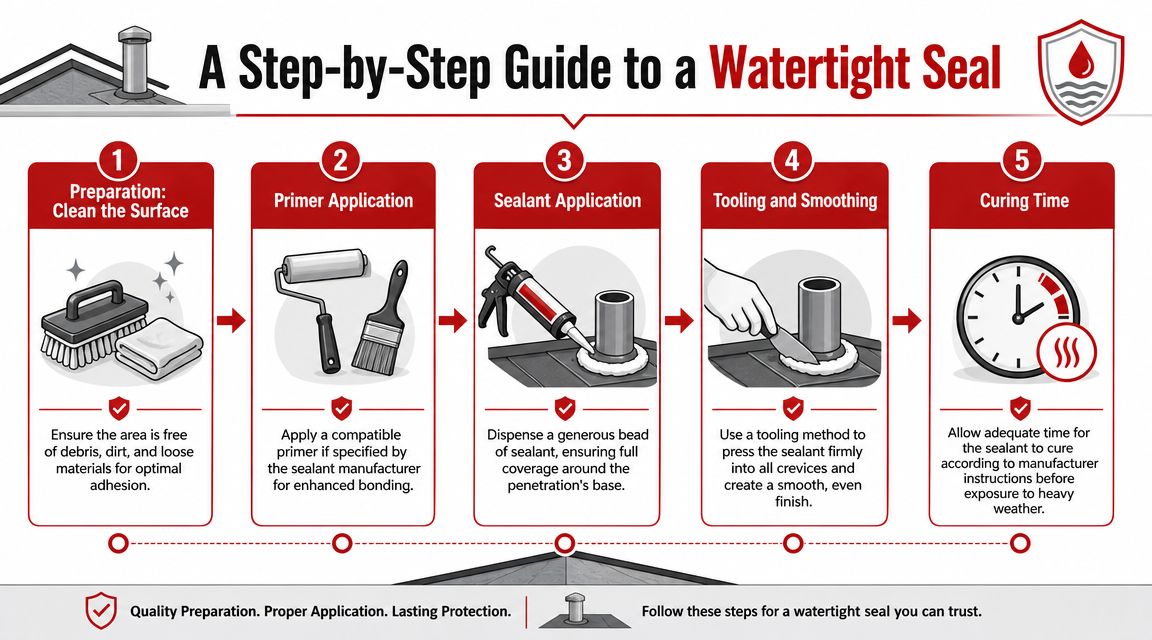
Start with access and prep
Open enough of the roof to rebuild the detail correctly. Around shingles, that means lifting or removing the surrounding courses without tearing them up. Around solar mounts, it often means pulling hardware so you can see the underlayment, decking condition, and any hidden water staining.
Then clean the work area completely. Remove dirt, loose granules, old mastics, failed sealant, and any fasteners that no longer belong there. A flashing flange cannot sit flat over debris, and in Texas heat, a bad bond that looks acceptable on day one often shrinks, hardens, and opens up by the end of summer.
If there is any doubt about hidden moisture around the opening, a thermal imaging roof inspection for moisture intrusion can help confirm whether the leak stayed local or spread under the field shingles.
Cut and size the opening correctly
A good seal starts with a controlled opening. If the hole is oversized, installers try to make up the difference with sealant. That shortcut fails fast on roofs that bake in the sun and then take wind-driven rain.
For pipe penetrations, Building America guidance on flashing penetrations in existing roofs recommends keeping the opening tight to the pipe, using properly fastened metal flashing, and maintaining the right pipe height above the roof. That guidance lines up with what works in the field. Tight geometry gives the flashing something solid to do its job against.
One sentence I tell crews all the time: tight layout beats thick caulk.
Install the water-control layers in sequence
The order matters more than the amount of sealant. Build the detail so water sheds downhill naturally.
A clean sequence usually looks like this:
- Expose the surrounding roof area carefully so the new detail can tie back into the existing system.
- Repair or replace damaged underlayment before any flashing goes in.
- Set the flashing flat to the roof plane with no rocking, buckling, or trapped debris under the flange.
- Reinstall the roof covering in shingle fashion so upper materials lap over lower materials.
- Seal only the manufacturer-intended points such as select fastener heads or termination points.
On composition roofs, that often means the upper flange disappears under the course above while the lower section stays free to drain. On tile or specialty profiles, the flashing has to match the shape of the roof so water moves out instead of ponding behind a raised edge.
Handle solar detach-and-reset penetrations like new roof details
Solar reroof work is where a lot of expensive leaks start. The old panel layout rarely drops back on the new roof perfectly, and rushed crews often try to reuse penetrations, overdrill decking, or bury bad fitment under sealant.
Treat each attachment and conduit as a fresh waterproofing detail. Verify framing location. Confirm the mount type matches the roof system. Replace damaged flashing instead of reusing bent parts. If conduit needs a new path, cut and flash that opening as if it were original construction, with proper support and drainage built in.
For conduit penetrations, one common field method is to drill the opening to fit the planned sleeve or conduit size and seat the flashing so it tucks correctly under the course above and aligns with the roof's drainage path, as shown in this installation guide for sealing roof penetrations. On detach-and-reset jobs in North Texas, I also check for hail bruising around old mount locations and for brittle shingles that crack when hardware is reinstalled.
Watch the process mindset here:
Finish with cure time and inspection
Do not rush the last part. Even a well-built detail can fail early if the sealant is disturbed before cure, if a flange edge is left slightly lifted, or if a shingle sits cocked over the flashing and creates a water trap.
I look for small defects here because small defects become service calls. A bead that bridged instead of bonded. A fastener set in the wrong place. A corner that did not seat tight after the roof warmed up. Those are the details that separate a repair that lasts from one that makes it through one storm.
Homeowners understand the importance of home window seals because failed seals let air and moisture where they do not belong. Roof penetrations work the same way, except the consequences are usually more expensive.
Common Sealing Failures and How to Spot Them
A lot of homeowners assume a leaking penetration just needs more sealant. Usually, that's treating the symptom and leaving the cause untouched. If the water-control layers were assembled wrong, extra caulk only hides the problem for a while.
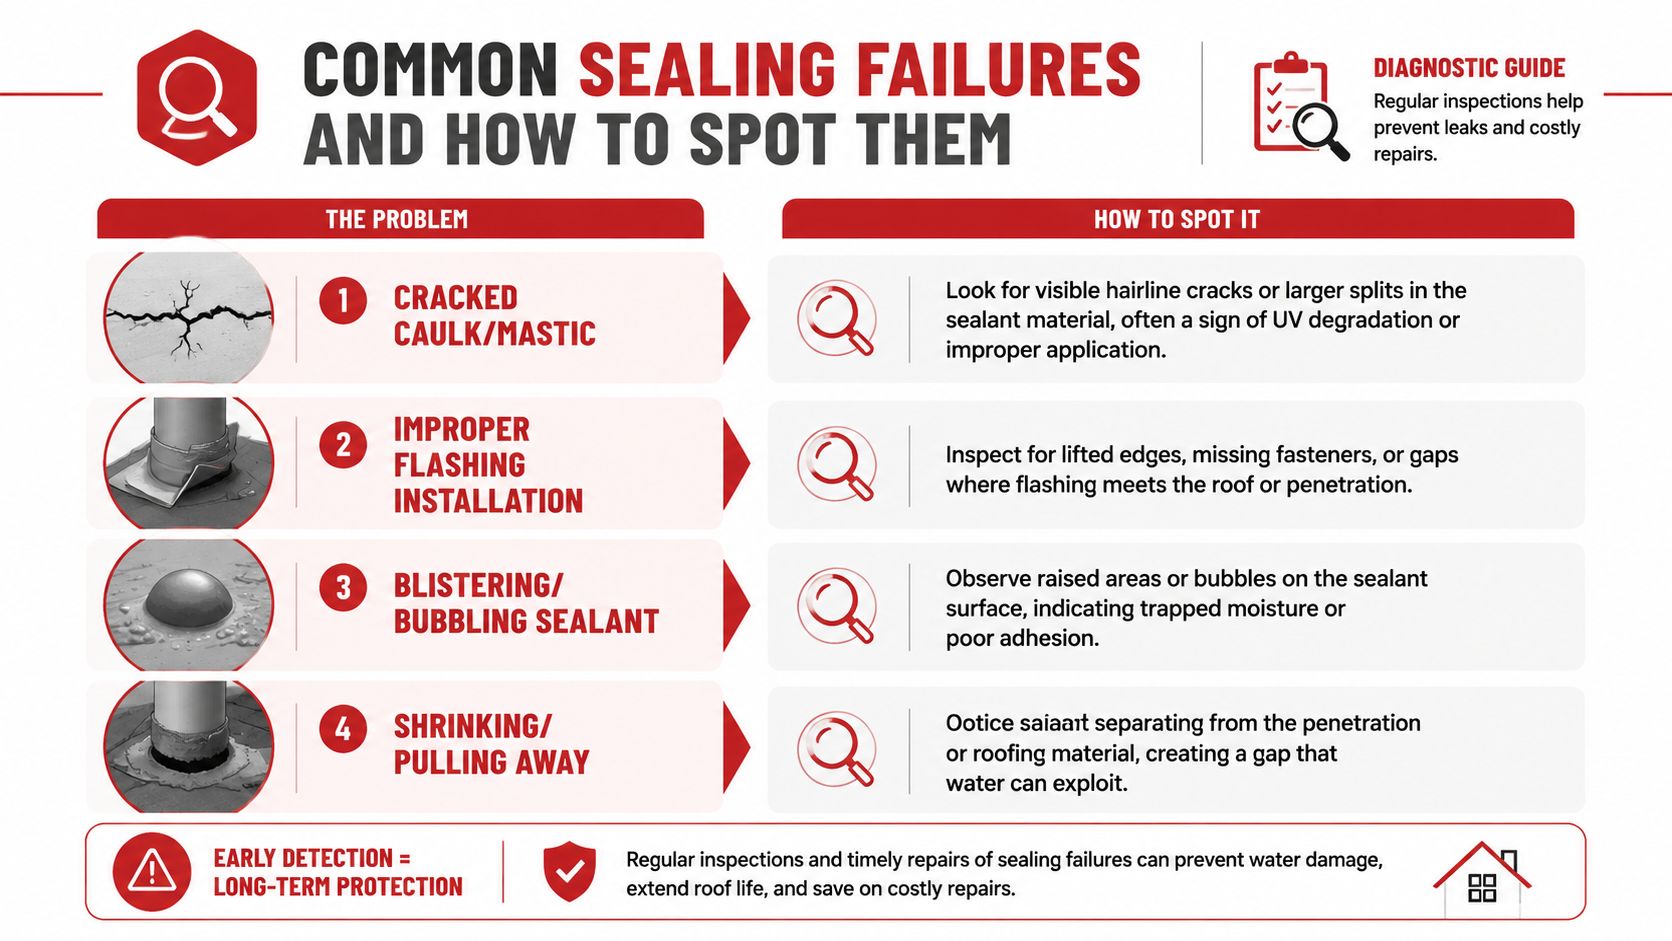
Failure signs you can often see from the roof edge or ladder
Look for these clues:
- Cracked exposed sealant that has dried out under sun exposure
- Shrinking or pull-away where the sealant no longer touches both surfaces
- Lifted flashing edges that no longer sit tight to the roof plane
- Face-nailed or improperly patched shingles around the penetration
- Rusting or staining metal that suggests trapped moisture
- Solar mounts with sloppy sealant halos instead of integrated flashing
These failures don't all mean the same repair. A cracked bead might be minor. Lifted flashing often means the detail was wrong from the beginning.
The mistake behind most recurring leaks
The biggest issue is poor sequencing. Roofing and building-science guidance stresses that the correct water-control order is underlayment, flashing, shingles, and only then sealant if needed, with materials lapped in shingle fashion and kept chemically compatible. That same guidance specifically notes that solar mounting brackets must be integrated into the roof's continuous water-control layer, which is why simple caulk-heavy solar repairs often fail. That point is covered in this building-science discussion of roof assembly sequencing.
If the laps are wrong, the leak is already designed into the roof.
That same logic shows up elsewhere on a house. If you've ever looked into the importance of home window seals, the principle is familiar. Water management depends on the assembly, not just on a bead of sealant at the visible edge.
When the leak path isn't obvious
Some penetration leaks don't show themselves clearly from the surface. Water can travel, especially after storms. In those cases, thermal imaging can help narrow down where moisture is moving beneath the visible roof surface. This overview of thermal imaging roof inspection is worth reading if a stain keeps returning and the source still isn't obvious.
What a proper repair usually changes
A correct fix often means removing the failed detail and rebuilding it, not topping it off. That can include new flashing, new surrounding shingles, a corrected underlayment tie-in, or reworking a solar mount location so water has a clean path around it.
That's why “sealed” and “waterproofed” aren't the same thing. Plenty of penetrations are sealed. Far fewer are sealed correctly.
When to Skip DIY and Call a DFW Roofing Pro
A lot of leak calls start the same way. A homeowner sealed around a pipe boot or solar attachment on a dry Saturday, then the next hard rain pushes water into the attic from somewhere else. The problem was never the visible crack alone. The problem was the flashing, the underlayment tie-in, or the way the penetration was set into the roof system in the first place.
That line matters. Touch-up work is one category. Rebuilding a roof detail is another.
A handy homeowner can sometimes handle a minor exposed sealant repair on an accessory that is still flashed correctly. Once the job requires lifting shingles, replacing a boot, resetting metal, tying new materials into existing underlayment, or removing solar components to rebuild the waterproofing, it needs a roofer who does this work every week in North Texas conditions.
Situations that usually need a pro
Bring in a roofing contractor when any of these apply:
- Hail or storm damage is part of the story. In DFW and East Texas, impact can bruise shingles, crack boots, loosen fasteners, and distort metal flashings around the penetration.
- The roof is older or brittle. Sun-cooked shingles often tear when they are lifted, and a simple repair can turn into a larger problem fast.
- The detail is complex. Chimneys, skylights, roof-to-wall areas, dead valleys, and low-slope penetrations need proper sequencing, not surface patching.
- Solar detach-and-reset is involved. The panels and racking have to come off, the penetration area has to be rebuilt correctly, and the mounts have to go back in without creating new leak points.
- The leak came back after somebody already sealed it. Repeat leaks usually mean water is getting in above or beside the spot that was treated.
Texas weather is hard on penetration details. Intense sun dries out exposed sealants and ages rubber components. Hail can shorten the life of boots and flashing even when the damage is not obvious from the ground. Wind-driven rain tests every lap and fastener. A repair that survives a light shower can still fail during the next spring storm line in Collin County, Tarrant County, or out toward East Texas.
Solar work deserves special caution. I see detach-and-reset jobs where the roofing part was treated like an afterthought, with reused flashings, overdriven lag bolts, or fresh sealant smeared over old hardware. That is how you end up with leaks months later, after the crew is gone and the stain shows up inside. On a proper reset, the roof penetrations get inspected, damaged components get replaced, flashing is rebuilt as needed, and every mount is integrated back into the roof assembly the right way.
There is also a paperwork side to this after storms. Insurance carriers, adjusters, and future buyers all look harder at repairs when hail has been through the area. Clean documentation, code-aware repair methods, and photos of what was replaced matter. So does making the roof easier to maintain and reroof later.
A good penetration repair should reduce future problems for the homeowner, the solar crew, and the next roofer who has to work on that house.
If you are still weighing a DIY approach, measure the risk by what has to come apart to do the job correctly. Surface maintenance is one thing. Removing roofing materials and rebuilding the water-shedding layers is skilled roof work. This guide on do-it-yourself roof repairs gives a fair picture of where homeowner maintenance usually stops.
The best call is the one that prevents a second repair.
If you're dealing with a stubborn leak, hail damage around vents and flashing, or a reroof that involves solar detach-and-reset, Hail King Professionals can help. Their team has served Dallas-Fort Worth and East Texas since 1991 with code-compliant roof repairs, replacements, leak diagnostics, and solar-coordinated reroofing built for Texas weather.