


Siding Water Damage: A Texas Homeowner’s Guide
The rain finally stops. The gutters quit overflowing, the wind settles down, and the yard starts dripping instead of blowing sideways. In Dallas, Fort Worth, Arlington, Tyler, and Longview, that moment feels like the danger has passed.
Sometimes it has. Sometimes it hasn't.
A lot of Texas homeowners walk the property after a storm and check the obvious trouble spots first. Missing shingles. Bent gutters. Fence panels on the ground. What often gets missed is the slower problem that starts after the storm, when water has already slipped behind the siding and into the wall assembly. At that point, the exterior can still look mostly normal while the sheathing, insulation, and framing begin staying wet longer than they should.
That's what makes siding water damage so expensive. The visible damage is often minor compared with what's happening underneath. A little bubbling paint, a loose panel, or cracked caulk around a window can be the early sign of hidden structural decay. In humid, storm-prone parts of Texas, that hidden decay is a problem worth taking seriously, but it's also manageable if you catch it early and make the right repair decision.
After the Storm Passes What Water Damage Lurks Behind Your Siding
A common Texas pattern goes like this. A severe thunderstorm rolls through Plano or McKinney in the evening. Wind drives rain against one side of the house for an hour, sometimes longer. The next morning, the siding doesn't look catastrophic. Maybe there's a little staining under a window, maybe one corner trim piece looks slightly separated, and maybe the caulk line at a penetration looks rough from heat and age.
That doesn't look urgent to most homeowners.
But wind-driven rain doesn't need a huge opening. It only needs a weak joint, failed flashing, deteriorated caulk, or a section of siding that was never installed quite right. Once water gets behind the outer surface, it can sit where you can't see it. In Texas, repeated storms, high humidity, and hard heat cycles make that worse because materials expand, contract, dry unevenly, and break down over time.
Water behind siding is rarely a one-storm problem. More often, one storm exposes a weakness that has been developing for months.
The houses most at risk aren't always the oldest or the cheapest. Newer homes can have trouble too if flashing details were rushed, house wrap was cut poorly, or window and door transitions weren't sealed correctly. Older homes in Mesquite, Garland, Marshall, or San Marcos often have a different issue. Time, sun exposure, and repeated weather movement wear out caulk, loosen trim, and create entry points where water follows gravity into the wall.
That's why siding water damage deserves the same attention homeowners give roof leaks. It can affect curb appeal at first, but the significant cost becomes apparent when wet sheathing softens, insulation loses performance, and framing starts to deteriorate.
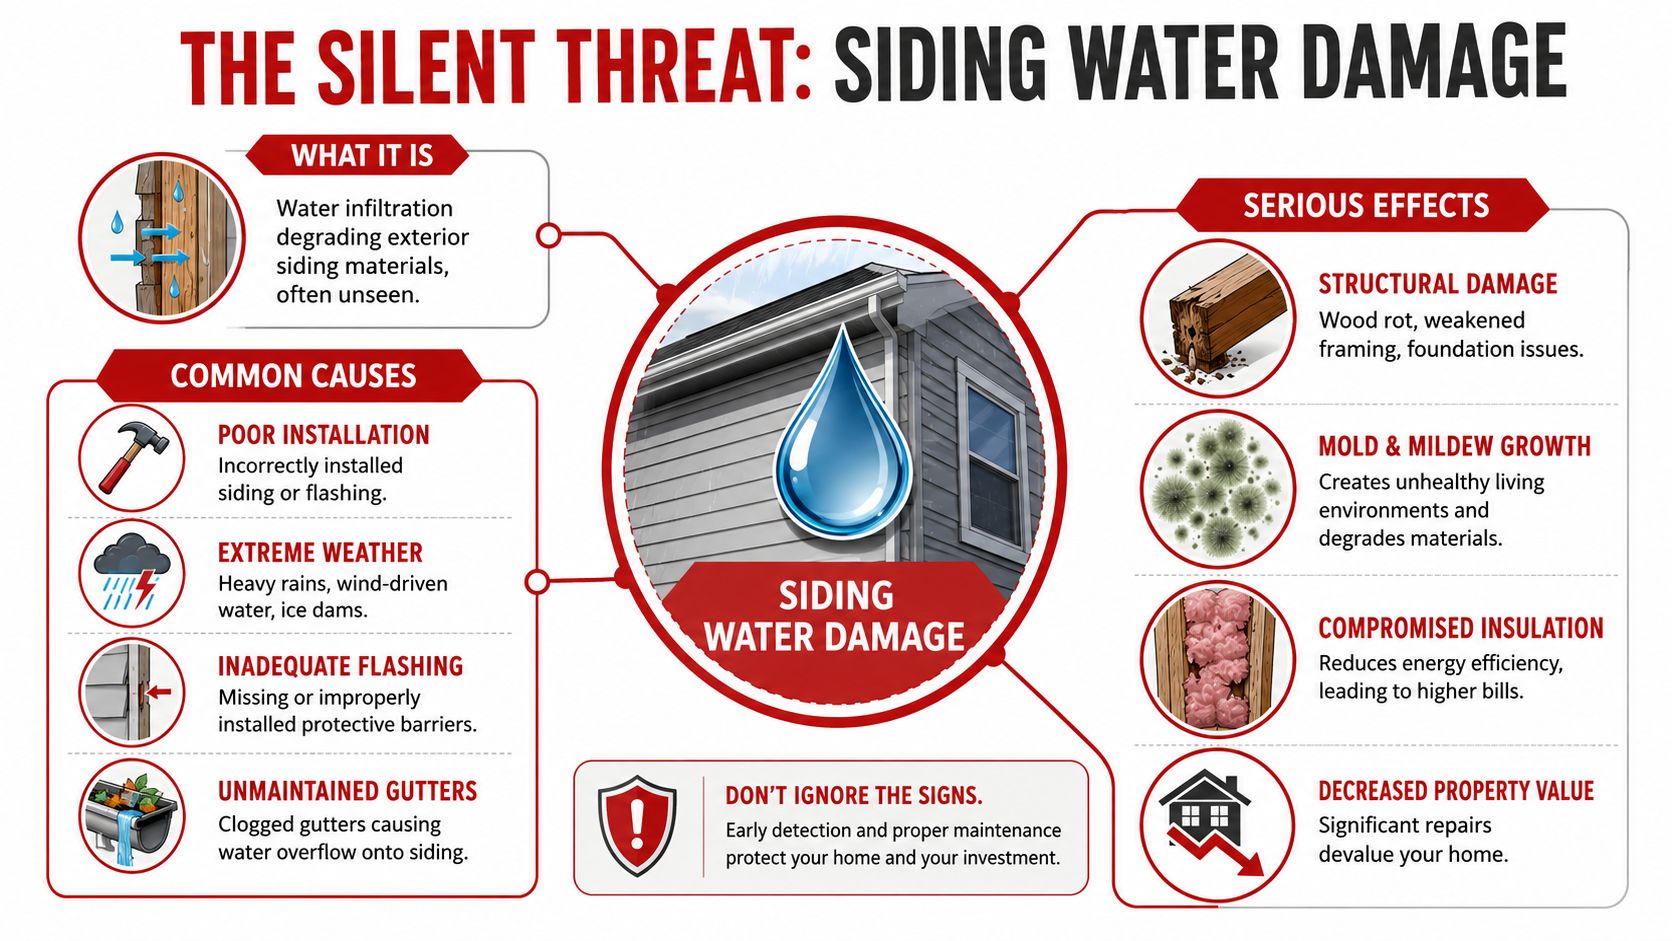
The Hidden Threat of Siding Water Damage
Siding water damage puts the wall assembly at risk long before the house looks badly damaged from the street.
What concerns me most on Texas homes is not the warped panel or the stained trim itself. It is the moisture that gets past the cladding and stays in the wall cavity, where homeowners cannot track it day to day. In Dallas-Fort Worth and East Texas, that hidden moisture can linger because storm cycles, humidity, and heat keep materials under constant stress.
Why the visible damage can fool you
A wall can hold together outwardly while the layers behind it are already breaking down. Sheathing can soften. Insulation can stay damp and lose performance. Framing can begin to absorb repeated moisture long before a homeowner sees interior drywall damage.
That hidden progression is the expensive part.
As noted by Wrozek Roofing on hidden structural damage from siding problems, many siding problems are first treated as surface issues even though trapped moisture behind the cladding can lead to serious structural decay. The same source connects soft or spongy siding areas with symptoms homeowners often miss at first, including drafts, higher energy use, and doors that no longer operate cleanly.
For homeowners who want a broader look at interior warning patterns, your guide to wall water damage is a useful companion reference.
How hidden decay starts on Texas homes
On homes across North Texas and East Texas, the pattern is usually straightforward. Water gets in at a joint, penetration, window edge, roof-to-wall intersection, or failed trim connection. Then it keeps coming back to the same area.
Repeated wetting causes more than discoloration. Wood-based sheathing can swell and lose holding strength around fasteners. Nails and staples can loosen their grip. Housewrap and flashing details that were supposed to direct water out can stop doing their job once surrounding materials shift, split, or rot. In humid conditions, that damp cavity can also support mold growth and indoor air complaints.
Small openings create large repair scopes when they stay active for months.
Why delay changes the repair scope
Early siding water damage is often limited to one detail and the materials directly around it. Delay gives moisture time to spread down and sideways, especially around windows, corners, band boards, and lower wall sections where drainage is slow.
That changes the conversation from replacing a few boards or resealing trim to opening the wall, replacing deteriorated sheathing, correcting flashing, drying the cavity, and rebuilding the exterior so the leak path is fixed. On some homes, the siding itself is not the highest cost. The hidden structural repair behind it is.
That is why a minor exterior symptom deserves a serious inspection. The visible damage is often the smallest part of the problem.
Recognizing the Warning Signs of Water Intrusion
The best time to catch siding water damage is before the wall starts failing in obvious ways. A careful walkaround can reveal a lot, especially after heavy rain, hail, or a season of repeated storms in Frisco, Irving, Austin, or New Braunfels.
Start with what you can see from the ground.
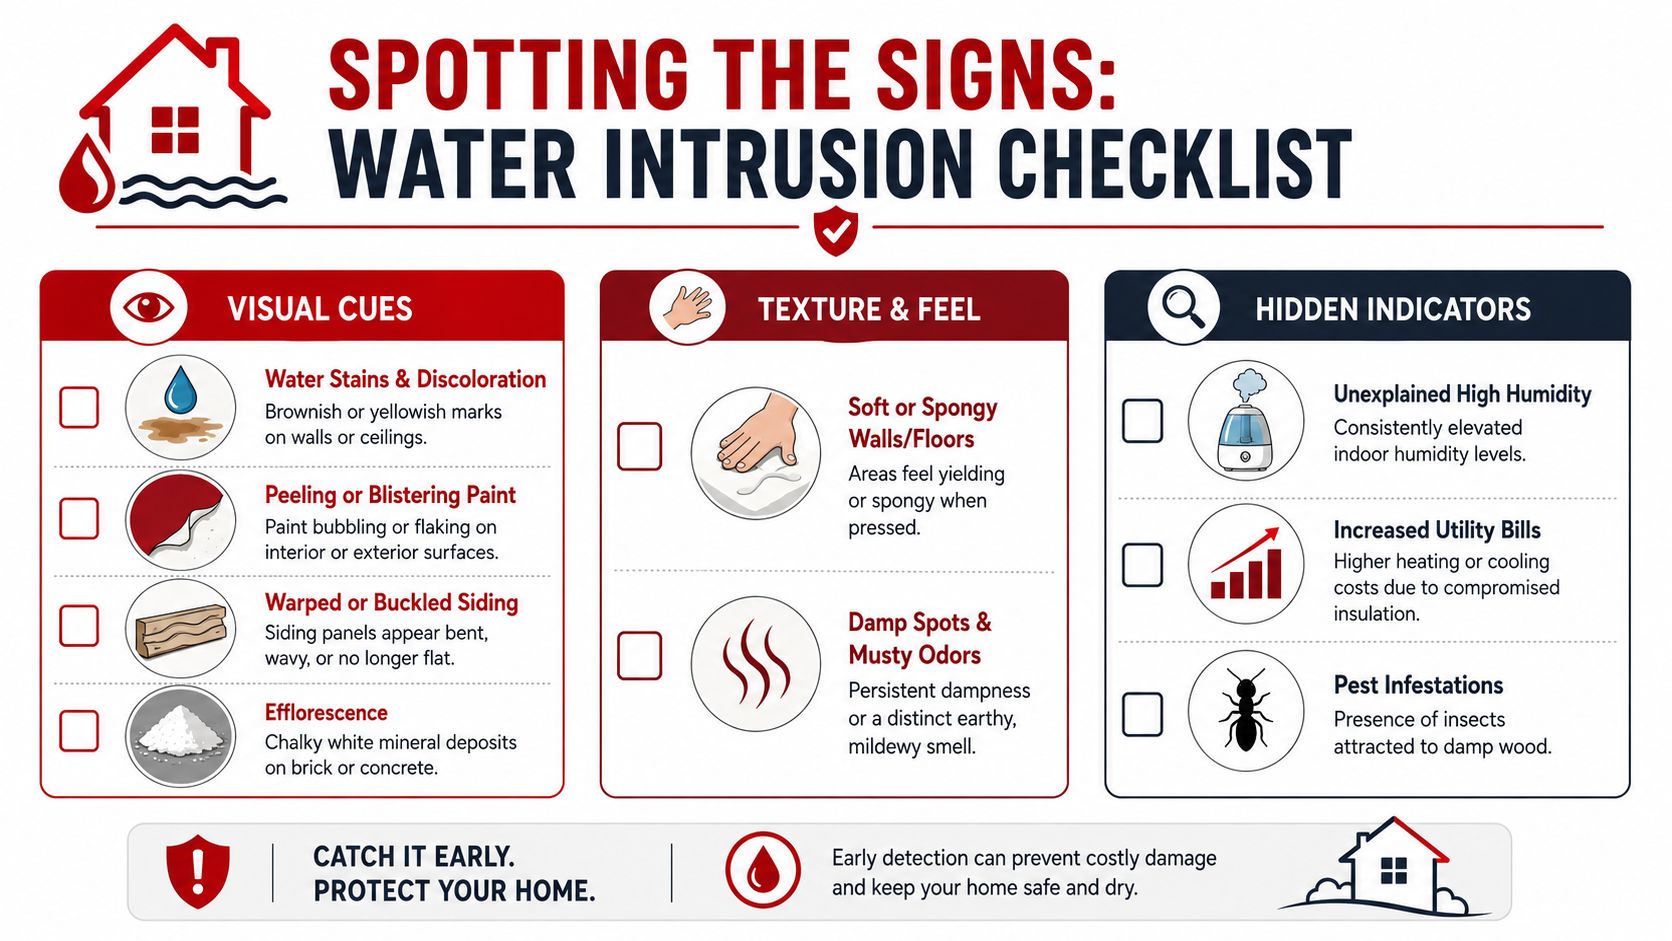
Visual signs outside the home
Look along the lower courses of siding, below windows, around door trim, under roof-to-wall intersections, and beneath gutters.
- Warped or wavy panels: If a section no longer sits flat, water may have affected the panel itself or the substrate behind it.
- Peeling paint or bubbling finish: This often shows up where moisture keeps pushing outward from behind the surface.
- Staining or discoloration: Brown, dark, or uneven streaking can point to recurring runoff or a failed detail above.
- Mildew or algae growth: Surface growth doesn't always mean wall damage, but it does tell you that area stays wetter than it should.
- Rust marks near fasteners or metal trim: That can signal prolonged moisture exposure.
What to feel for by hand
If you can safely reach an area from the ground, press gently. Don't force anything.
Soft, spongy, or crumbling siding matters because it often means the material has absorbed too much moisture for too long. According to Window World Eau Claire's explanation of siding damage from water, wood fibers reach critical saturation at more than 25% moisture content, and structural decay can begin within 3 to 6 months. The same source notes that damaged caulking becomes both a cause and an effect of water exposure, because cracked caulk loses adhesion and lets more water into panel seams, accelerating warping.
That's why a soft spot isn't just a surface issue. It often signals that the wall assembly has stayed wet longer than the siding was designed to tolerate.
For a quick visual on what these issues can look like in the field, this walkthrough is useful:
Indirect signs inside the house
Sometimes the siding gives less evidence than the interior does. Pay attention if you notice:
- Musty odors near exterior walls
- Interior drafts that weren't there before
- Paint changes around windows or baseboards
- A room that suddenly feels harder to cool
- A door or window that starts sticking near an exterior wall
If you're trying to connect exterior clues to interior symptoms, your guide to wall water damage is a practical companion resource. It helps homeowners recognize when a siding issue may already be affecting the wall cavity and inside finishes.
If the outside shows only a small flaw, but the inside smells musty or feels damp, trust the combined evidence, not the cleaner-looking surface.
Your Siding Inspection Checklist for Texas Homes
A good inspection doesn't need a ladder to be useful. In fact, most homeowners should keep it simple and stay on the ground. The goal is to inspect safely, consistently, and right after the kind of weather Texas homes see every year.
Start with a full perimeter walk
Begin at the front corner of the house and move one direction all the way around. Don't jump from spot to spot. Patterns matter, and you'll miss them if you inspect randomly.
Use this ground-level checklist:
- Look up first. Check roof edges, eaves, and gutter lines for spots where water may be dumping onto siding.
- Study window and door trim. These transitions fail often because several materials meet in a tight area.
- Inspect corners carefully. Corner boards and vertical seams are common entry points.
- Check the base of the wall. Splashback, poor drainage, and slow drying often show up near the foundation.
- Scan for shadow lines. Warping is easier to see when sunlight hits from the side.
Focus on the details that usually fail first
Most siding leaks don't start in the middle of a perfect panel. They start where the system changes direction or gets interrupted.
Pay close attention to these areas:
- Below gutters and downspouts: Overflow sends concentrated water down the wall.
- Around penetrations: Vents, light fixtures, meter boxes, and hose bibs often have vulnerable sealant lines.
- At horizontal joints and butt ends: These spots can open up with time and heat movement.
- Where siding meets masonry or rooflines: Transitions need proper flashing to stay dry.
If you want to understand how professionals locate moisture that isn't visible from the outside, identifying hidden home damage gives a useful overview of thermal imaging and why concealed wet areas can escape a basic visual check.
Check caulk, flashing, and material movement
Move slowly around every window, door, and trim intersection. Cracked, missing, or separated caulk deserves attention. So does bent or exposed flashing. If siding was installed too tight, heat expansion can distort panels and open pathways where water sits instead of draining.
For homeowners comparing material behavior and installation details, this overview on what vinyl siding is and how it performs helps explain why some systems shed water better than others when properly installed.
Walk the house once after the storm, then walk it again the next morning. Fresh moisture signs often show up more clearly after the wall has had a few hours to dry unevenly.
Know when your checklist has done enough
A homeowner inspection is for spotting clues, not proving the full extent of damage. If you find multiple red flags in one area, such as loose trim, cracked sealant, staining, and a soft spot near the same window, the next step isn't guessing. It's getting a proper diagnosis before a hidden wall problem grows.
Repair or Replace Deciding on Siding Solutions and Costs
The right fix depends on one question. Is the damage limited to the outer material, or has water already affected the wall behind it?
That answer determines whether a simple repair makes sense or whether replacement is the smarter move.
When a repair is the right call
A localized repair can work when the problem is small, recent, and confined to a clearly defined area. That usually means one damaged section, one failed joint, or one trim detail that allowed water in but hasn't caused broad deterioration.
Repairs usually make sense when:
- The affected area is isolated: One elevation or a small section near a window or corner.
- The substrate is still sound: No meaningful softness in sheathing or trim behind the panel.
- The cause is identifiable: A failed caulk joint, damaged flashing detail, or impact-related break.
- The siding is still serviceable overall: The rest of the wall system is aging normally.
Professional siding repair costs between $362 and $1,498 on average, with minor repairs starting at $200 and widespread damage reaching up to $16,330, according to Angi's siding repair cost guide. The same source states that siding repair costs range from $10 to $24 per square foot on average, with many homeowners spending $6,000 to $7,000 for repairs covering about 300 square feet.
When replacement is the better investment
Replacement becomes the better move when the visible siding damage is only part of the story. If water has been entering for a while, patching the face of the wall won't solve the underlying problem. You may need removal, drying, sheathing inspection, house wrap correction, flashing replacement, and new siding installation over a sound base.
Replacement is often the stronger decision when:
- Multiple symptoms appear together: Warping, softness, staining, and recurring leaks in the same area.
- The material has aged unevenly: Matching older panels becomes difficult and patched sections stand out.
- The wall has repeated failures: If one repair follows another, the assembly is telling you it needs a reset.
- You suspect hidden decay: Temporary fixes risk wasting money.
Most siding types last 20 to 40 years, but climate and installation quality can shorten that lifespan, especially when flashing or fastening details were poor from the start. That makes replacement less about appearance and more about restoring the wall's ability to manage water.
Cost comparison at a glance
| Siding Material | Average Repair Cost (per sq. ft.) | Average Replacement Cost (300 sq. ft.) |
|---|---|---|
| Vinyl siding | $10 to $24 | $16,000 to $20,000 or more |
| Fiber cement siding | $10 to $24 | $16,000 to $20,000 or more |
| Wood siding | $10 to $24 | $16,000 to $20,000 or more |
| Engineered wood siding | $10 to $24 | $16,000 to $20,000 or more |
The replacement range above comes from Peak Home Exteriors' siding repair and replacement cost discussion, which notes that major repairs spanning an entire wall or multiple elevations typically cost $16,000 to $20,000 or more.
A cheap patch is expensive when it covers up wet sheathing.
What works and what doesn't
What works is removing the cause of water entry, confirming the wall behind the siding is sound, and rebuilding the detail correctly. That may include new flashing, corrected house wrap laps, properly sealed penetrations, and replacement of damaged panels.
What usually doesn't work is treating a recurring moisture problem like a cosmetic defect. Fresh caulk over failed substrate, paint over swollen boards, or isolated panel replacement without checking behind the wall often buys appearance, not protection.
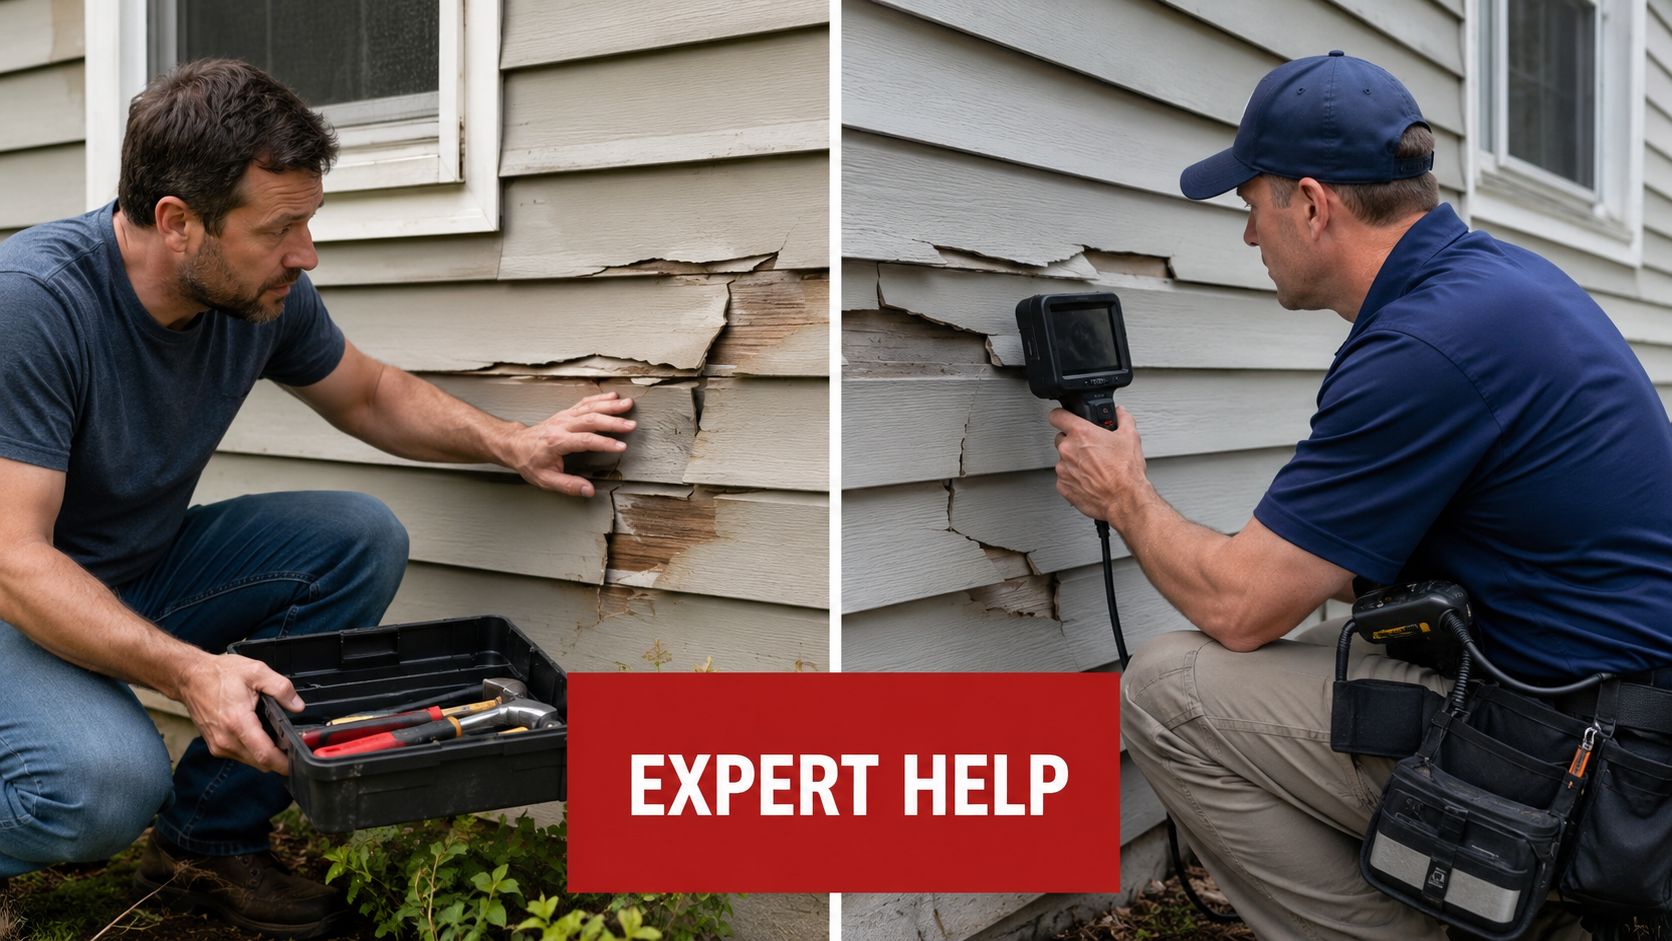
DIY Fixes vs Hiring a Professional Contractor
A lot of Texas siding damage looks small from the yard. A loose panel after a storm, a dark line under a window, a little swelling near the bottom edge. What worries me is what those signs can hide behind the wall, especially in Dallas-Fort Worth and East Texas where humidity, wind-driven rain, and long drying cycles can keep framing damp far longer than homeowners expect.
Homeowners can handle a few low-risk tasks. Cleaning gutters, cutting back shrubs, and watching for fresh gaps around trim all help reduce repeat exposure. Managing roof runoff also matters. Good downspout installation and drainage control keeps water from pounding the same wall section every time a storm rolls through.
DIY also has a place in short-term protection. If a piece of siding has come loose, securing the area from further exposure until a repair can be scheduled is reasonable. Careful photos after a storm are useful too, especially if the damage may involve wind or hail.
The line is crossed once water may be behind the siding.
At that point, the job is no longer about patching a visible defect. It is about finding the water path, checking the sheathing and framing, and confirming whether the wall can still dry properly. That often takes moisture readings, selective removal, flashing checks, and a trained inspection around windows, roof-to-wall transitions, penetrations, and lower wall edges where rot often takes hold unnoticed.
DIY repairs often go wrong. Fresh caulk can trap moisture inside the assembly. A replaced panel can hide stained sheathing that is already soft. Paint can cover a symptom for a season while decay keeps spreading into trim, studs, and sometimes the framing near the slab. On some homes, chronic moisture at the base of the exterior wall can overlap with drainage and settlement concerns, which is why issues tied to grading and structure may call for Addressing Dallas foundation problems along with exterior repairs.
Professional contractors bring two things that matter here. Accurate diagnosis and a repair plan that restores the wall's water-shedding details. The good ones do not stop at the stain or buckle you can see from the driveway. They check what is wet, what is still sound, what caused the failure, and what needs to be rebuilt so the same section does not keep taking on water.
That approach costs more than a quick patch. It also prevents the expensive version of this problem, hidden structural decay that sits out of sight until the repair grows from siding work into sheathing, framing, insulation, and interior damage.
Proactive Siding Maintenance for Texas Properties
The best siding water damage repair is the one you never need. Prevention isn't glamorous, but it's what protects walls in Dallas, Fort Worth, Garland, Tyler, San Antonio, and Round Rock when the weather turns rough.
Most siding types last 20 to 40 years, but high humidity and intense sun exposure can shorten lifespan, and poor installation quality such as missing flashing or improper nailing is one of the most common reasons homeowners replace siding earlier than expected, according to Energy Home Improvements on when to replace siding.
Maintenance habits that actually help
- Keep gutters moving: Overflow is one of the fastest ways to concentrate water on siding. Good drainage matters, and properly planned downspout installation and runoff control can keep repeated splashback off vulnerable walls.
- Watch the transitions: Windows, doors, roof-to-wall lines, and utility penetrations deserve regular checks because that's where water usually gets in.
- Don't ignore small movement: A loose panel, shrinking caulk joint, or minor trim separation is easier to correct before it becomes a wall repair.
- Pay attention to the foundation line: If water isn't moving away from the house, moisture problems can show up low on the wall and around base framing. For homeowners dealing with broader movement concerns, this guide on Addressing Dallas foundation problems helps explain how water management and structural issues can overlap.
A strong exterior system works as a chain. Roof drainage, flashing, siding, and grading all support each other. When one part fails, the others carry more stress.
If your home has been through recent storms or you've noticed subtle warning signs, don't wait for the siding to look obviously bad before acting.
If you've seen staining, warped panels, soft spots, or signs of hidden moisture, Hail King Professionals can inspect the exterior, identify likely water-entry points, and give you clear repair or replacement options. Homeowners across Dallas, TX, Fort Worth, TX, Arlington, TX, Plano, TX, Frisco, TX, McKinney, TX, Garland, TX, Irving, TX, Mesquite, TX, Tyler, TX, Longview, TX, Marshall, TX, San Antonio, TX, Austin, TX, New Braunfels, TX, San Marcos, TX, Boerne, TX, Round Rock, TX, and Georgetown, TX can schedule a free, no-obligation inspection to make sure the next Texas storm doesn't turn minor siding damage into a major structural repair.